Lima (Fursuit Build Log)
Posted: Wed Oct 28, 2026 12:24 am
This build log doubles as my submission to the October 2026 edition of the Midway Menagerie blogging carnival https://anchovie.fish/blog/2026-09-25. You want to see what my dreams look like? They aren't abstract. I'm hell bent on making them real. Watch me succeed.
[hr][/hr]
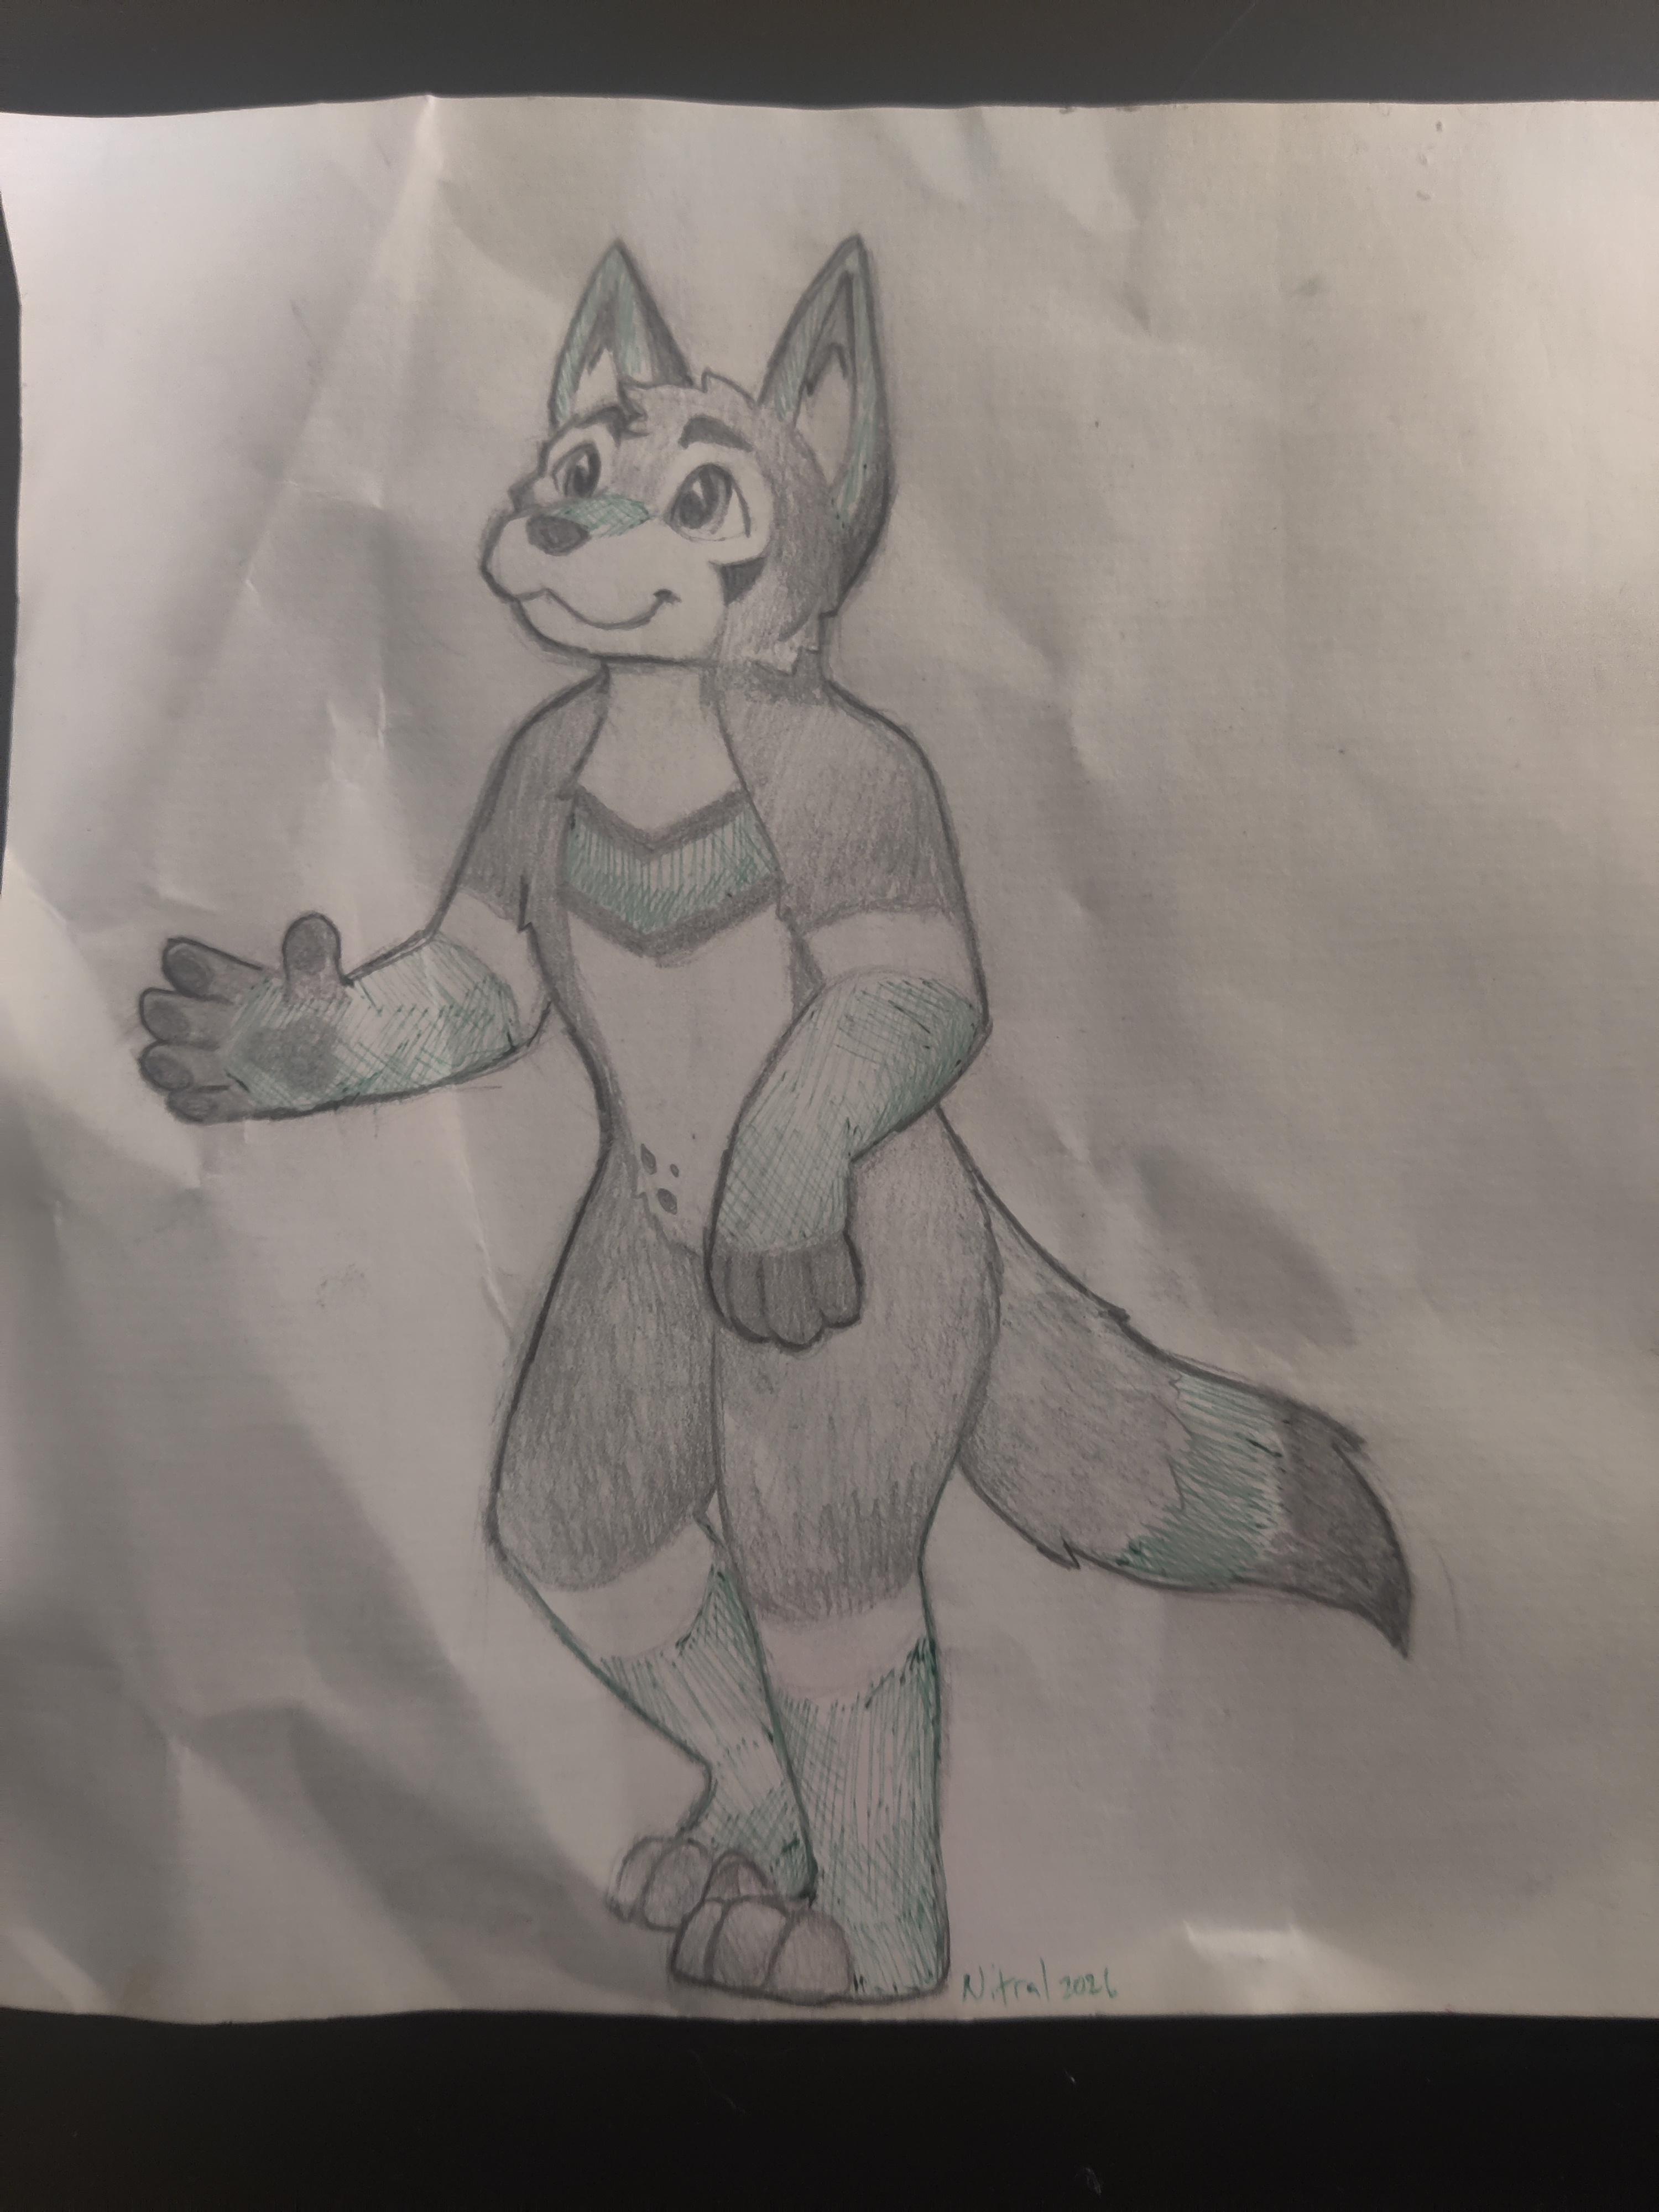
This is Lima.
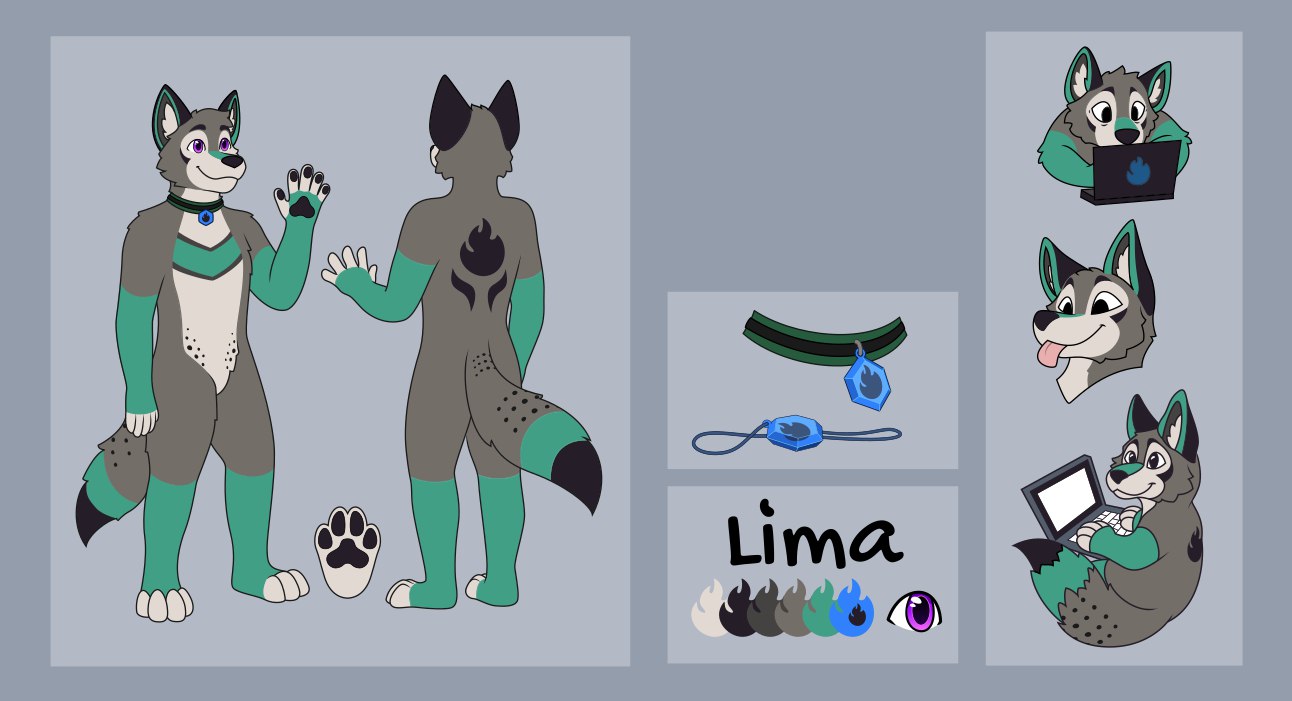
After nearly 5 years in the furry fandom and 3 fursuits, Lima finally solidified as my fursona early this year, after I had just about given up hope of ever completing him. I have settled into the identity, and in fact the previous sentence is somewhat off-putting-- because it's speaking in the third person! I am Lima.
I have made build logs or writeups for every fursuit I've made. The last one, Koromaru, the Shiba Inu from Persona 3, was posted to the Furry Corner forum here https://furrycorner.boards.net/thread/931/koromaru. (For personal reasons, the build log was never finished and will not be finished. ) I believed that that forum had gone defunct as it went through a major outage earlier this year, but it turns out that that was temporary, and it's back now! Nonetheless, I intend to cross post this thread in two places in order to maximize its chances of survival; here and https://crittertime.fun, which is a neat little semi-active furry forum.
I have long delayed starting this build log mostly due to severe physical health issues which dramatically limit my ability to use a computer. While building Koromaru I frequently complained in my build log of carpal tunnel, which is an interesting real-time progress of my decline; it turns out that I was misdiagnosed and mistreated, and I have a rare health condition that basically shredded all the muscles in my arms that I need to work a keyboard and mouse. After over a year of physical therapy, some highly specialized and expensive input devices, and lots of use of voice control, I've grown able to use a computer enough to basically get through my work week and nothing else. SO, while I am indulging myself and typing this first entry, further entries will be restricted to solely using voice control with zero corrections so it remains practical to keep this log up. (I've also written some small voice control automation to simplify the process of appending images. Talon Voice is wonderful. https://talonvoice.com/)
Let's get started!
[hr][/hr]
The project is roughly 50% complete at the time of writing. It began early August, when I placed some orders of fur. My intended completion date for this project is New Years Eve. 9.5 weeks remain.
The first and by far biggest hiccup of the project started the moment I received the fur.
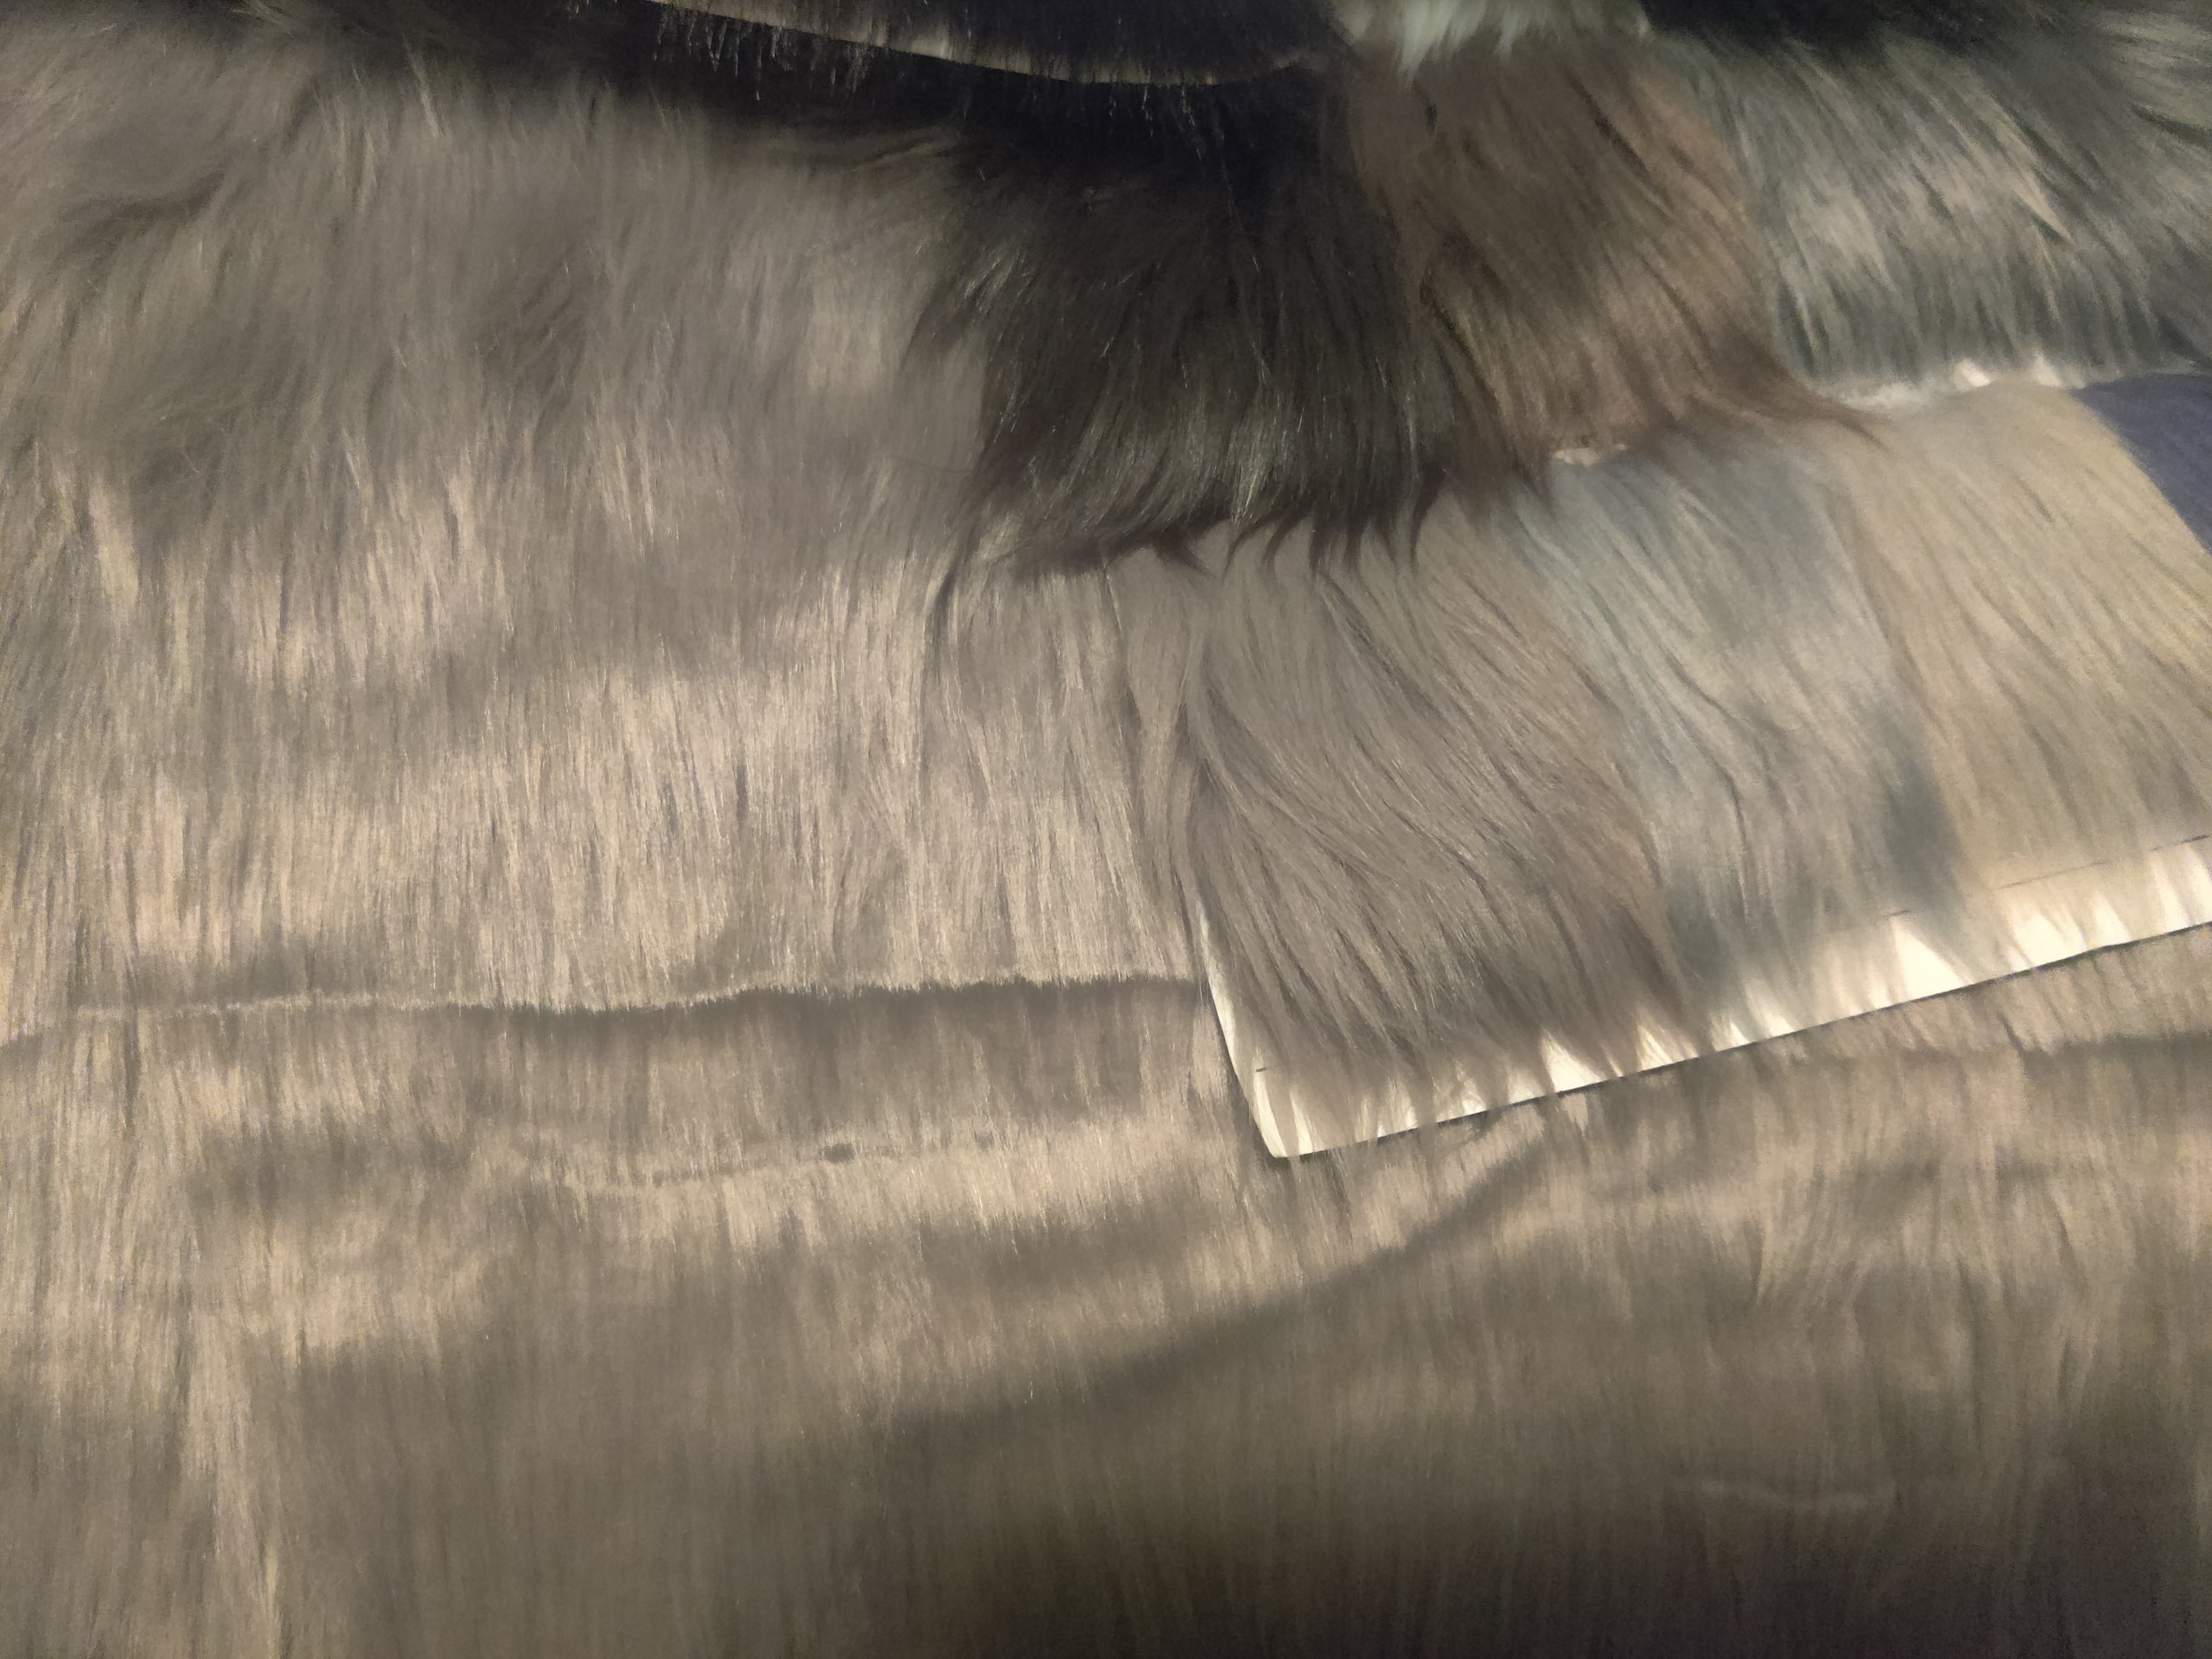
The fur was completely different from the swatch sample I had used to judge the order! This was unusable; the swatch was on the edge of what I considered acceptable, and this was far outside of it. It turns out Howl Fabrics has basically given up on quality control and just resupplies colors to "something that looks vaguely right".
I could not start the project until this was resolved. Sadly, and surprisingly, despite our three fur suppliers in the united states, we do not have anyone that makes decent greys.
The solution was to place an order for a swatch card from Miemiefurs, a Chinese fur manufacturer, and pay an outrageous amount of shipping to have the cards shipped to me. I believe the swatches cost $80 total. From there, I picked out a lovely grey, and placed an order for multiple lengths of it, and with a total turnaround time of a month (2 weeks cards + 2 weeks fur) I was ready to begin! This was both an outrageously long delay and a remarkable testament to the state of global shipping; a world away and it only took 14 days to travel to my doorstep.
With it being late September now, I started in earnest. (It's been a month since I started, with the order arriving September 23, and today being October 26.) Lima got a slight redesign to manage his white extremities; having built and worn white hand/feetpaws for the last year, I can confidently say that I no longer wish to do that. Keeping them clean is nearly impossible.
I started by redesigning my feet paw 3D model to be plantigrade instead of digigrade. Because I am not the original author of this model and therefore didn't keep the typical stages of progress I usually do, this wound up being a total pain in the ass, and took something ridiculous like 5 hours because I had to basically hack the model into being in a sanely editable state and then re-hack my changes back. I'm sure if I were an expert in topology I could figure that out fast, but I did it completely in Nomad Sculpt.
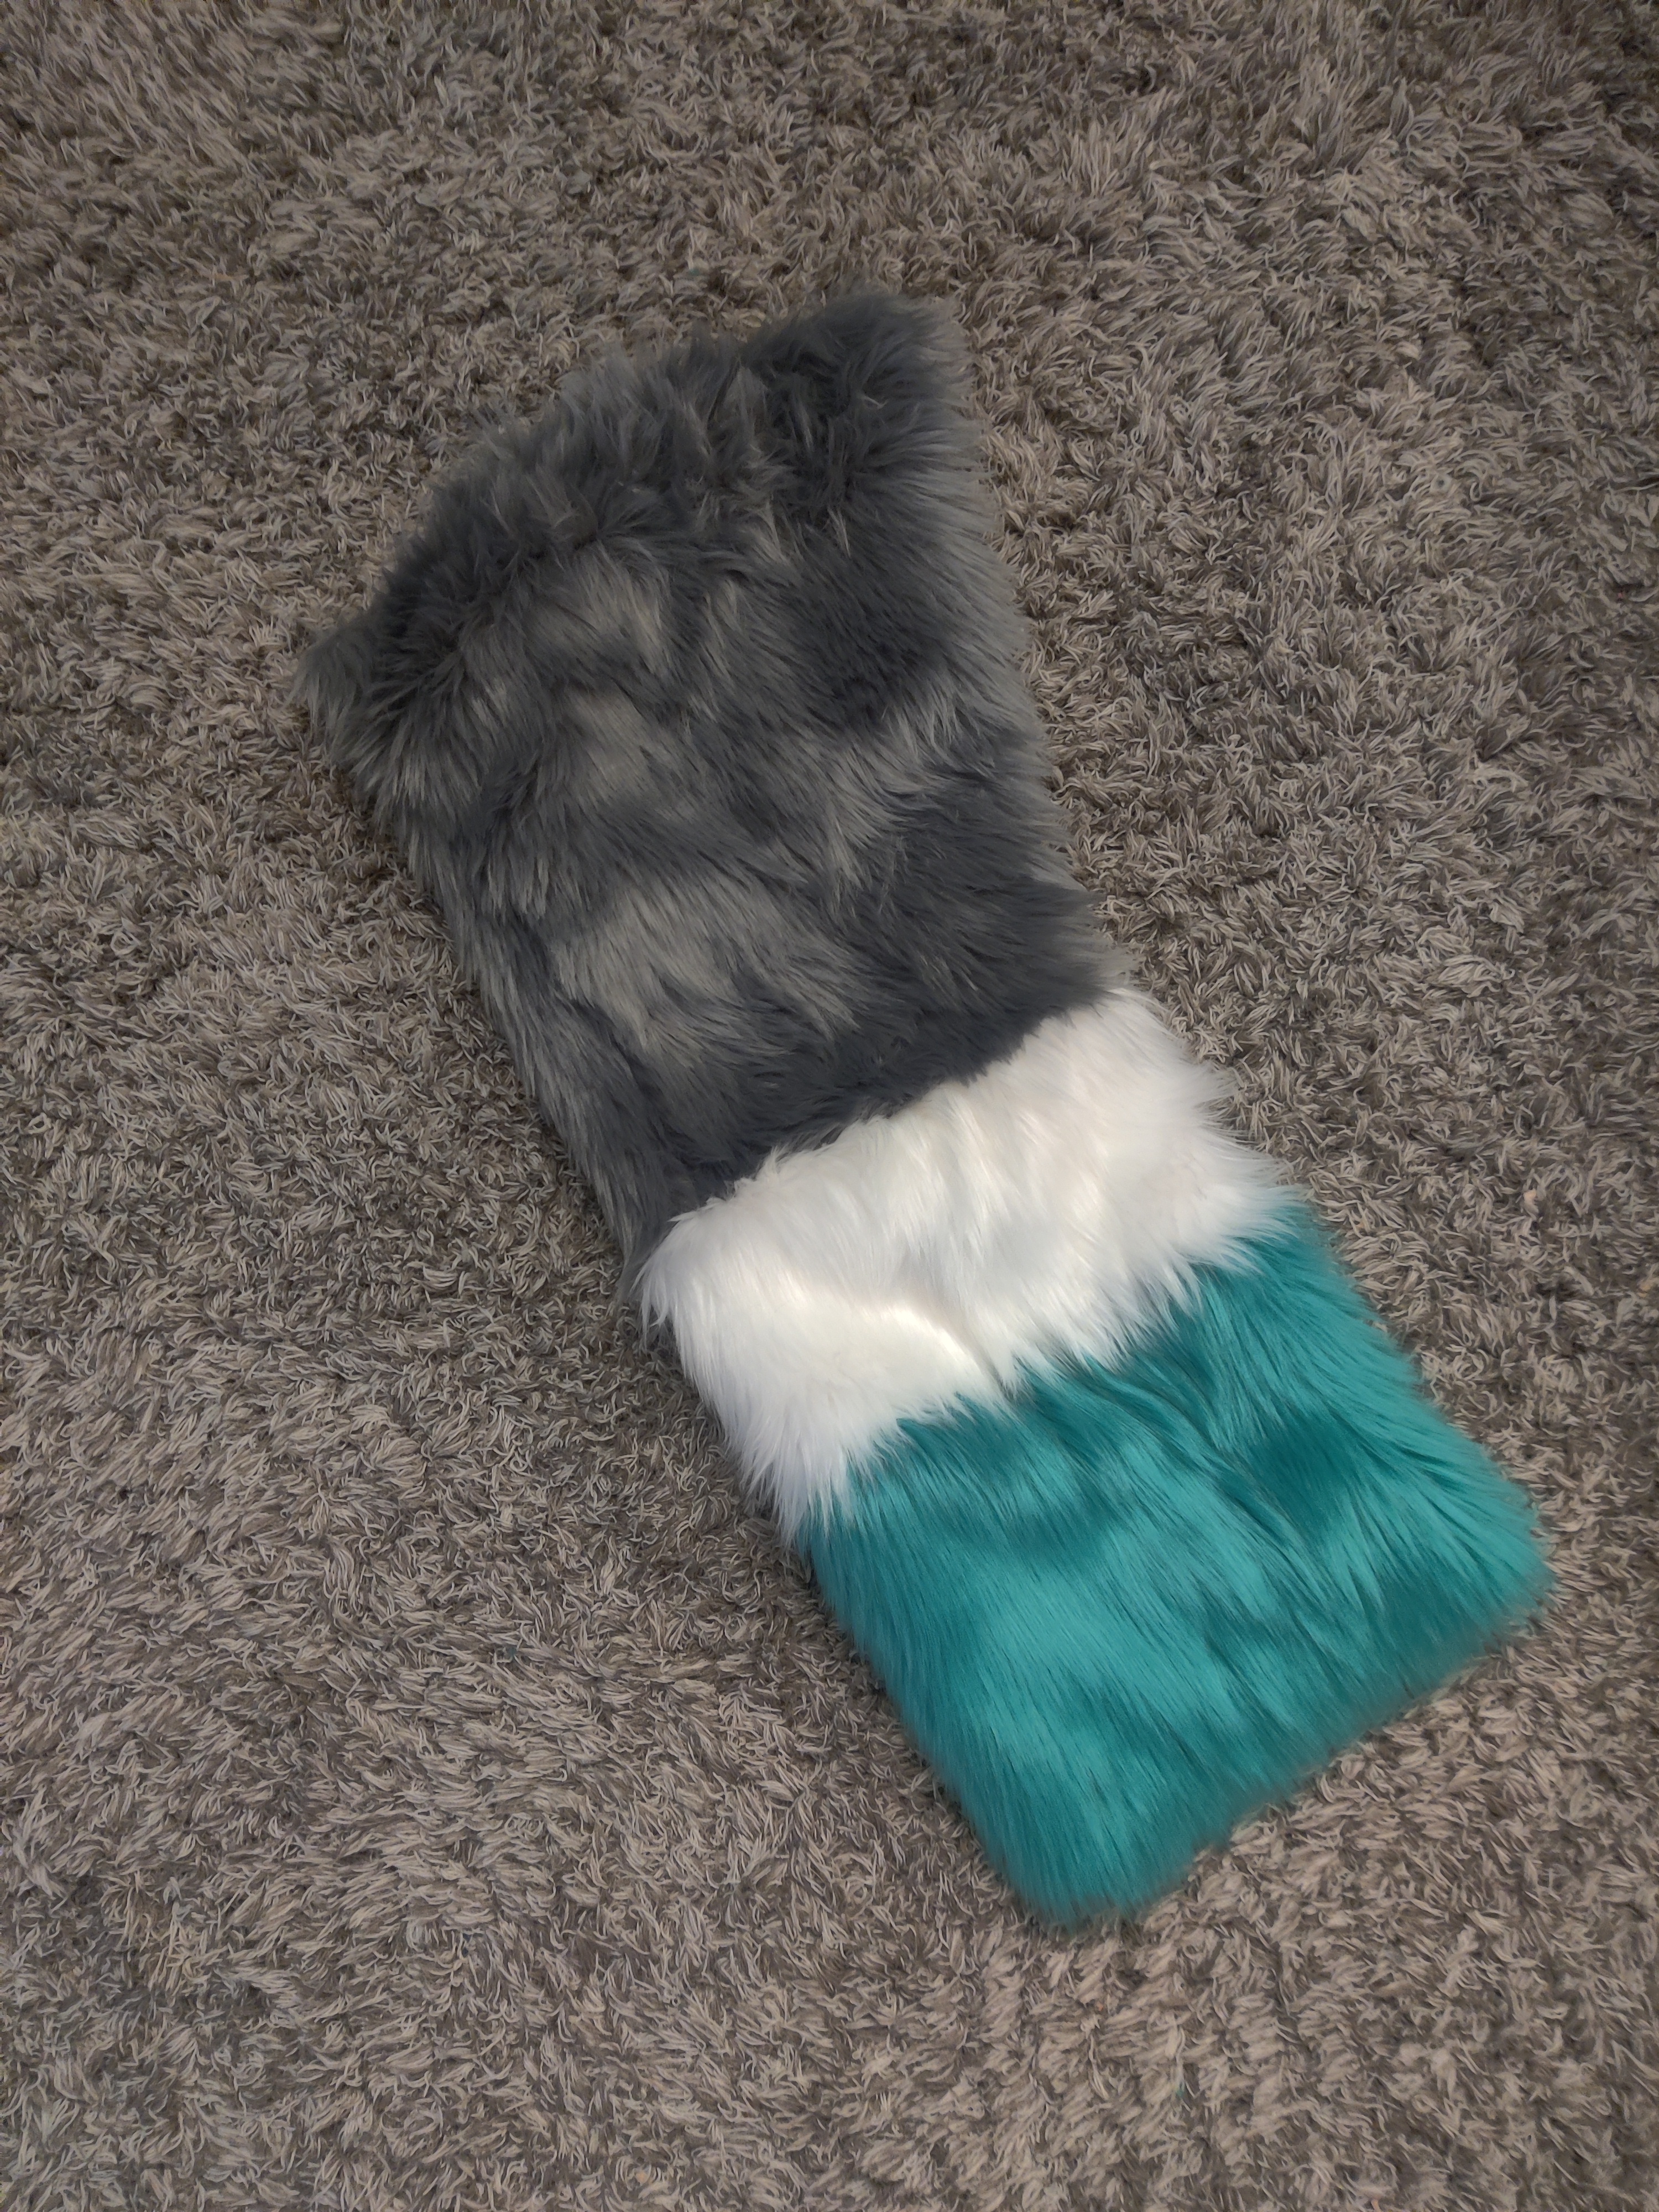
Next was patterning the feet paws. Technically, I didn't actually need the gray fur to do this, but I did need to acquire some charcoal fur, which a friend had a small amount left over of.
I have a tendency to go nuts and come up with wildly new and innovative ways of doing the most basic tasks. I have been trying to manage this urge, with moderate amounts of success; I set out to have the three following major innovations, and keep everything else to established techniques that I already know how to do:
- Laser cut fur at scale
- Feet paw escapes for shoelaces (To be covered in a later post)
- Embroidery machine
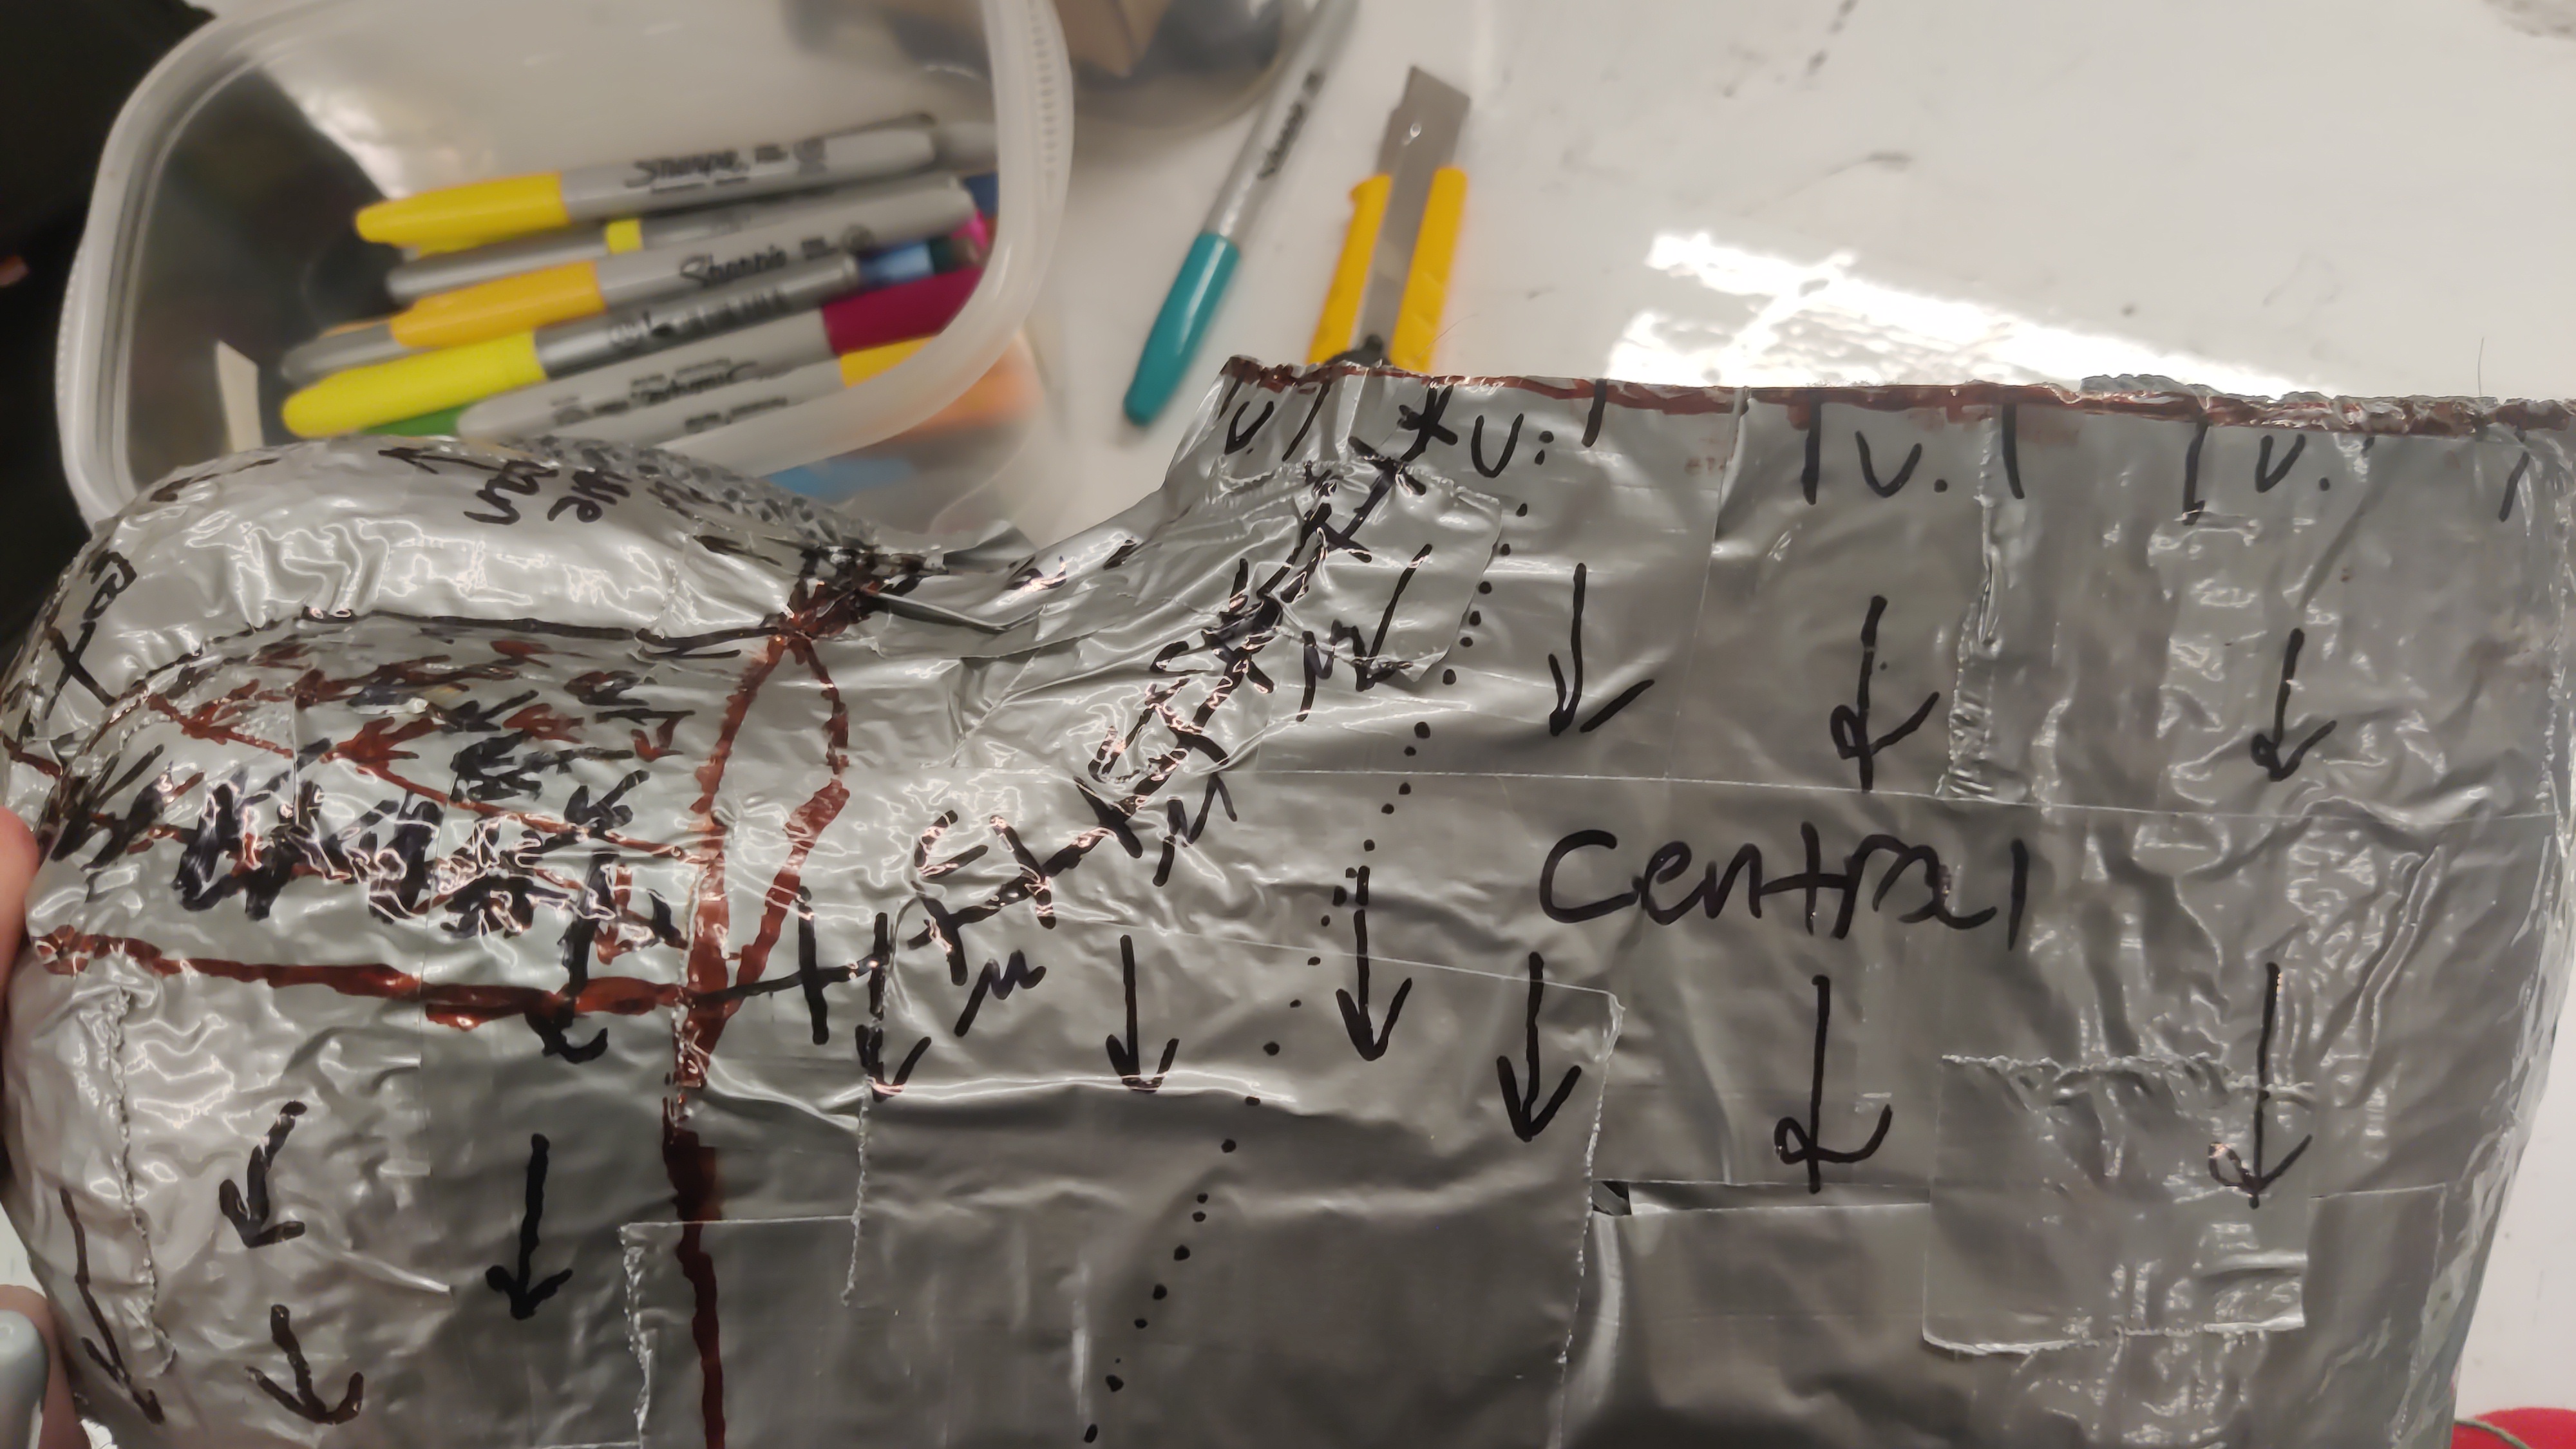
I had already made successful attempts at laser cutting fur earlier this year. It's actually not that hard if you know what to do; what you have to do is basically do a binary search with two parameters, speed and power, to determine the exact right amount of energy to deliver to cut JUST THE BACKING, but not damage the fur itself. I had a nice profile saved which I recalled and cut my pieces with. Actually getting the pieces ready is a somewhat tedious process of cutting the duct tape, scanning the pieces on a flat bed scanner, tracing them by hand in a vector processing software, adding seam allowance, and lining them all up to fit together nicely.
Unfortunately, I am a complete dumbass, and even recorded a video showcasing myself cutting almost all the charcoal fur I have left. With the wrong fur direction. Yep, every piece was ruined. Unless I want to be Bizarro Lima. At least it's fun to watch. (You can hear a peer mistakenly stating a notable exclamation at the end... ) https://art.morbinti.me/lima_build_log/ ... utting.mp4
At the time of writing Big Z Fabric is out of charcoal fur. So... Not really sure what I'm going to do about that right now.
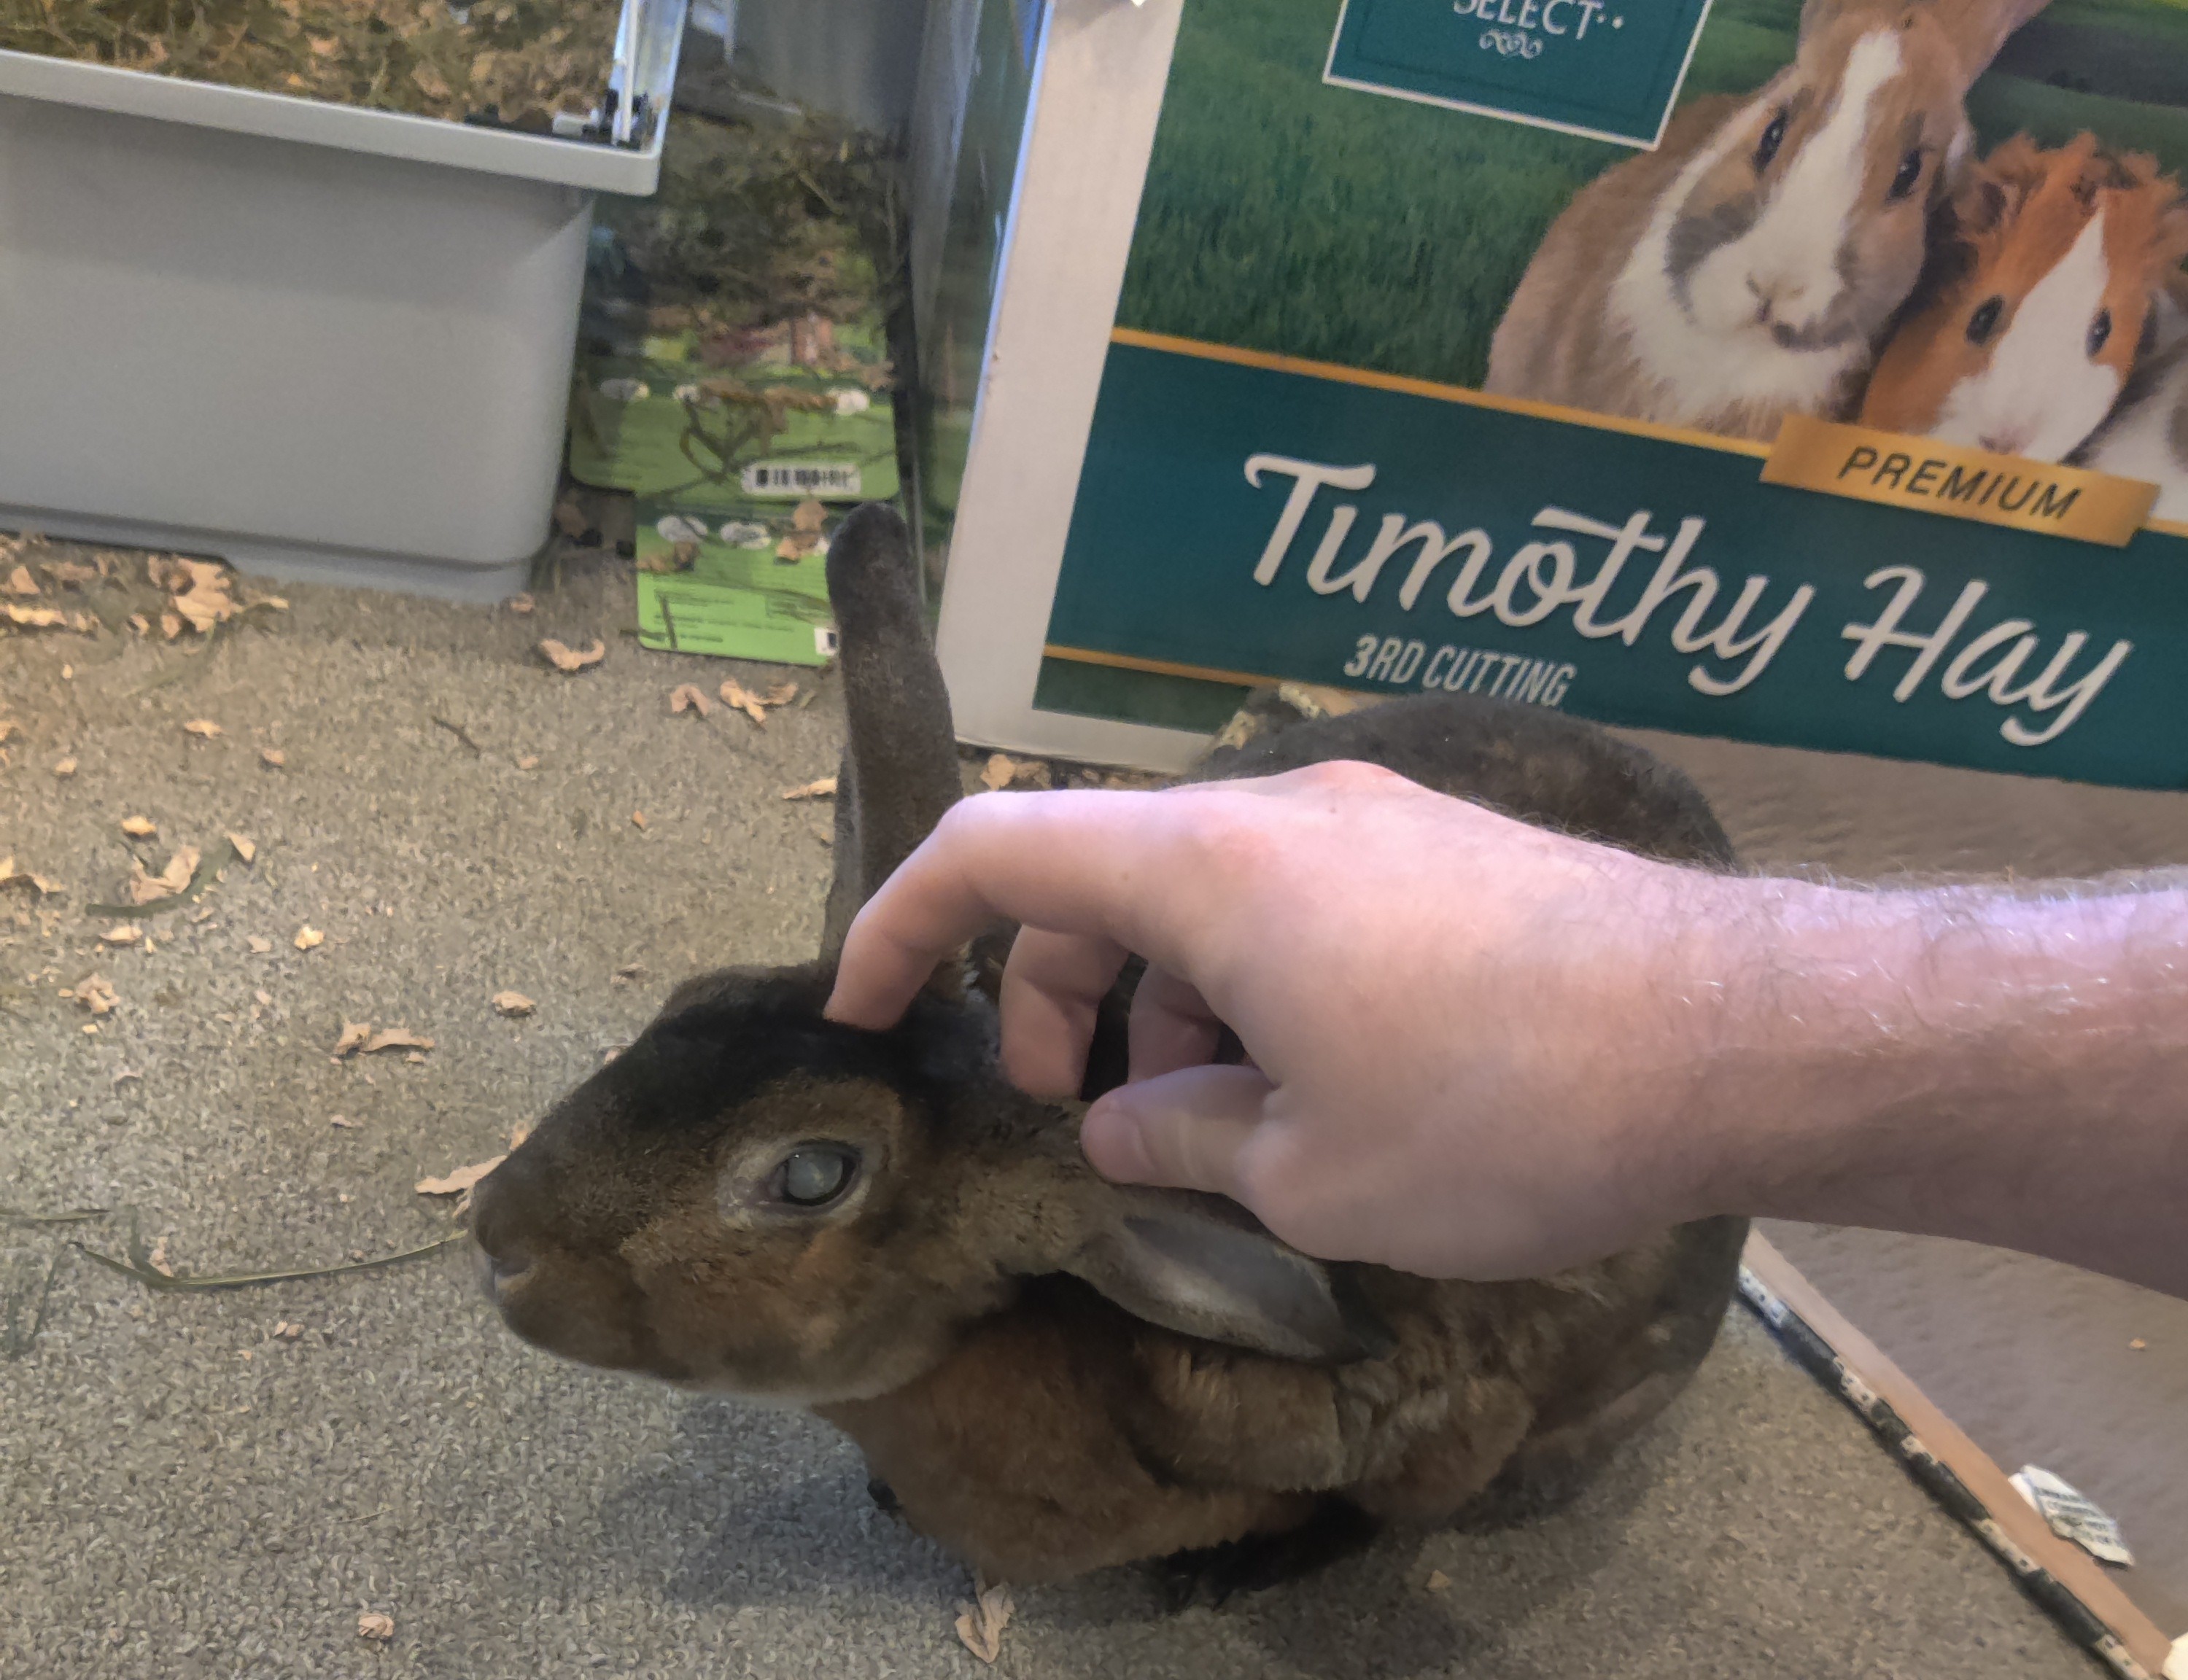
There was a picture of Ollie in my photo reel. In the interest of maximum whimsy, I am posting it here. Meet Ollie, my geriatric 11 year old rabbit. Ollie is a good bun and loves eating grass and cuddling.
Next, embroidery. Running on fumes with miniscule amounts of scrap charcoal fur remaining, this was pretty stressful when trying to learn a new technique-- but I got there!
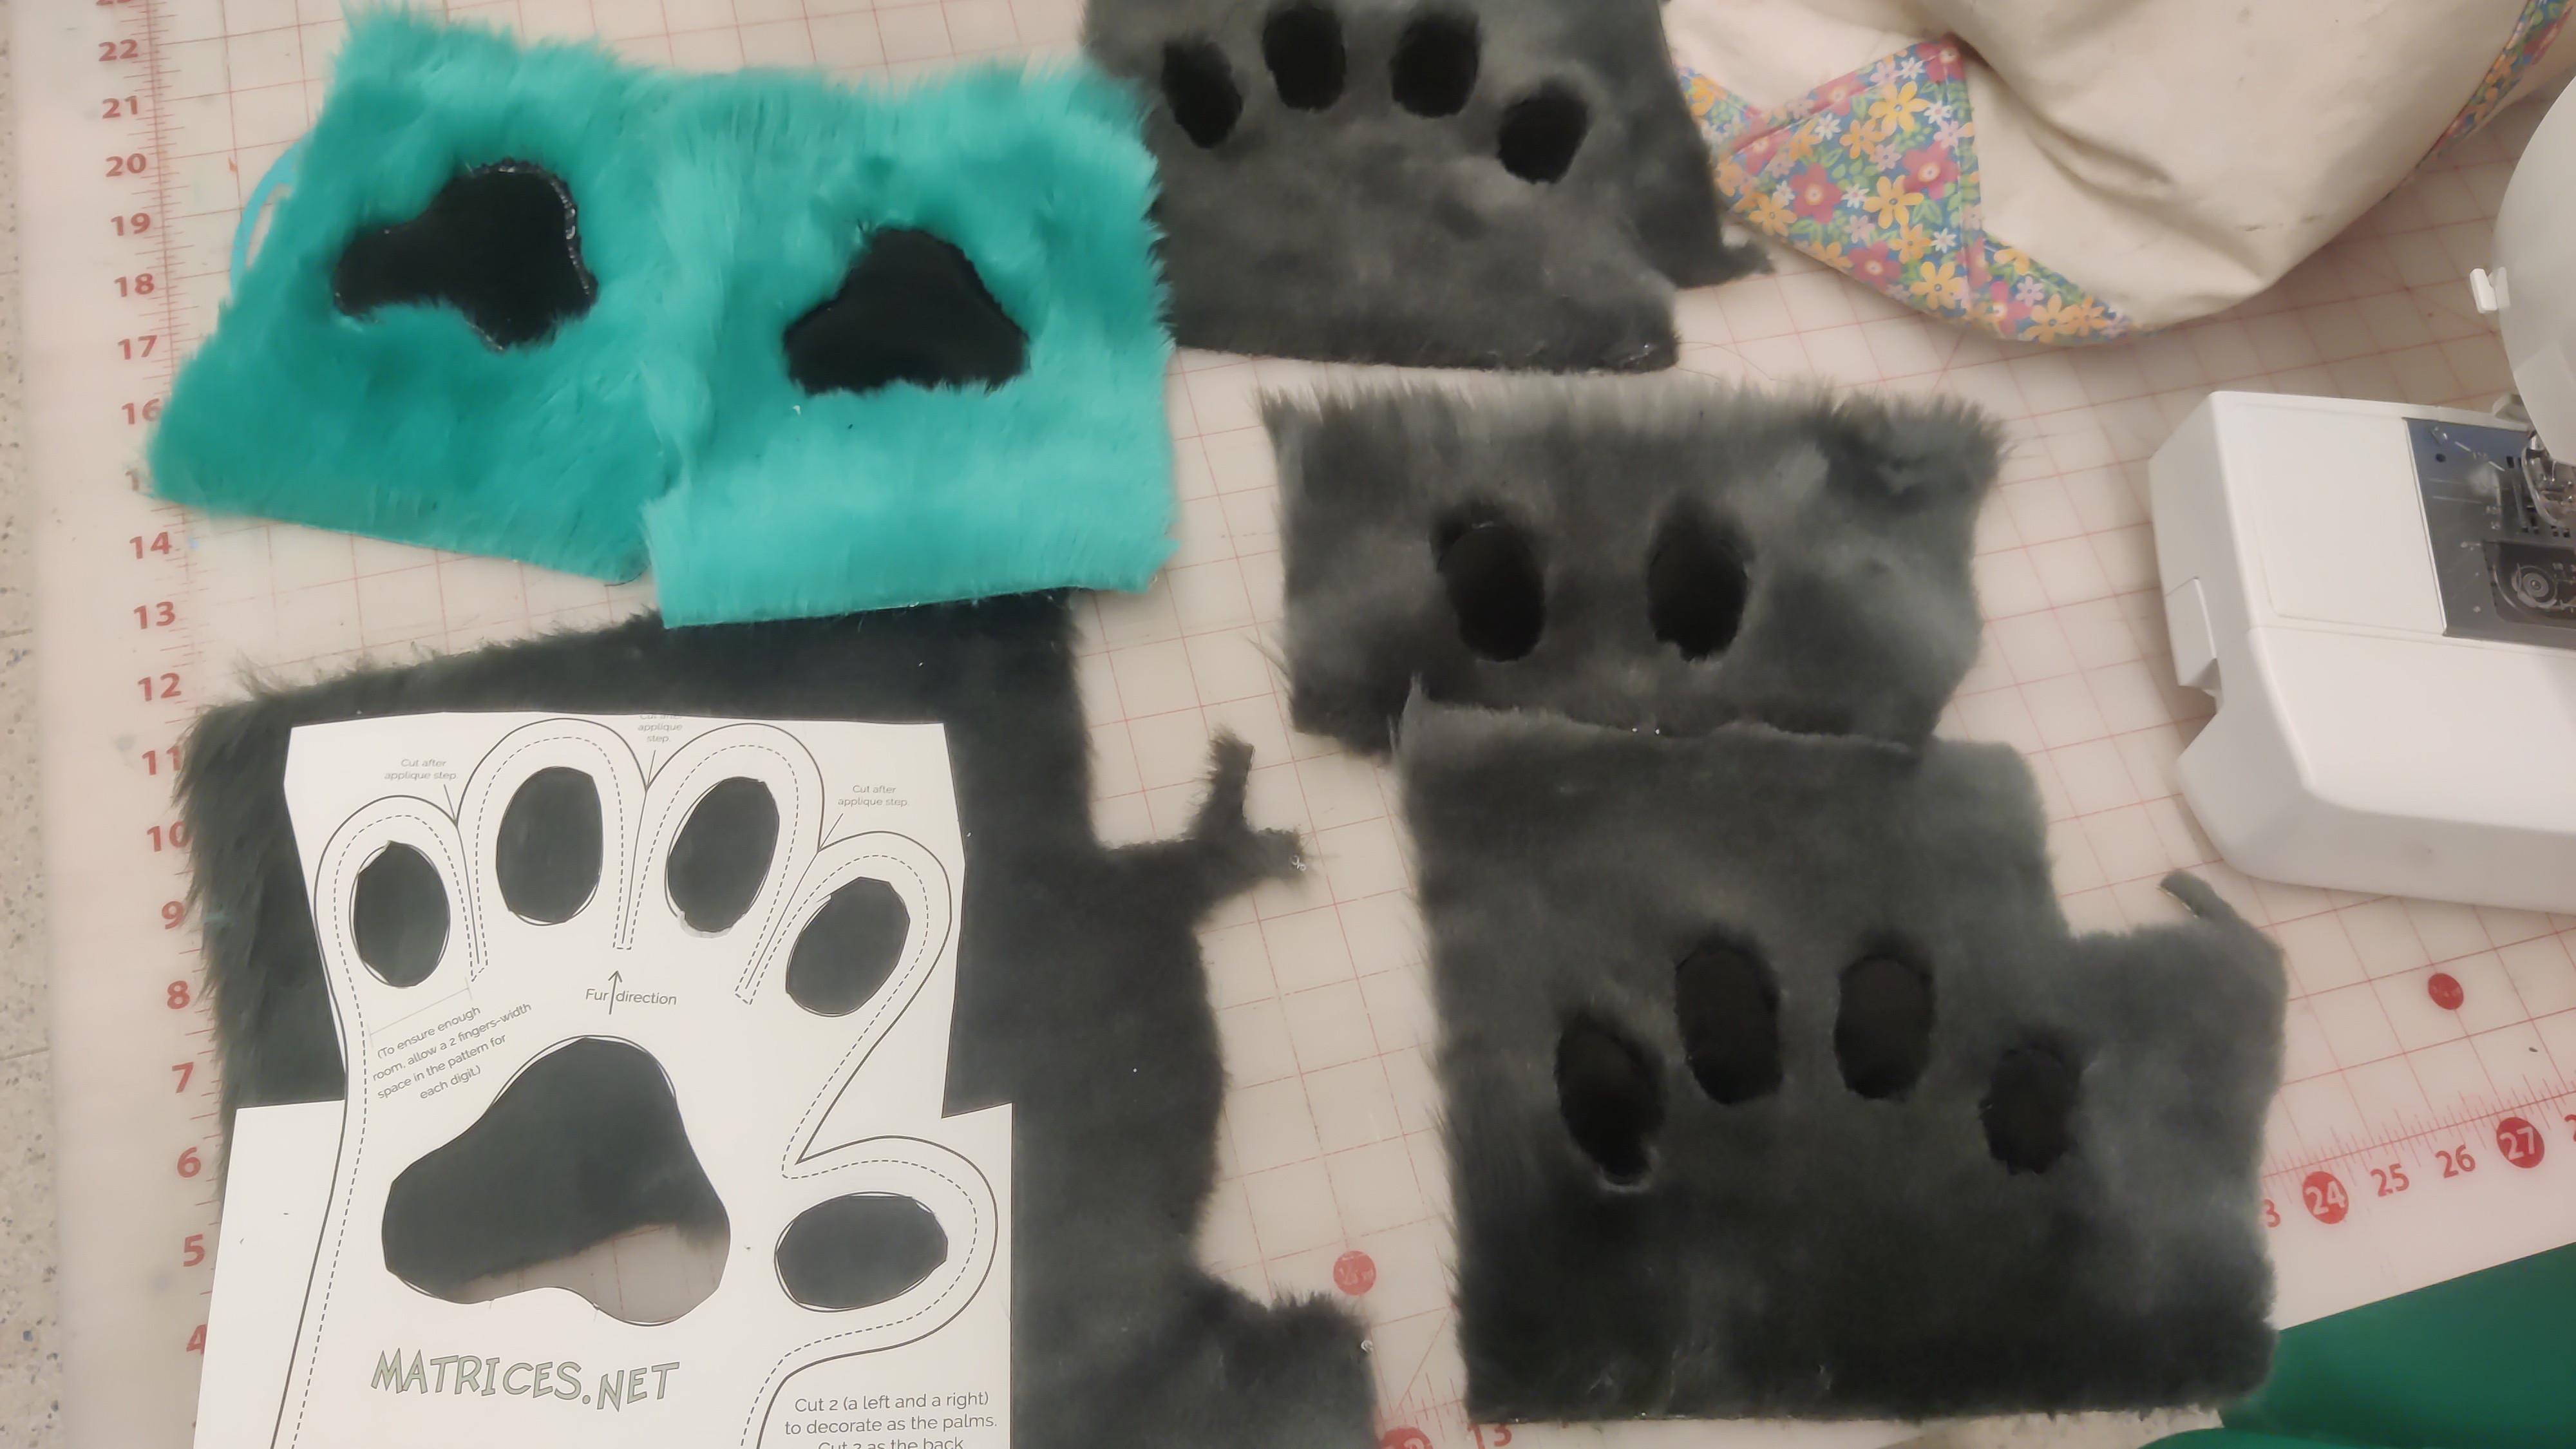
The objective was to perform appliqué, the process by which paw pads are attached to fur. Basically what you're trying to do is sew a fabric right on top of another fabric, then cut away the edges, so that you have an overlay. I ordered some mochi minky for this.
When using an embroidery machine, this is a two-stage process. Step one is to lay down the fabric within the hoop, with tear-away interfacing on both the bottom and top to prevent the minky, which loves to go everywhere except where you want, from slipping. Then, you command the machine to sew a simple straight stitch on the desired regions.
Notably, commanding the machine IS REALLY EASY WHEN YOU HAVE A COMPUTER PAW PATTERN! You can just extract the vector curves from a .PDF file, and basically dump them straight into the embroidery software. I don't have a picture of this at the moment but I will update this post with one later.
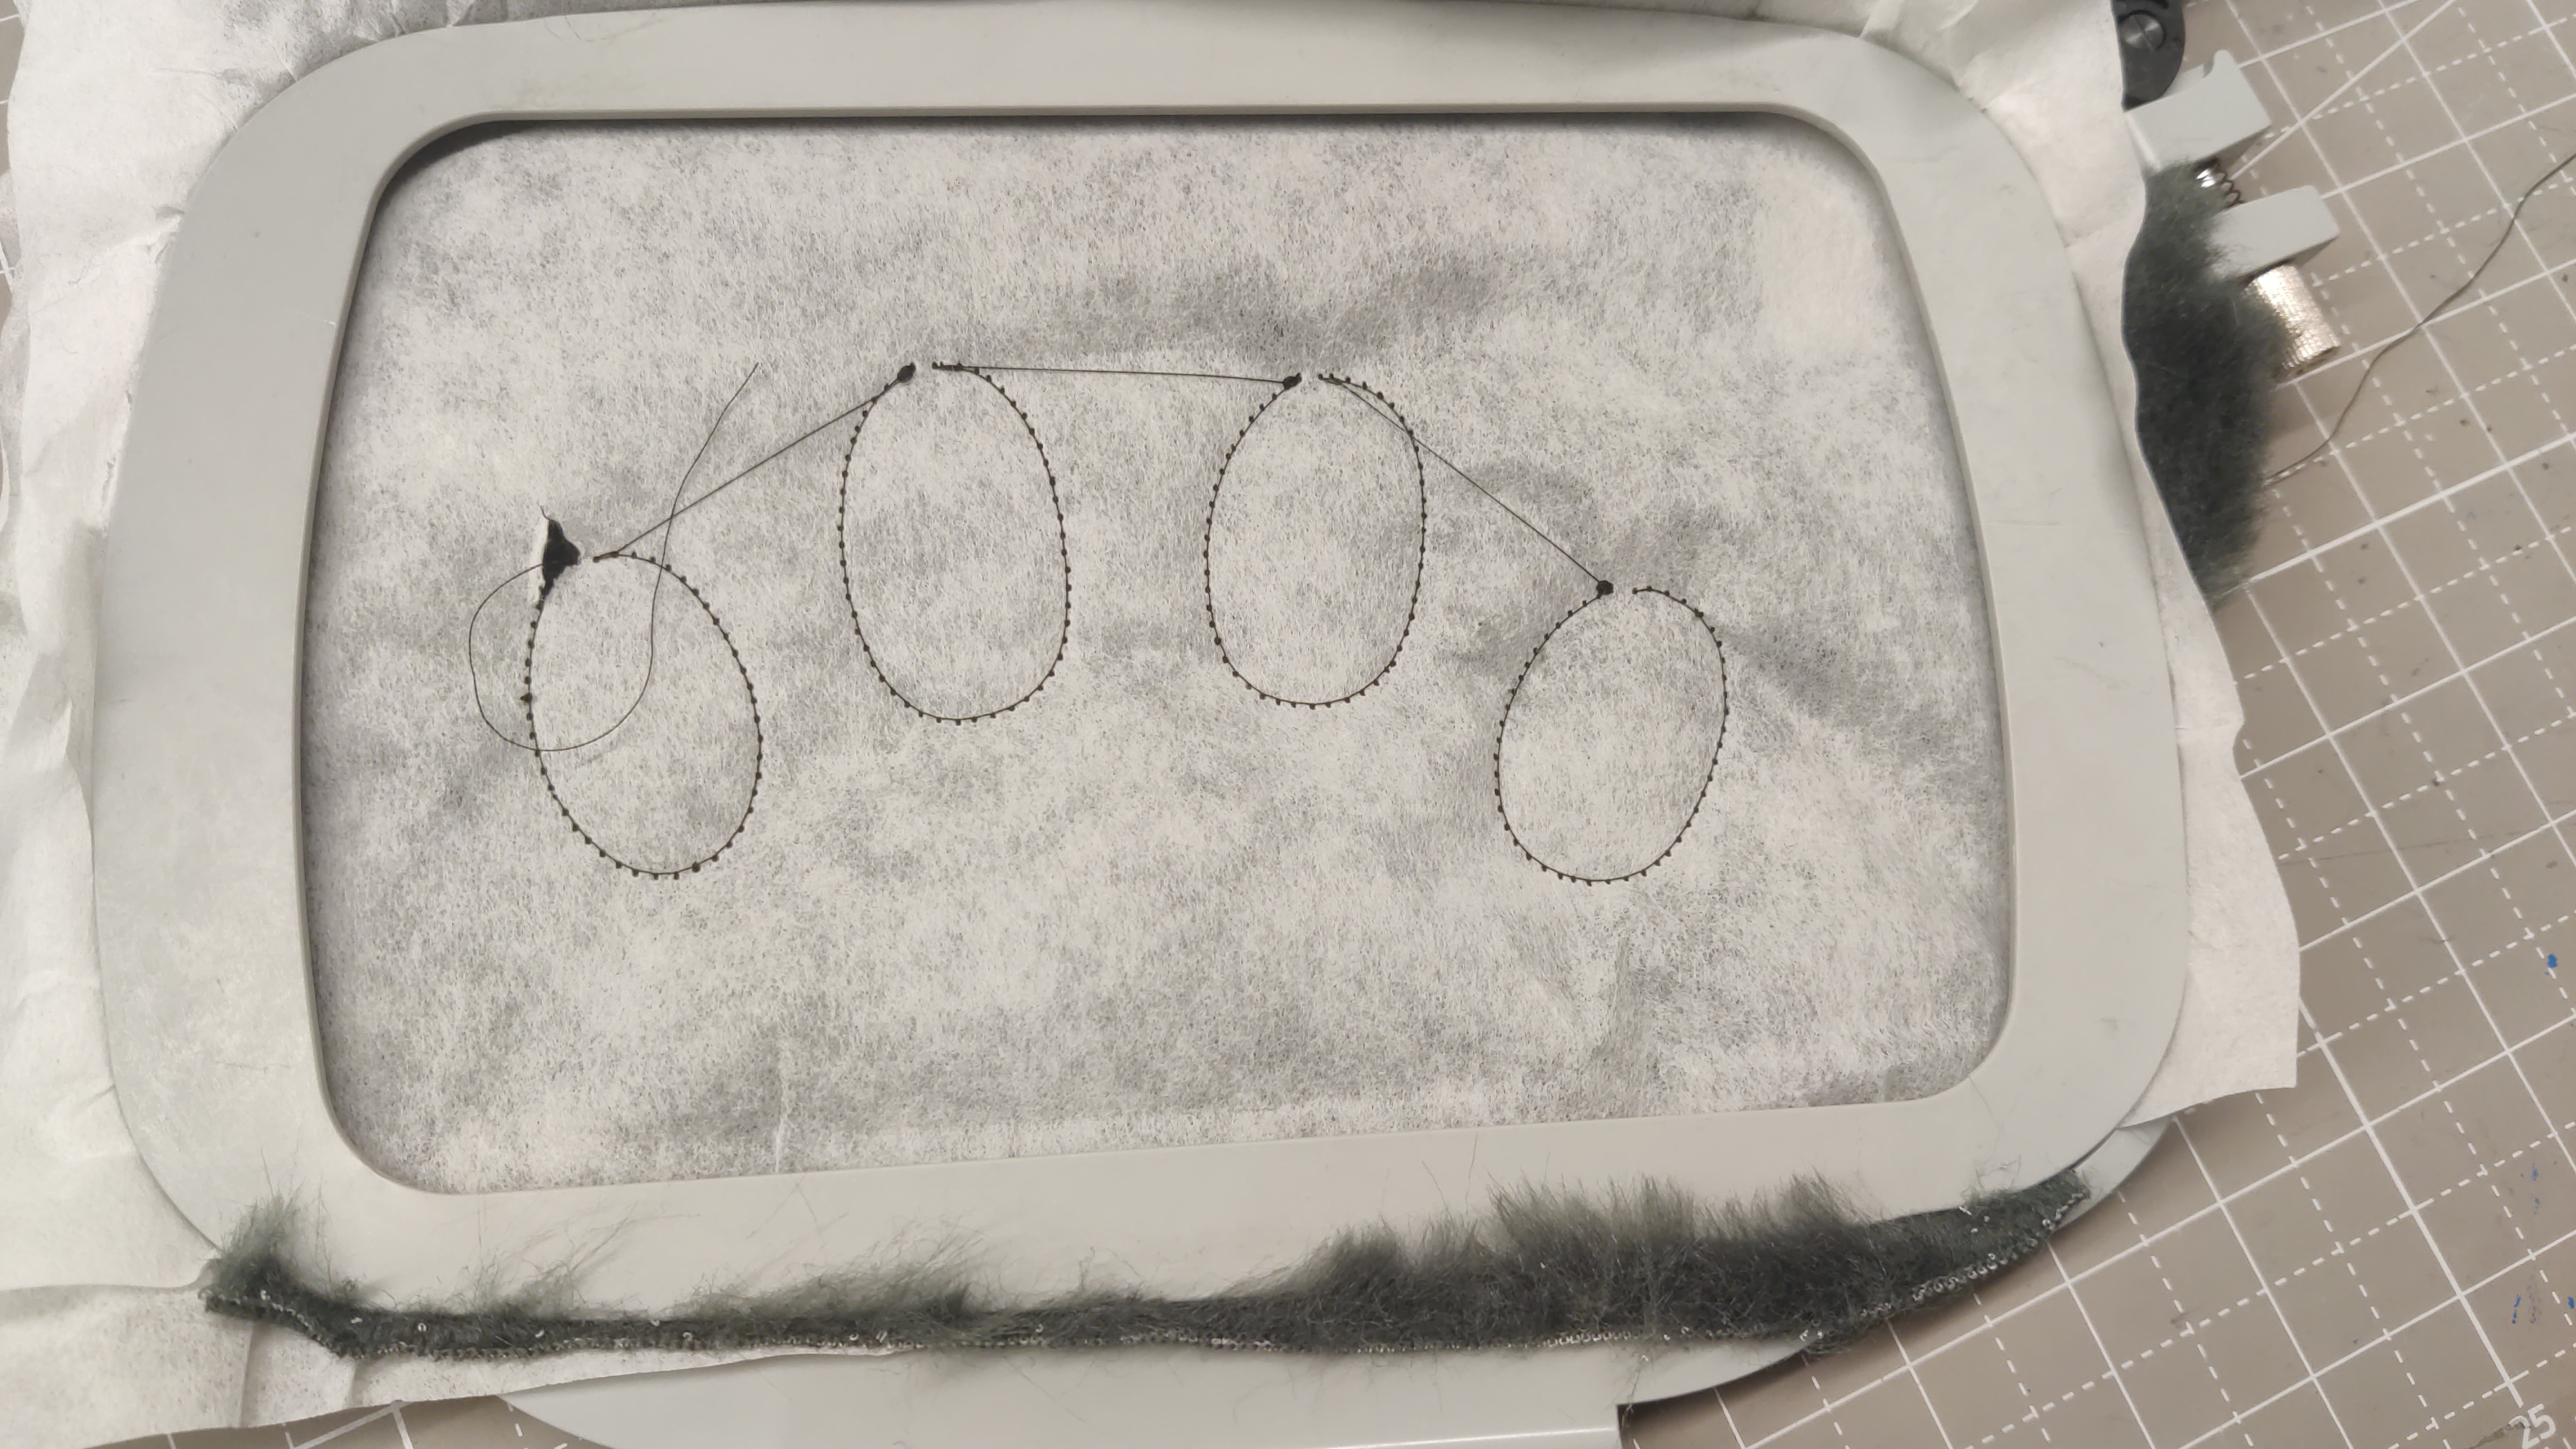
VERY CAREFULLY cut away the minky around the edge...
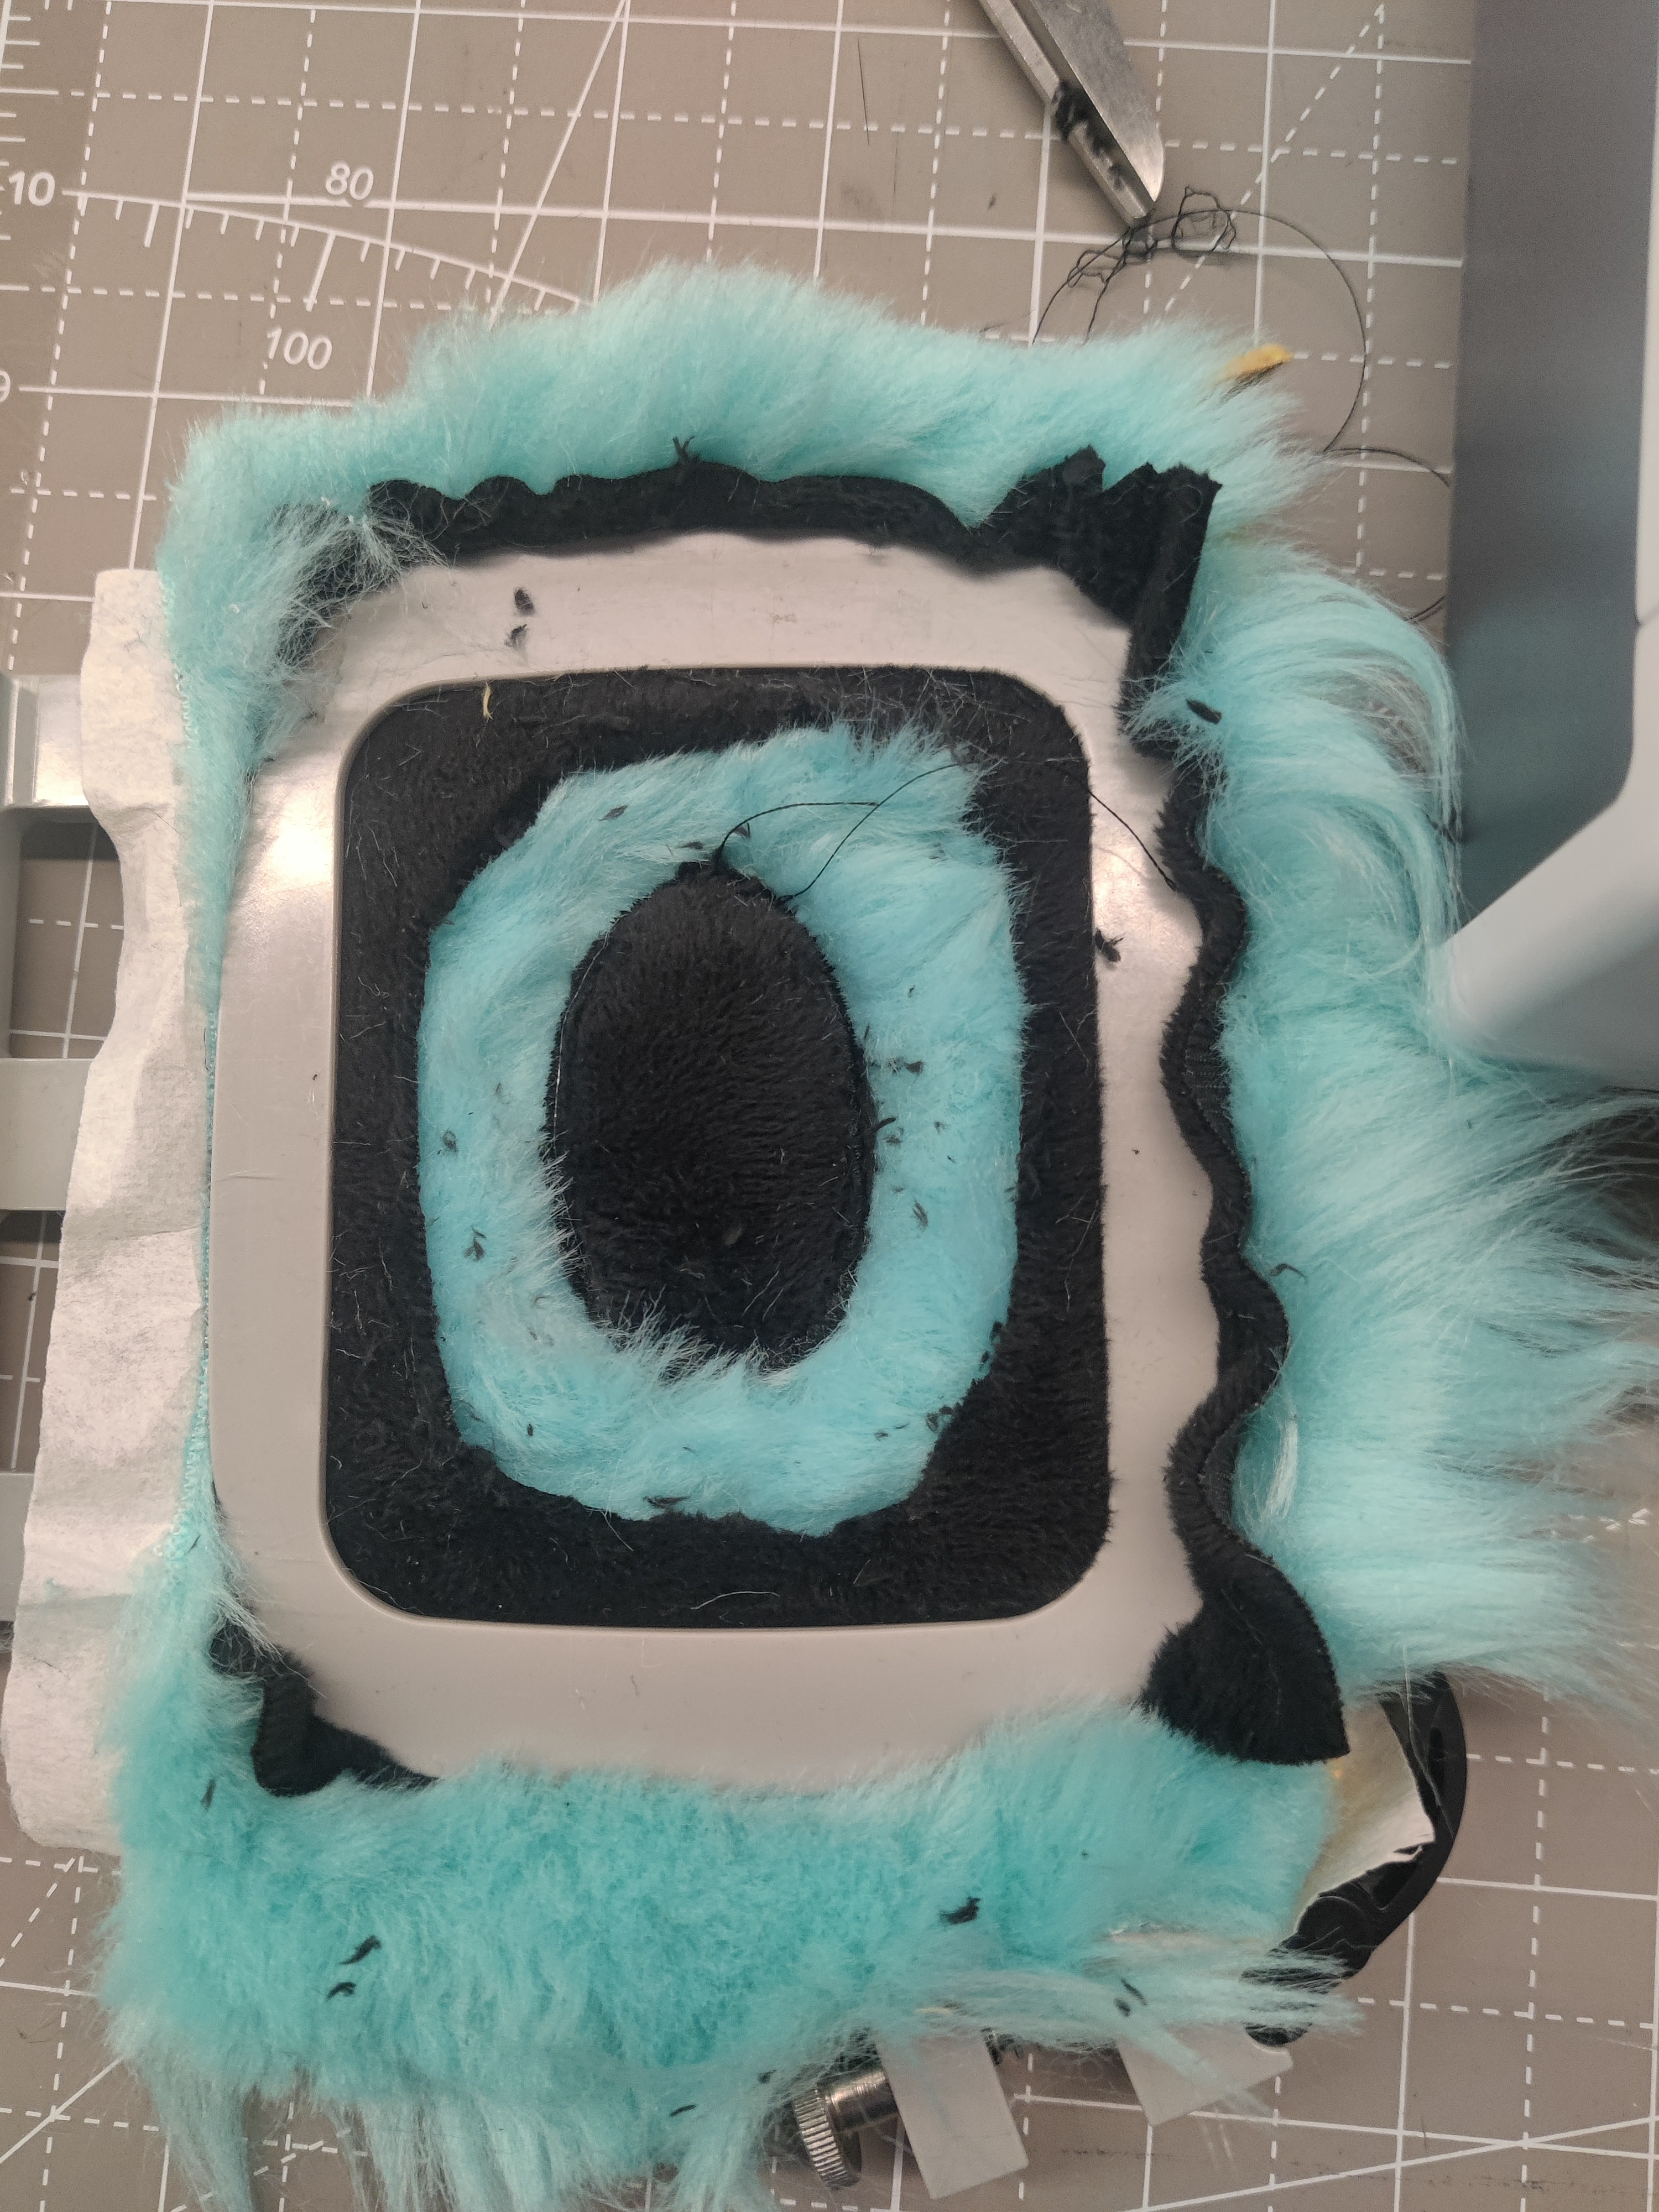
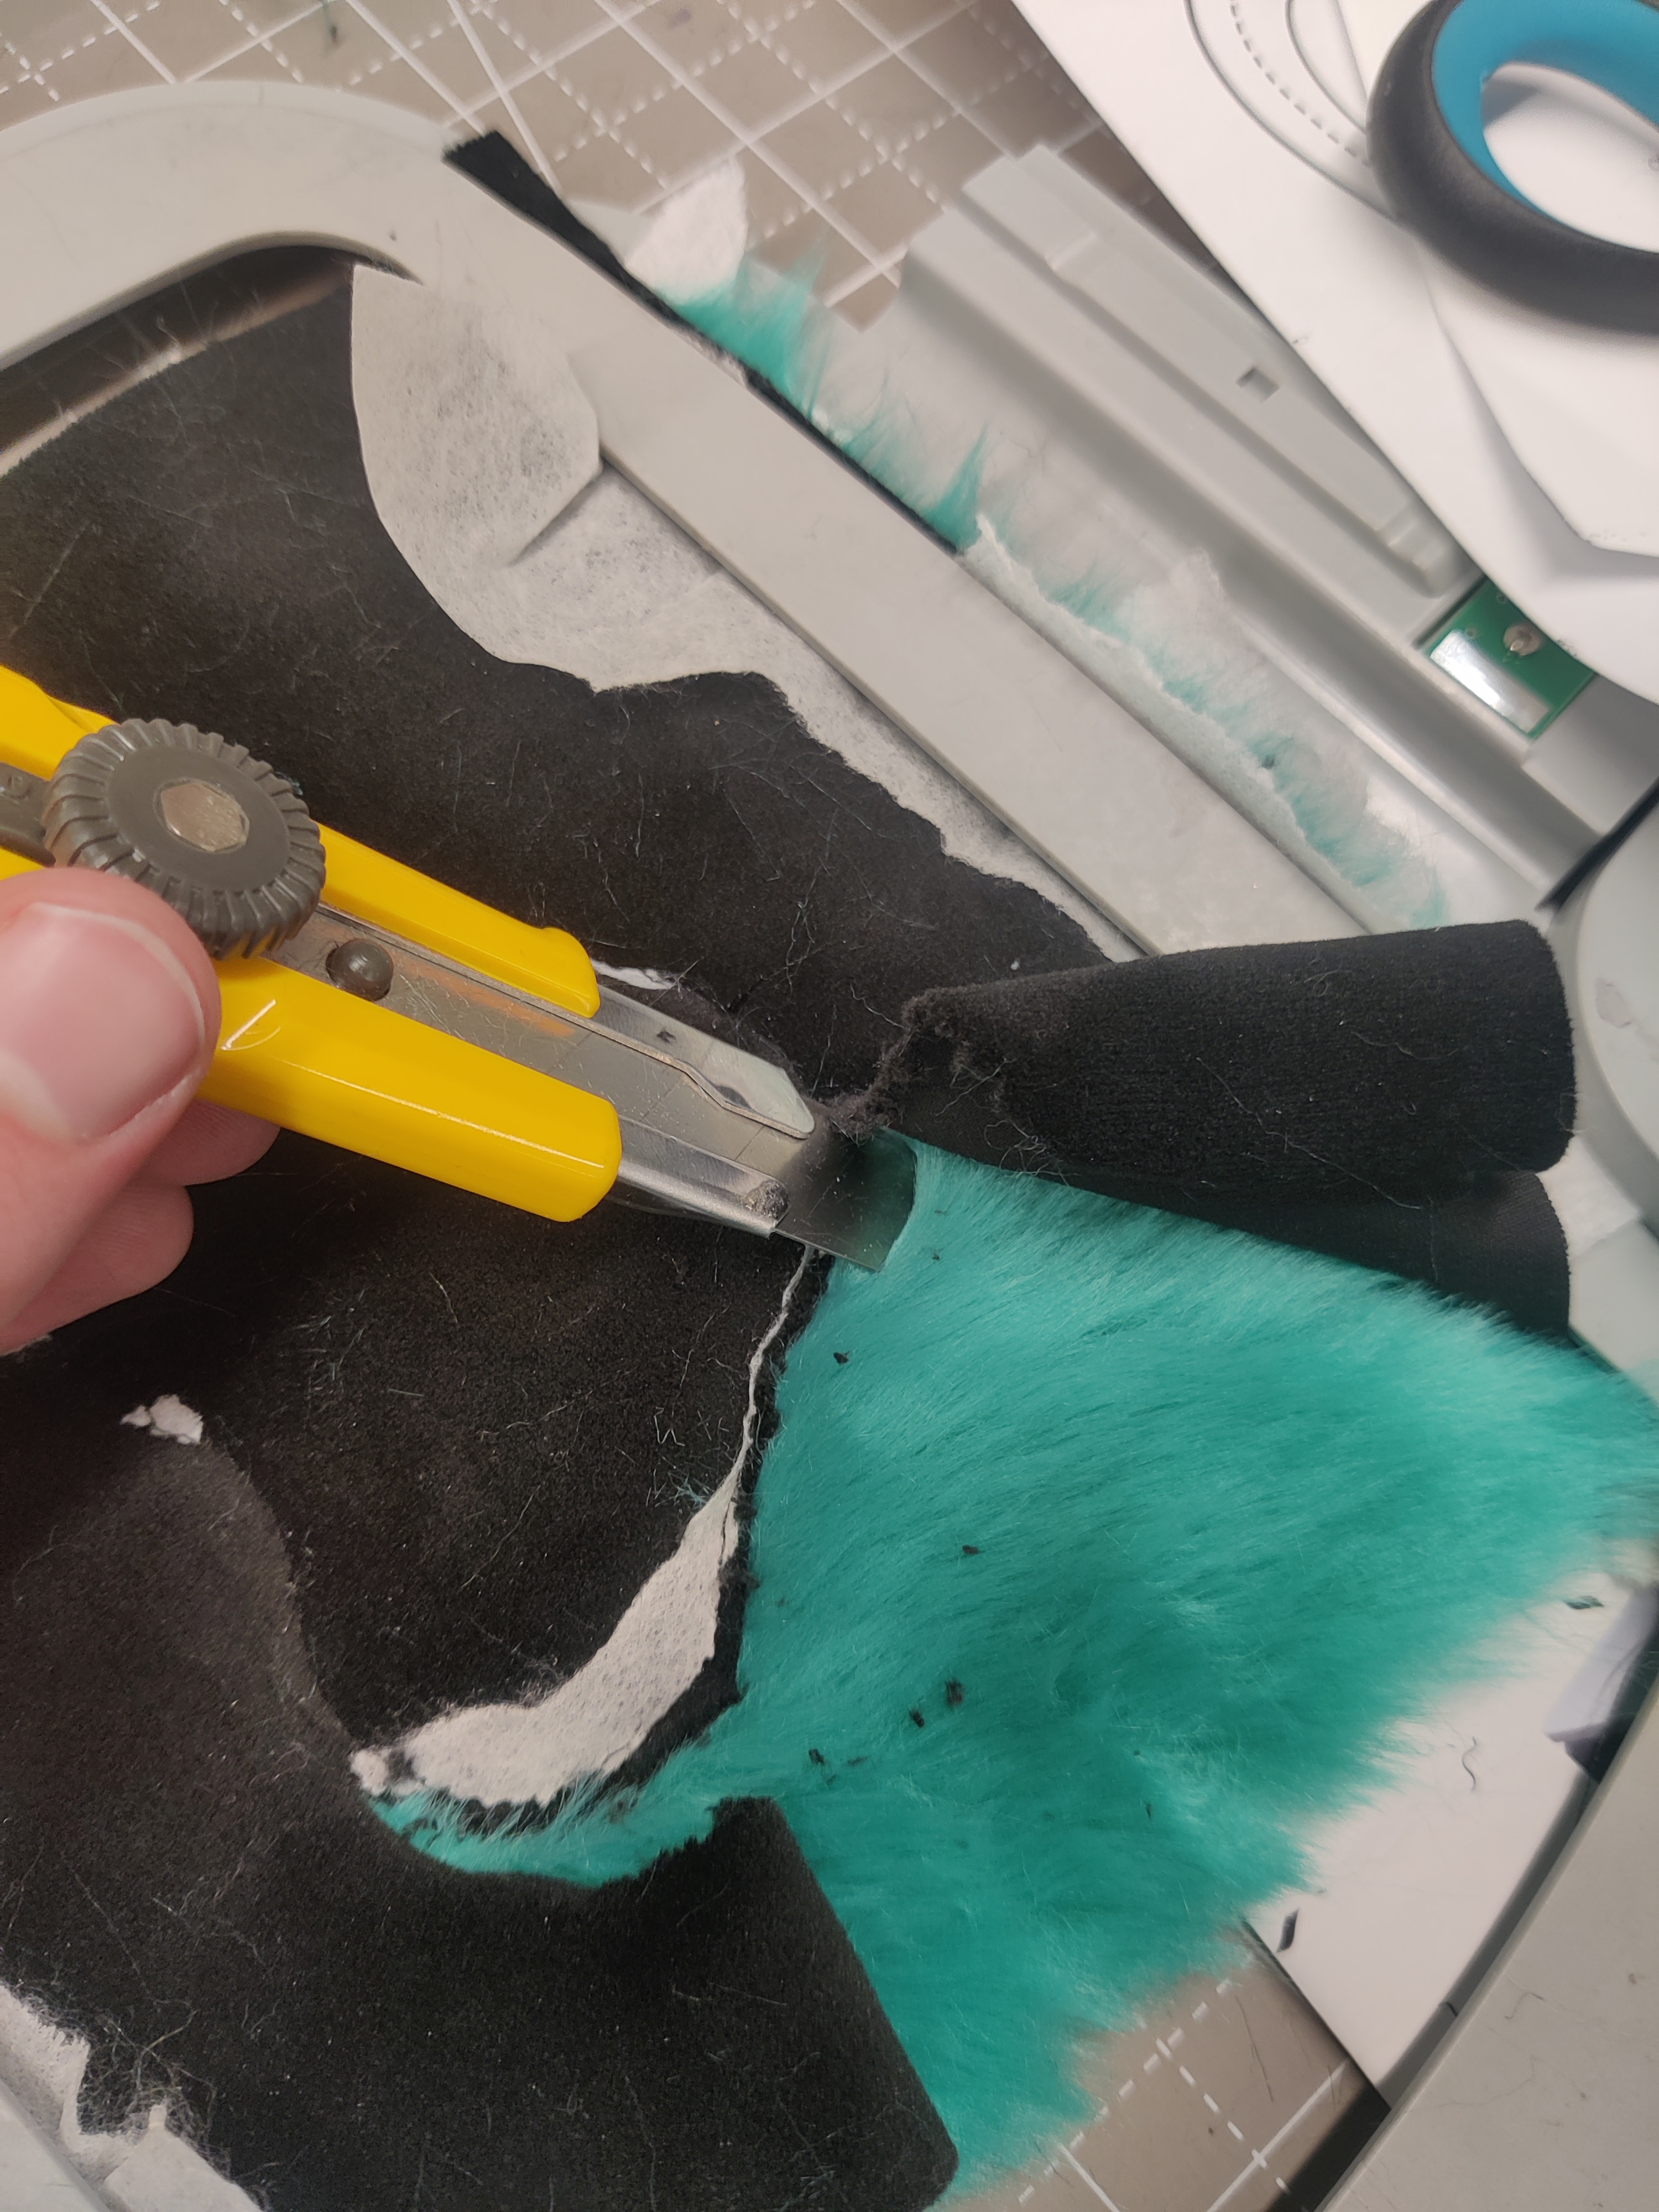
Then run it over a second time with a satin stitch in the exact same place for a nice smooth edge.
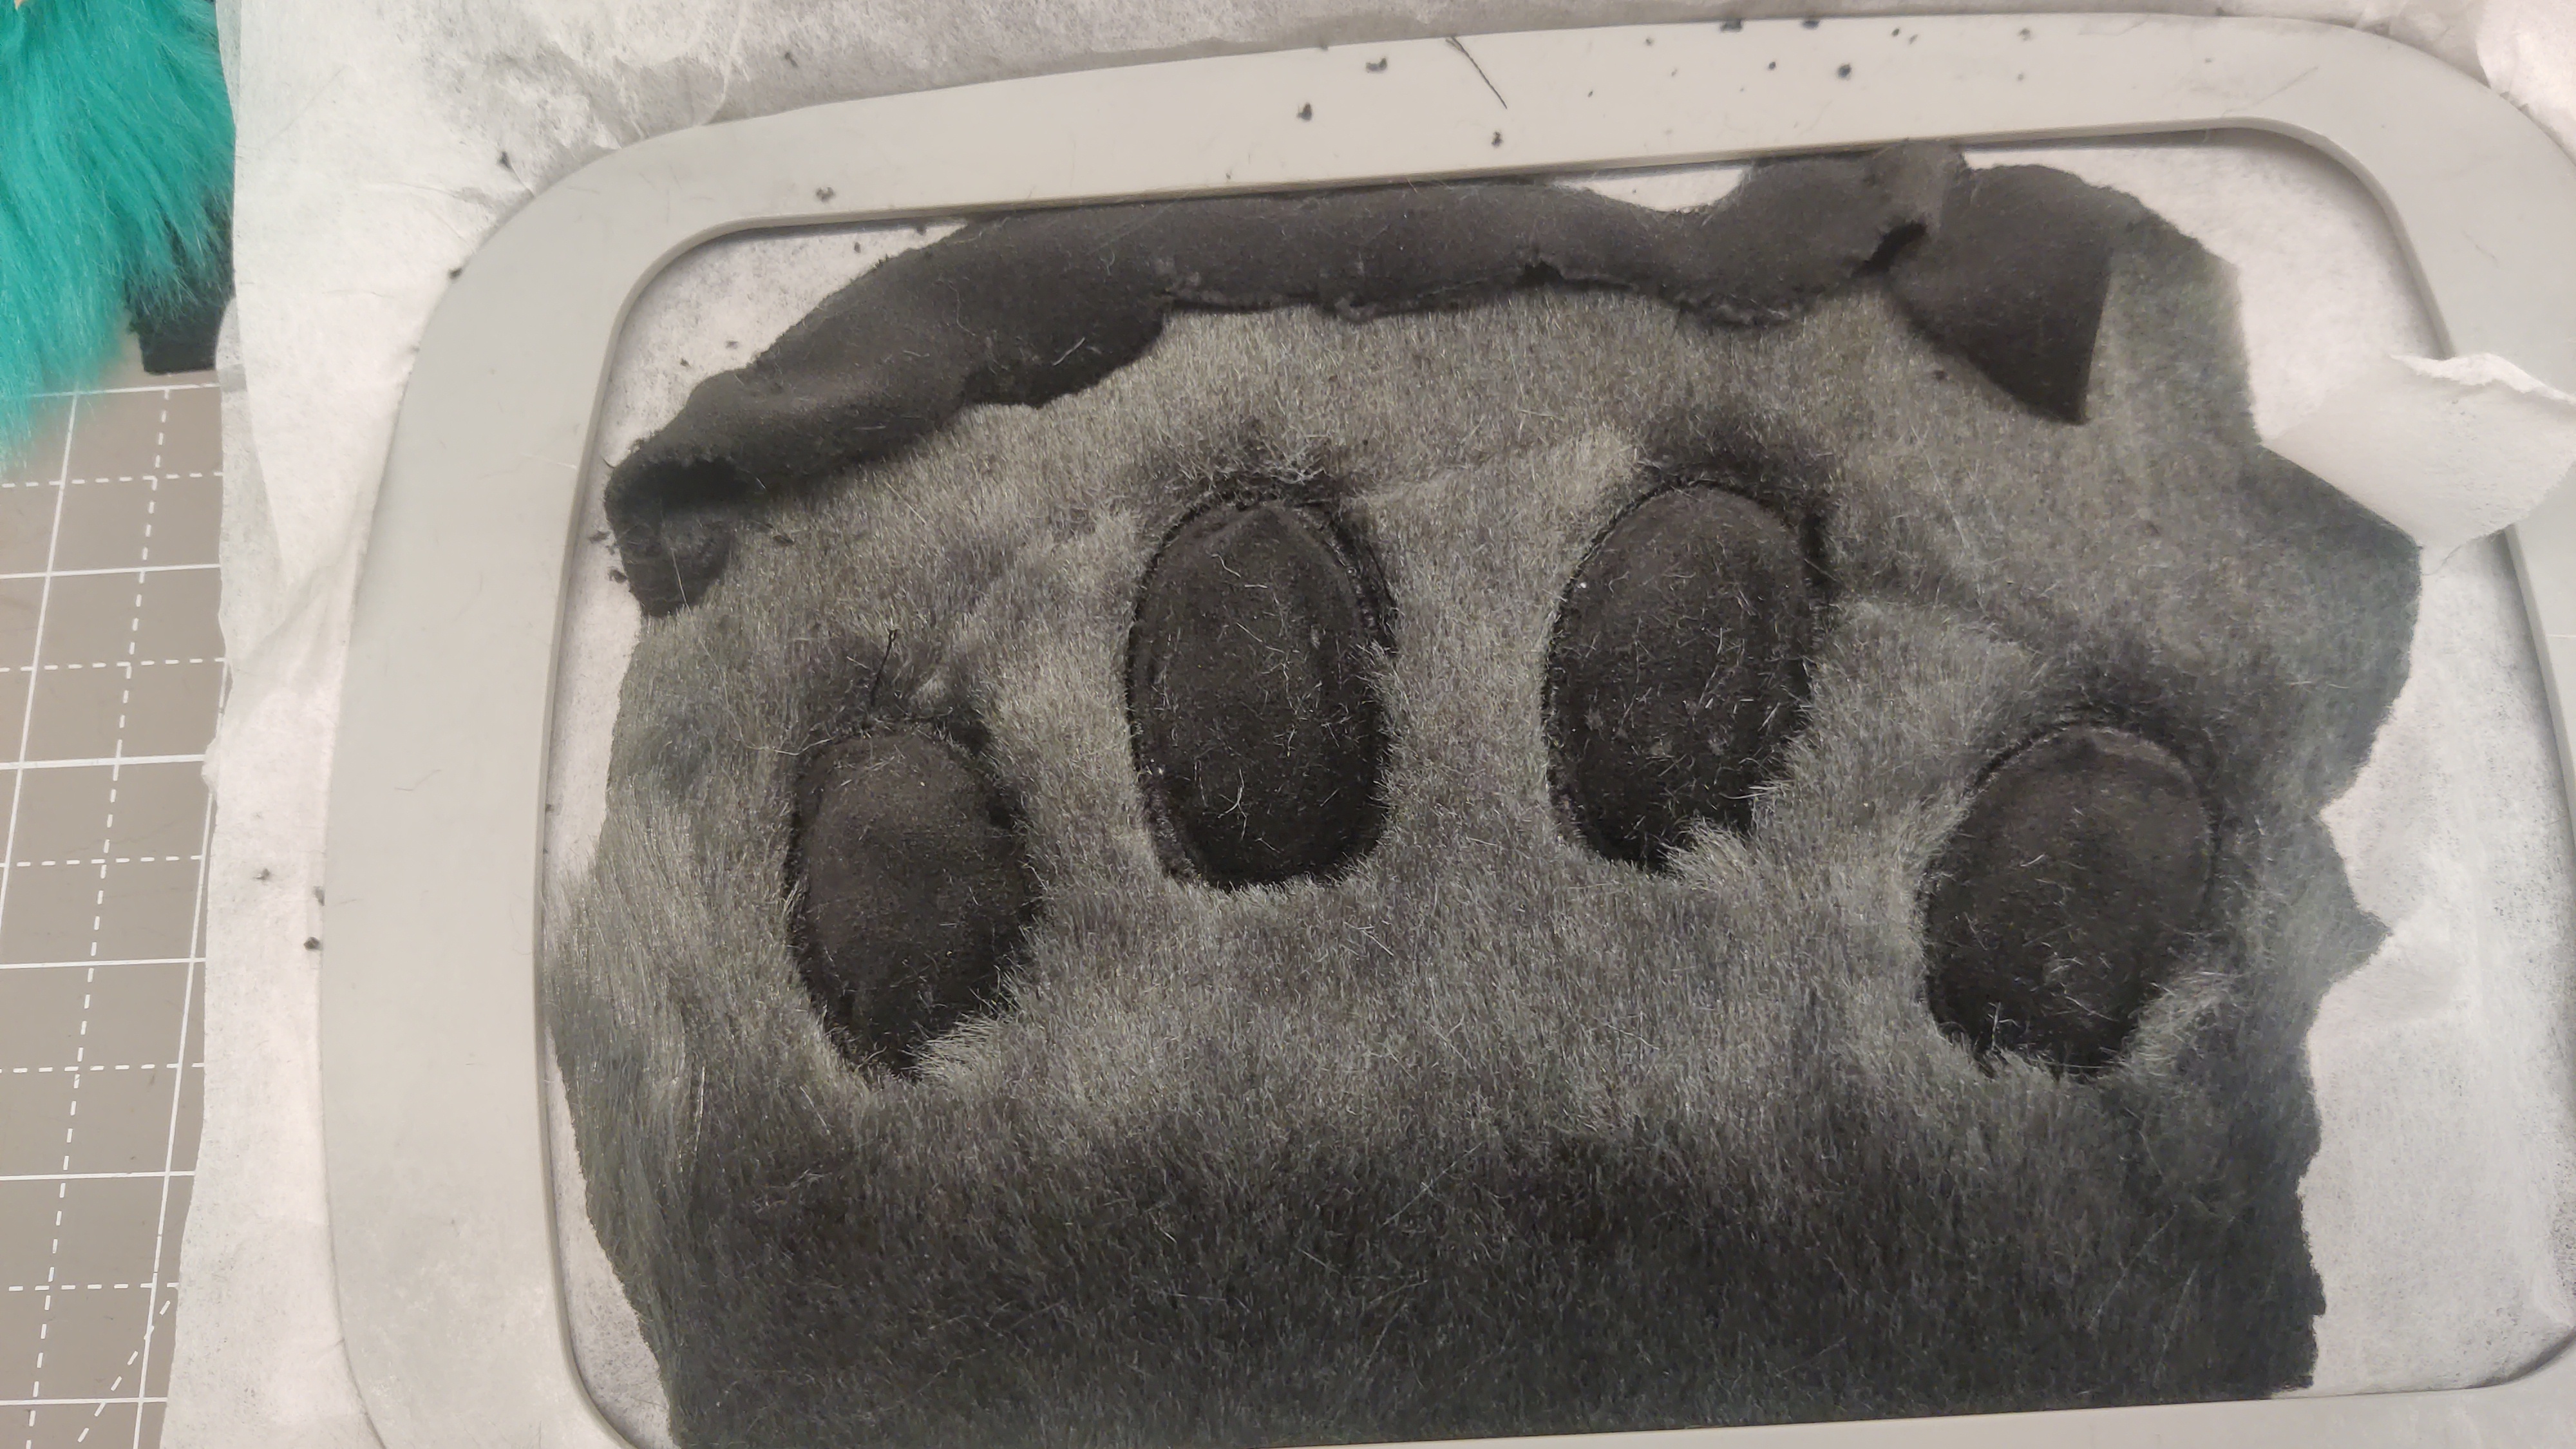
A nice trick I picked up is what I am calling "the scrap trick". Embroidery machines rely on tensioning the fabric with a hoop that snugly encloses it on all edges. However, this is pretty wasteful in this case, when you're not using the full build volume of the hoop (and ESPECIALLY when you're running critically short on material. Seriously, I have like 6 square inches left.) To work around this, just quickly use a crummy stitch to attach some extra scrap to the edges for the hoop to catch.
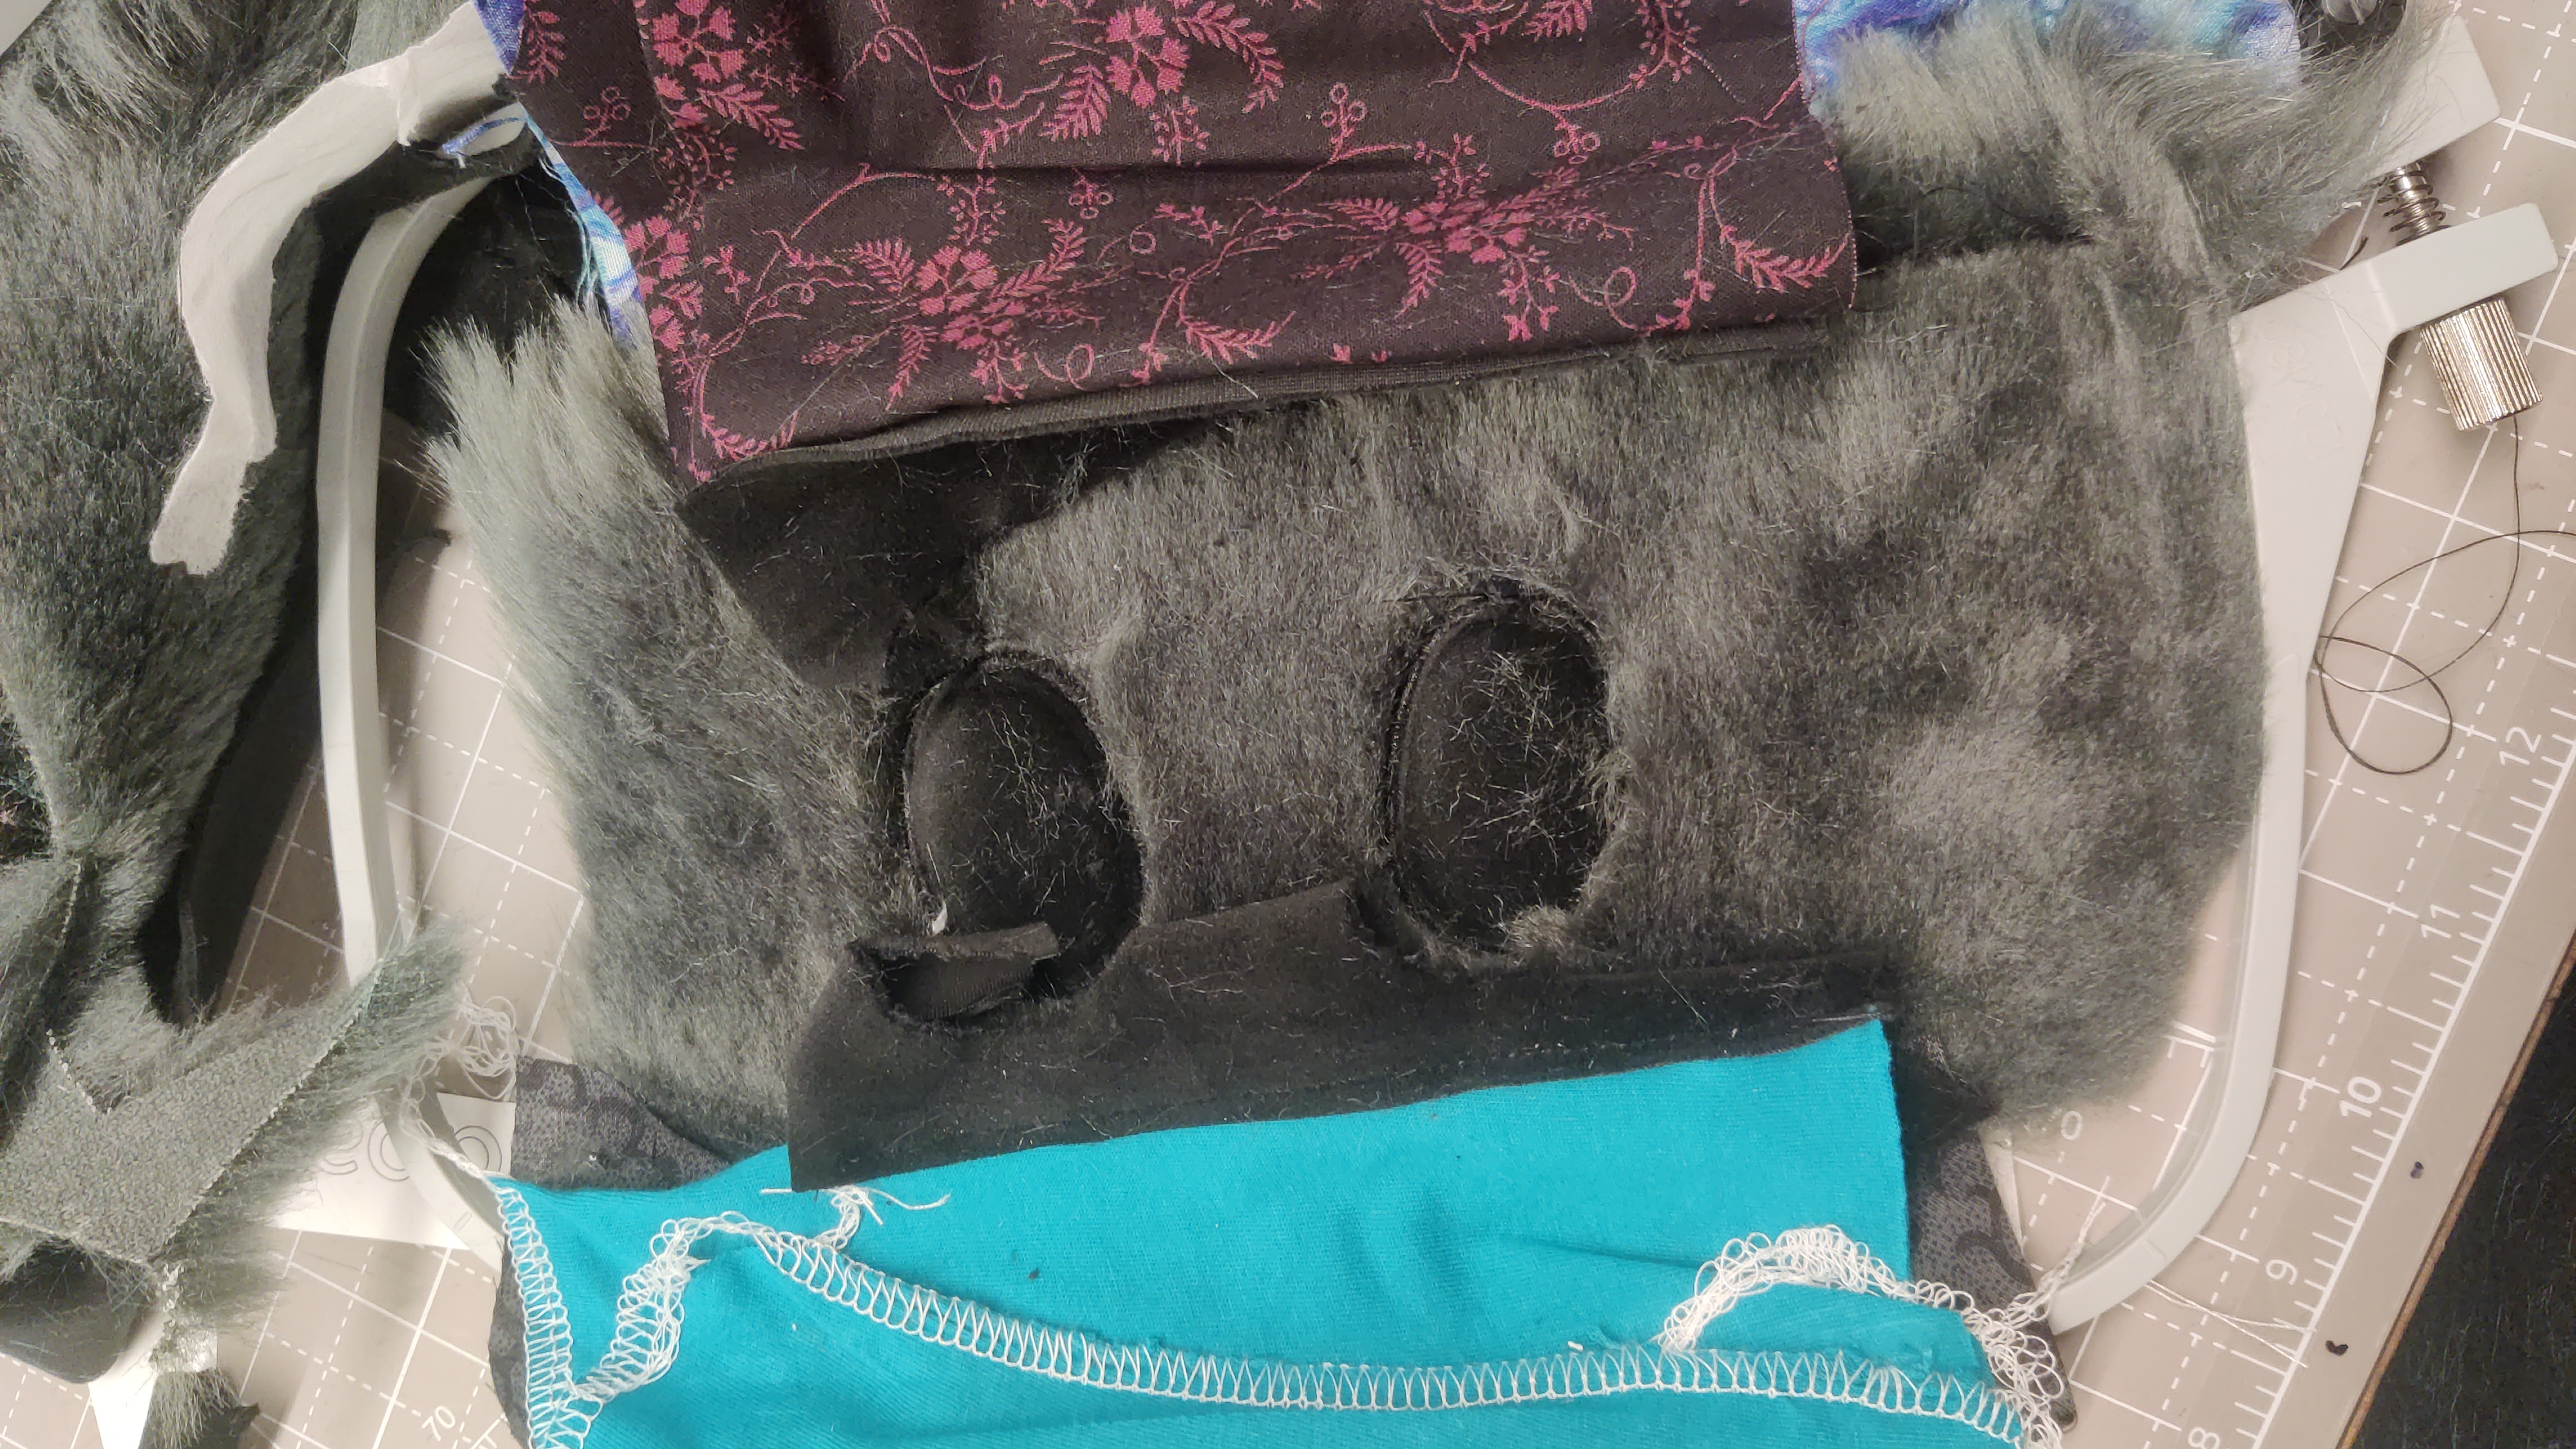
And with this my hand paws were fully cut!
[hr][/hr]
Next up was laser cutting the bodysuit fur. Now, the duct tape dummy part of this was easy; a few years back, I had been voluntold to be the victim of a duct tape dummy making panel at a convention. In exchange for a free duct tape dummy, I became the target of public mockery for 65 minutes while being wrapped in duct tape in order to explain to onlookers how a good DTD is made.
Patterning and cutting the dummy out was easy, but how would I prepare the pieces to be laser cut? This is where I state an opinion I've decided on after going through this--
I don't think laser cutting fur is worth it. The process of preparing physical duct tape pieces to be laser cut is extremely time consuming, outstripping any time savings you get from having a machine perform the physical cut.
For bodysuit pieces, the first problem is having the piece scanned. With pieces as large as 28x16", how will you fit that under a typical flatbed scanner on a printer? You can't, and stitching together various partial scans will be miserable. Fortunately I managed to escape this problem thanks to local libraries oversized 24x18" scanner, forcing me to only cut one single piece, this panel on the back, in two--
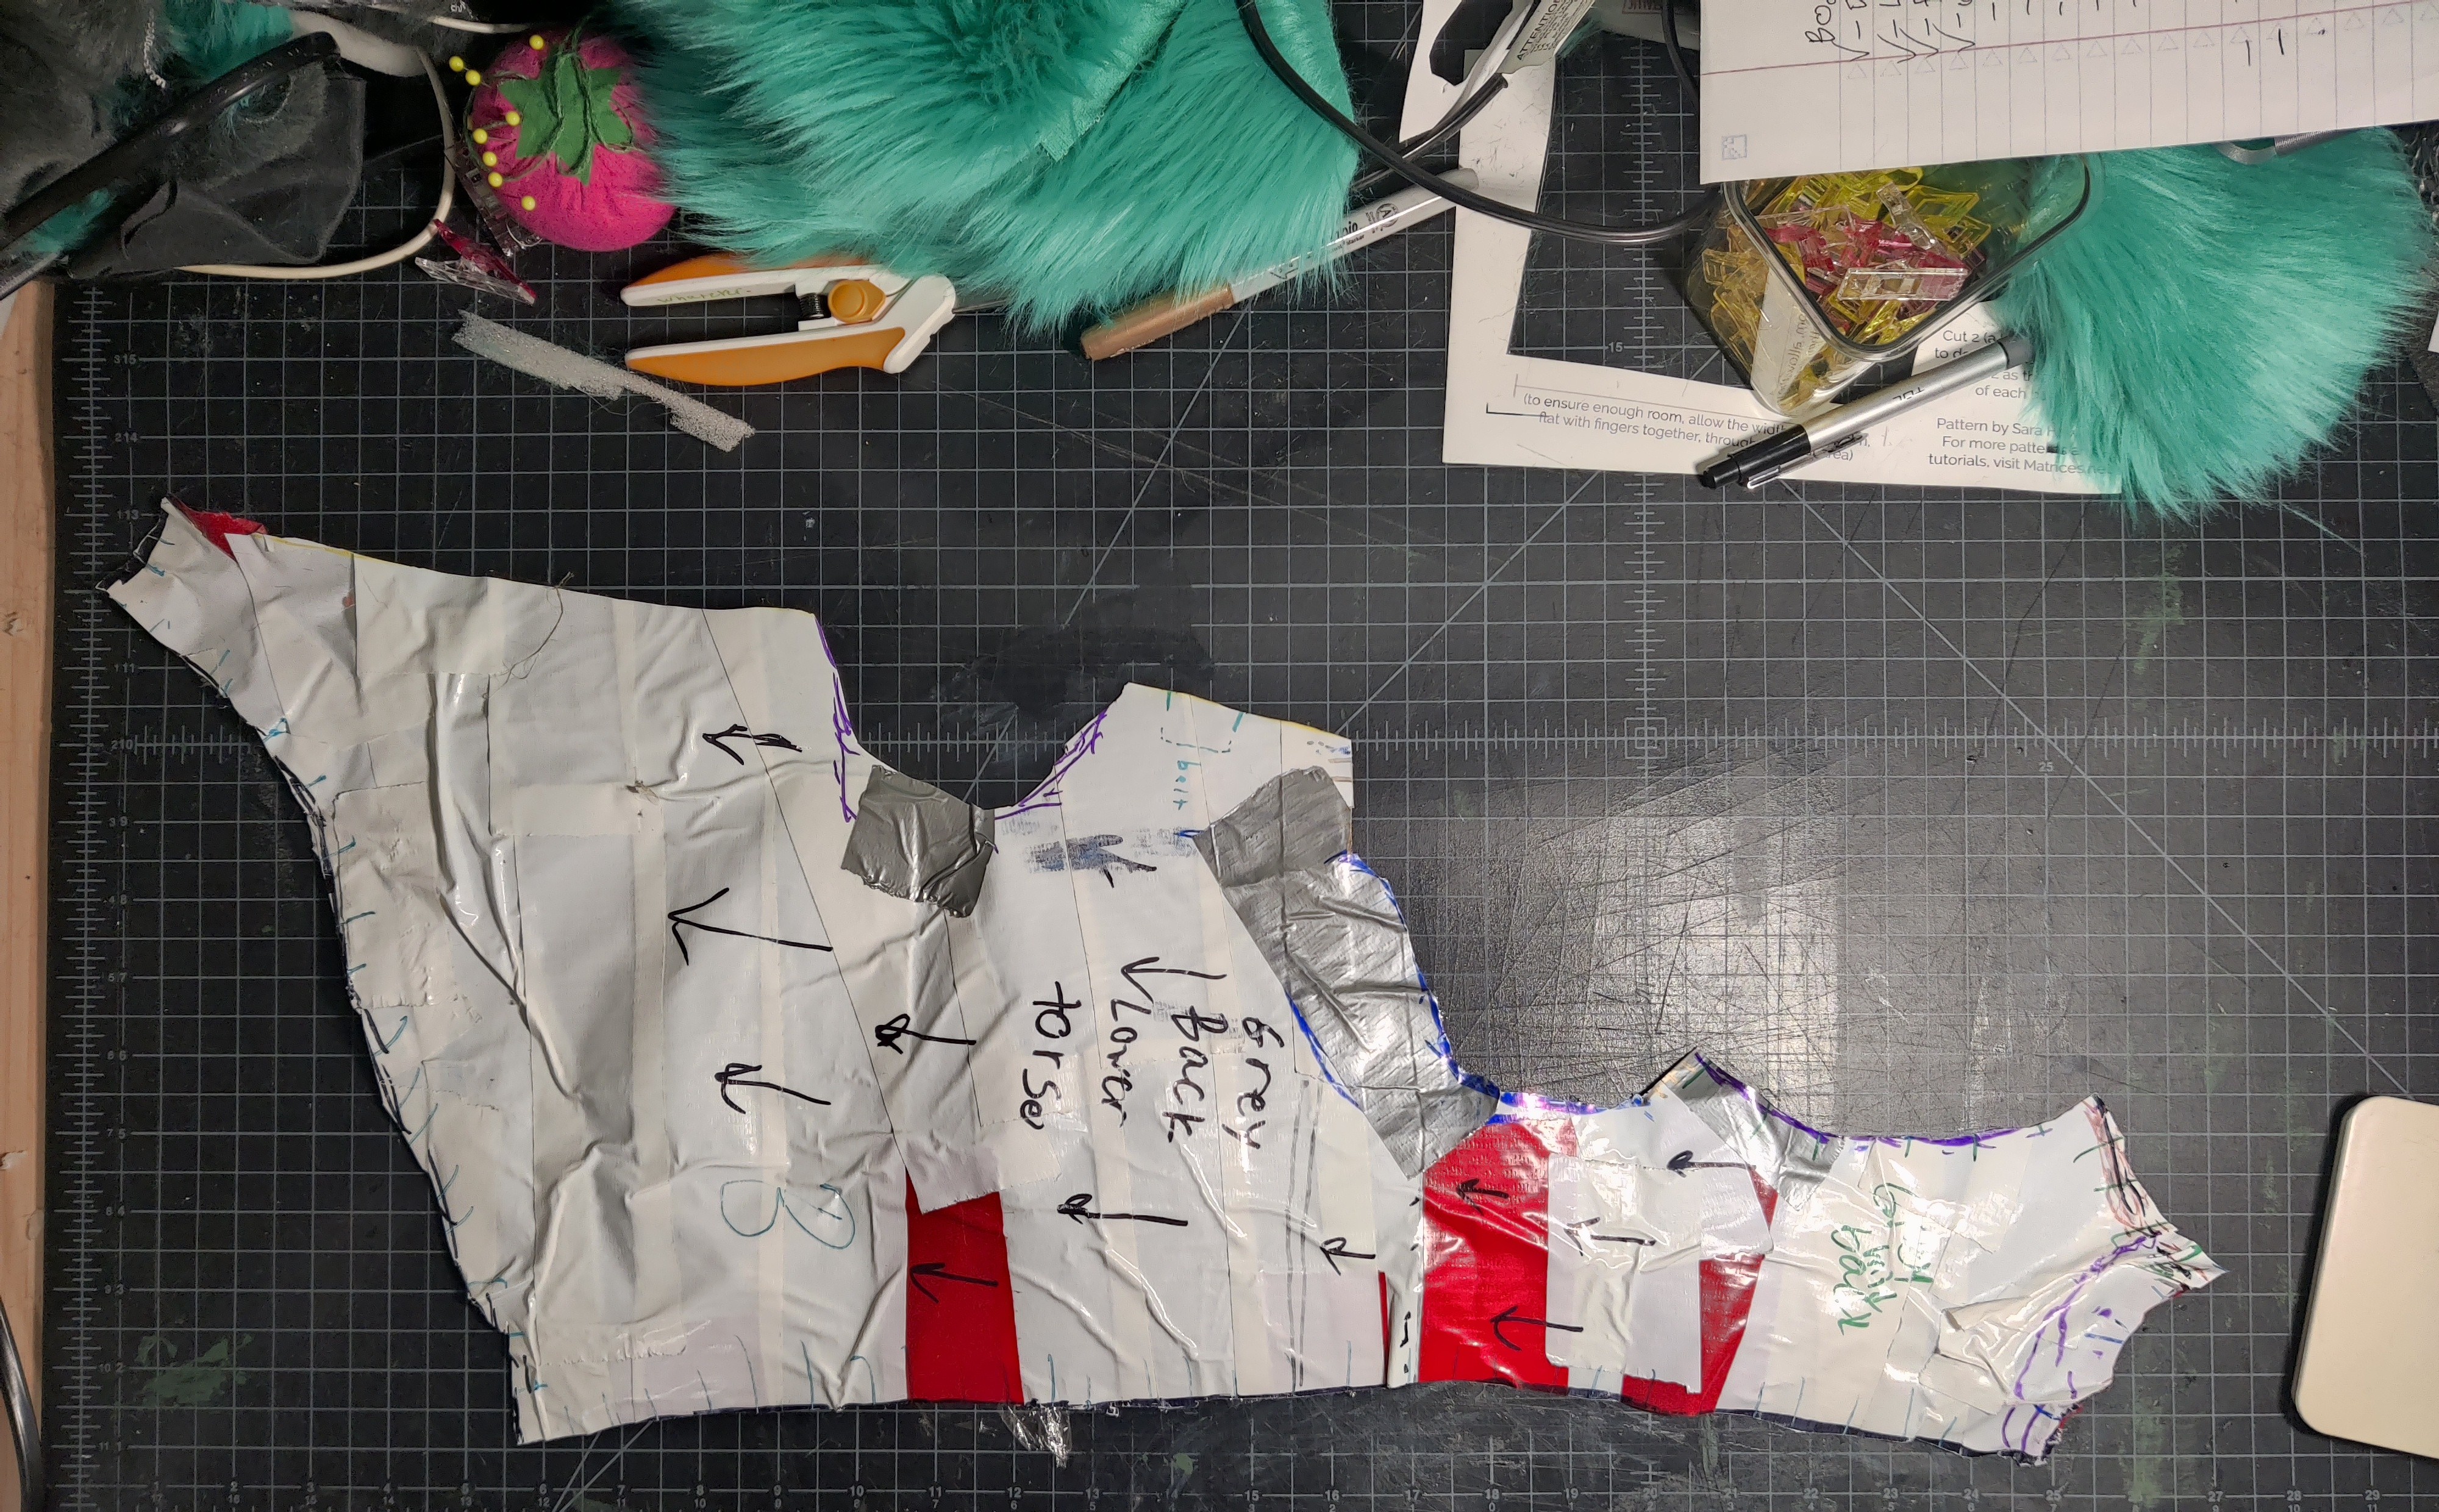
Then came the prep work. I had 23 unique pieces (x2 = 46 for both sides), not including spots. (Aside-- a friend is autistic in all the best ways, including a bizarre enjoyment of hand sewing, and offered to hand sew as much of the suit as I wanted. Thus, I also had 13x2 spots to cut. I don't understand them. ILU Emmet <3)
Every one of these pieces had to be hand-traced from the raster scan into a vector, rotated to match fur direction, have seam allowance added (including correcting for darts), aligned by fur color and length, copied with a mirror for the other side, and arranged so that everything fit into the 32x20" laser bed. THIS ALONE TOOK 4 HOURS.
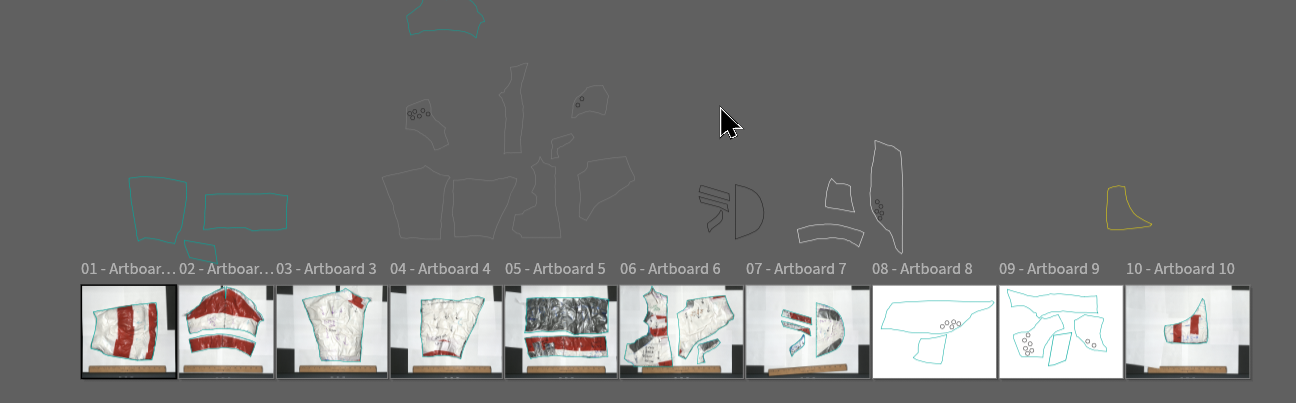
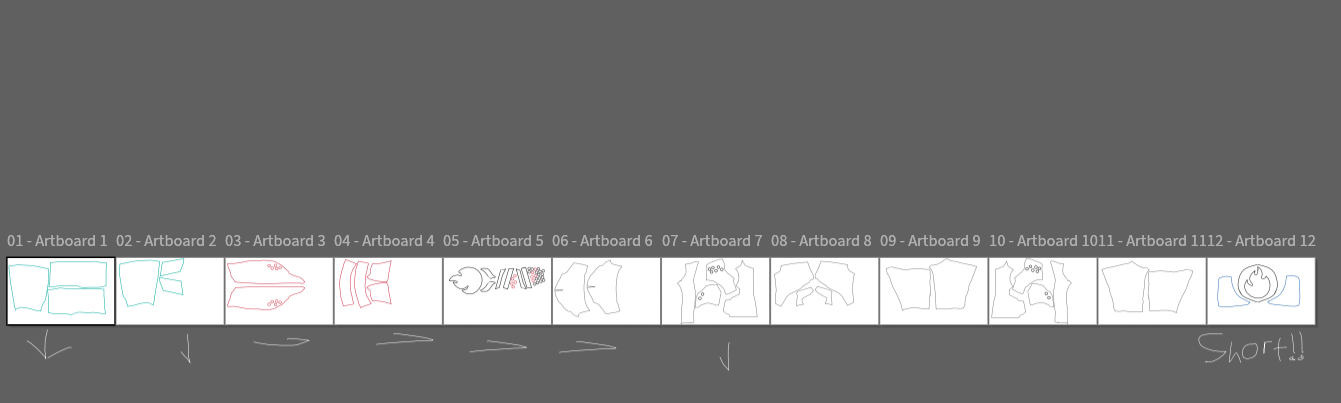
Finally, I had to cut 12 pieces for every bed, matching up with the size that was actually consumed (for instance, bed 5 was roughly 28"x10", so I cut that much), aligned that piece under the laser, double checked dimensions, double checked seam allowance, double checked fur direction (in a bid to avoid the failure of the feet) and finally performed the cut. 12 times over.
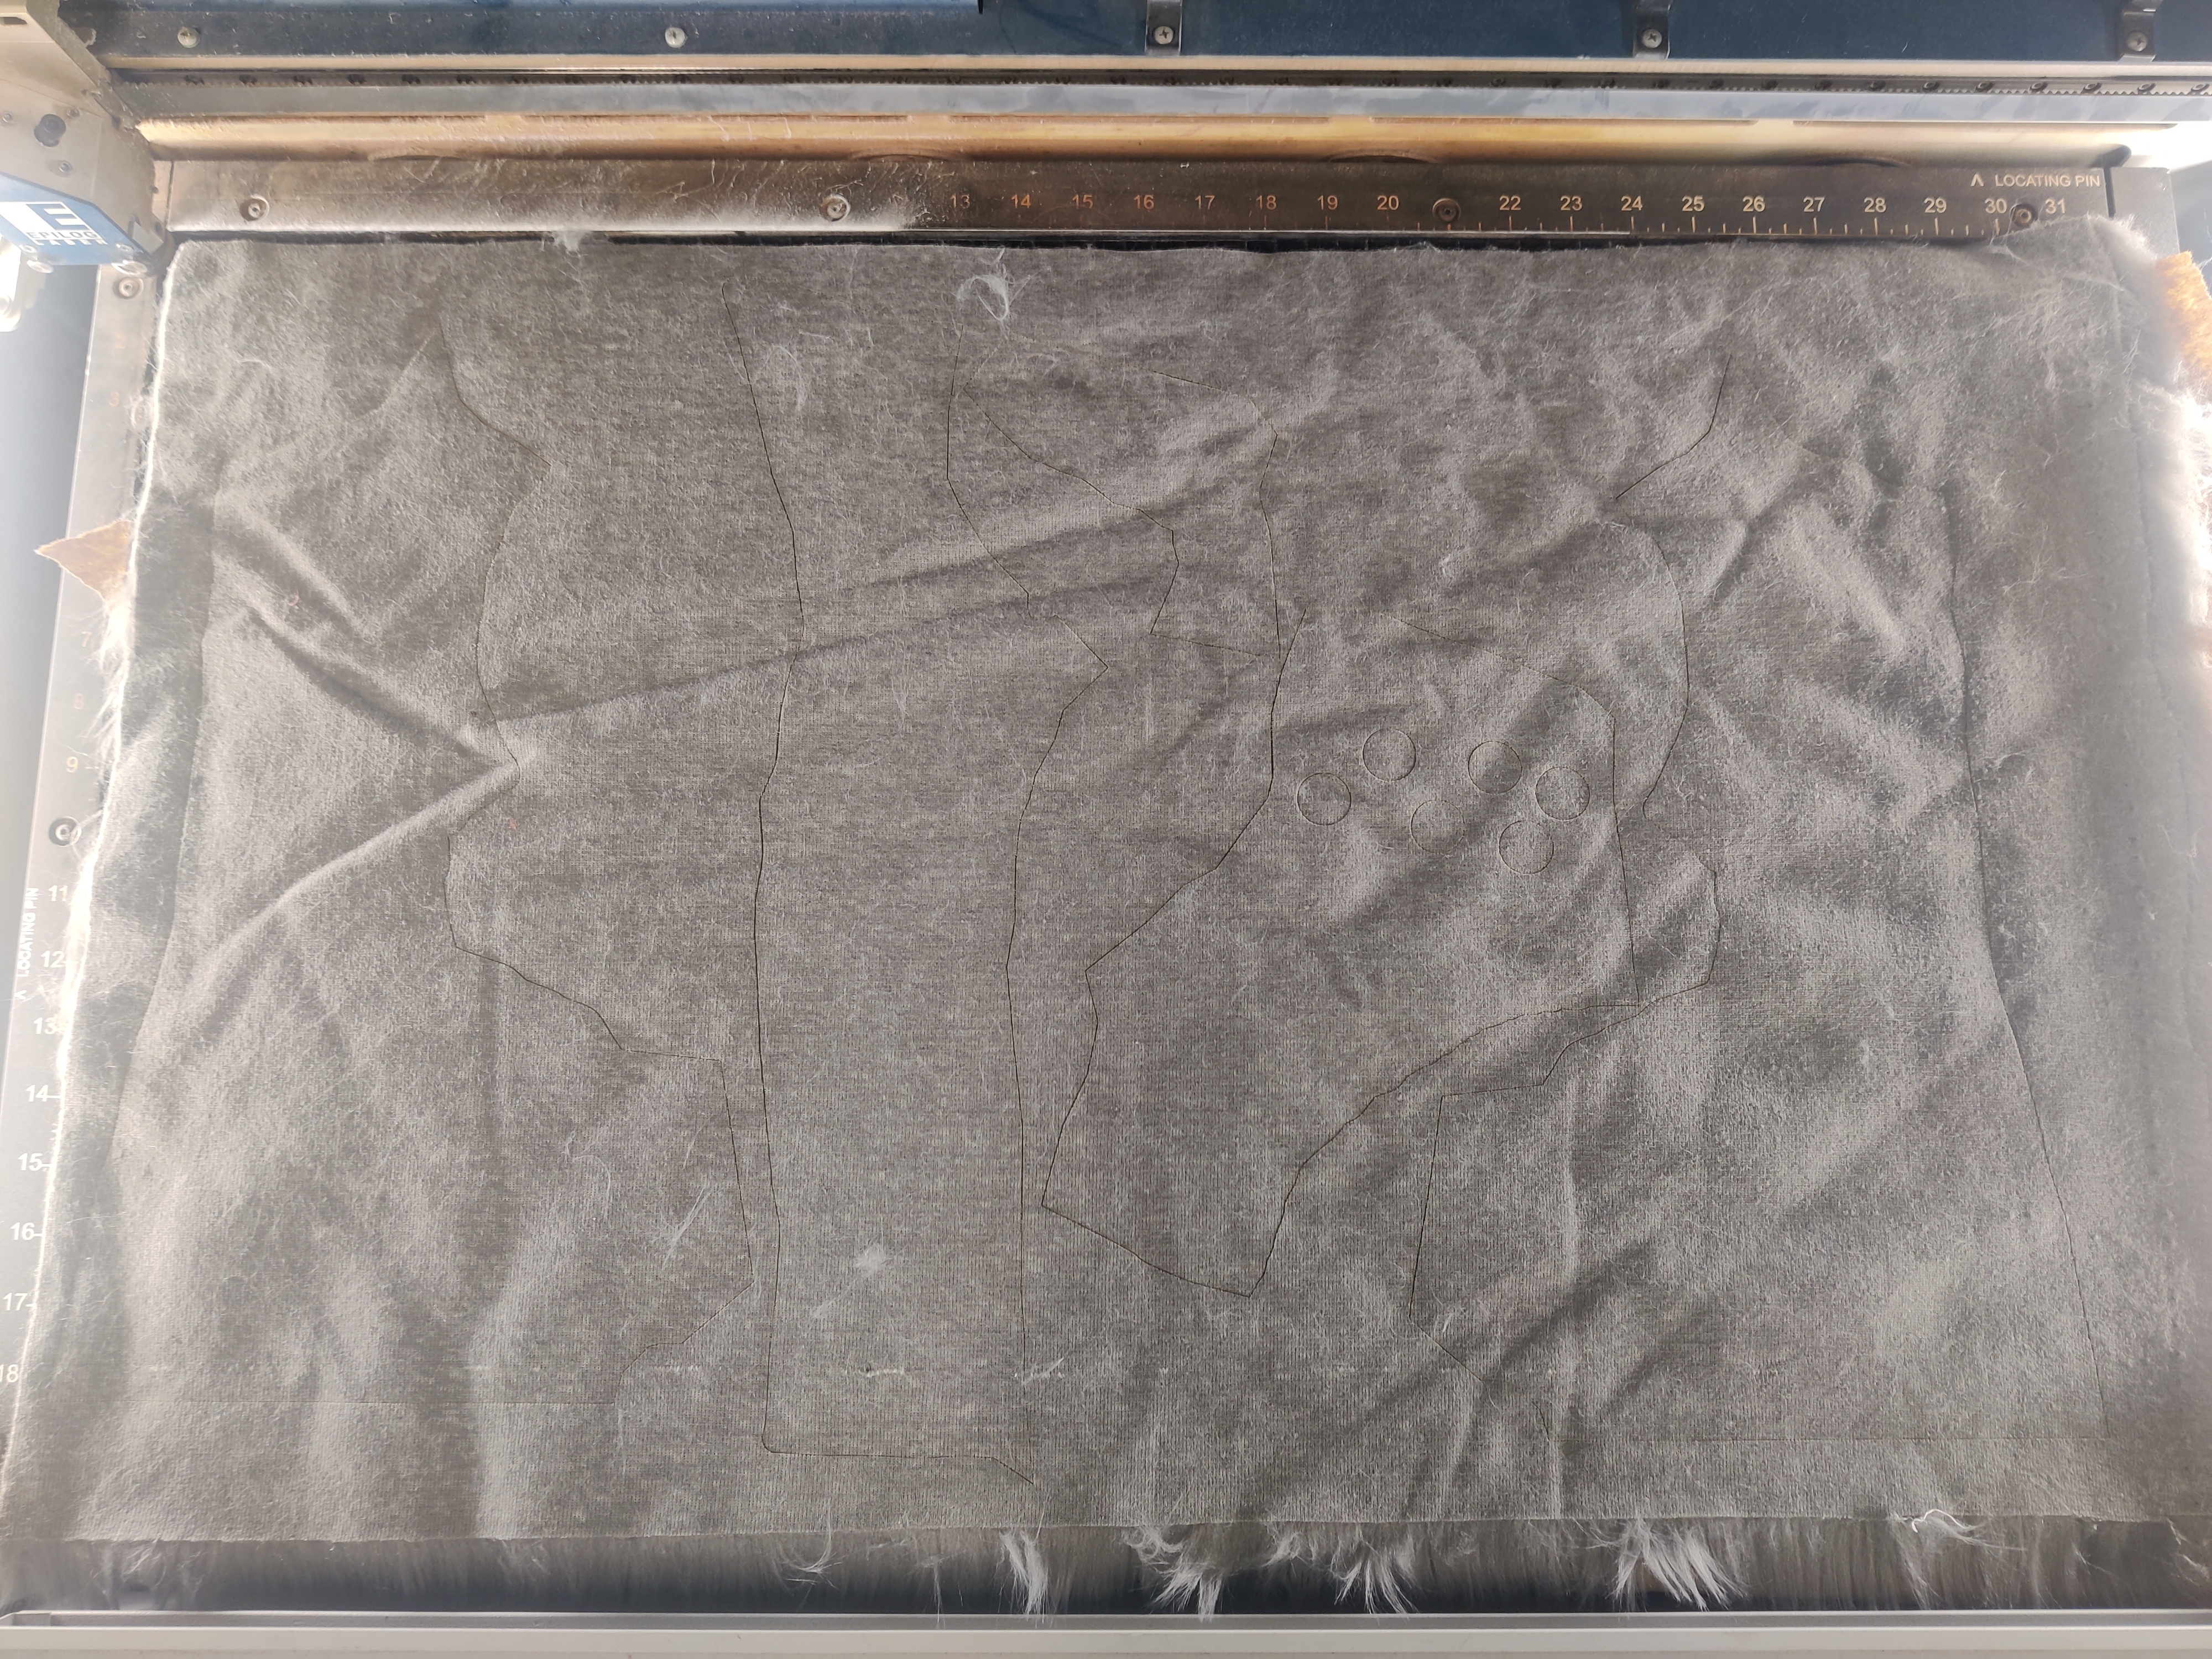
I genuinely think that I would have finished quicker just cutting it all by hand. BUT, in addition to this being just plain cool, there are some great upsides to this approach- perfect complex geometry.
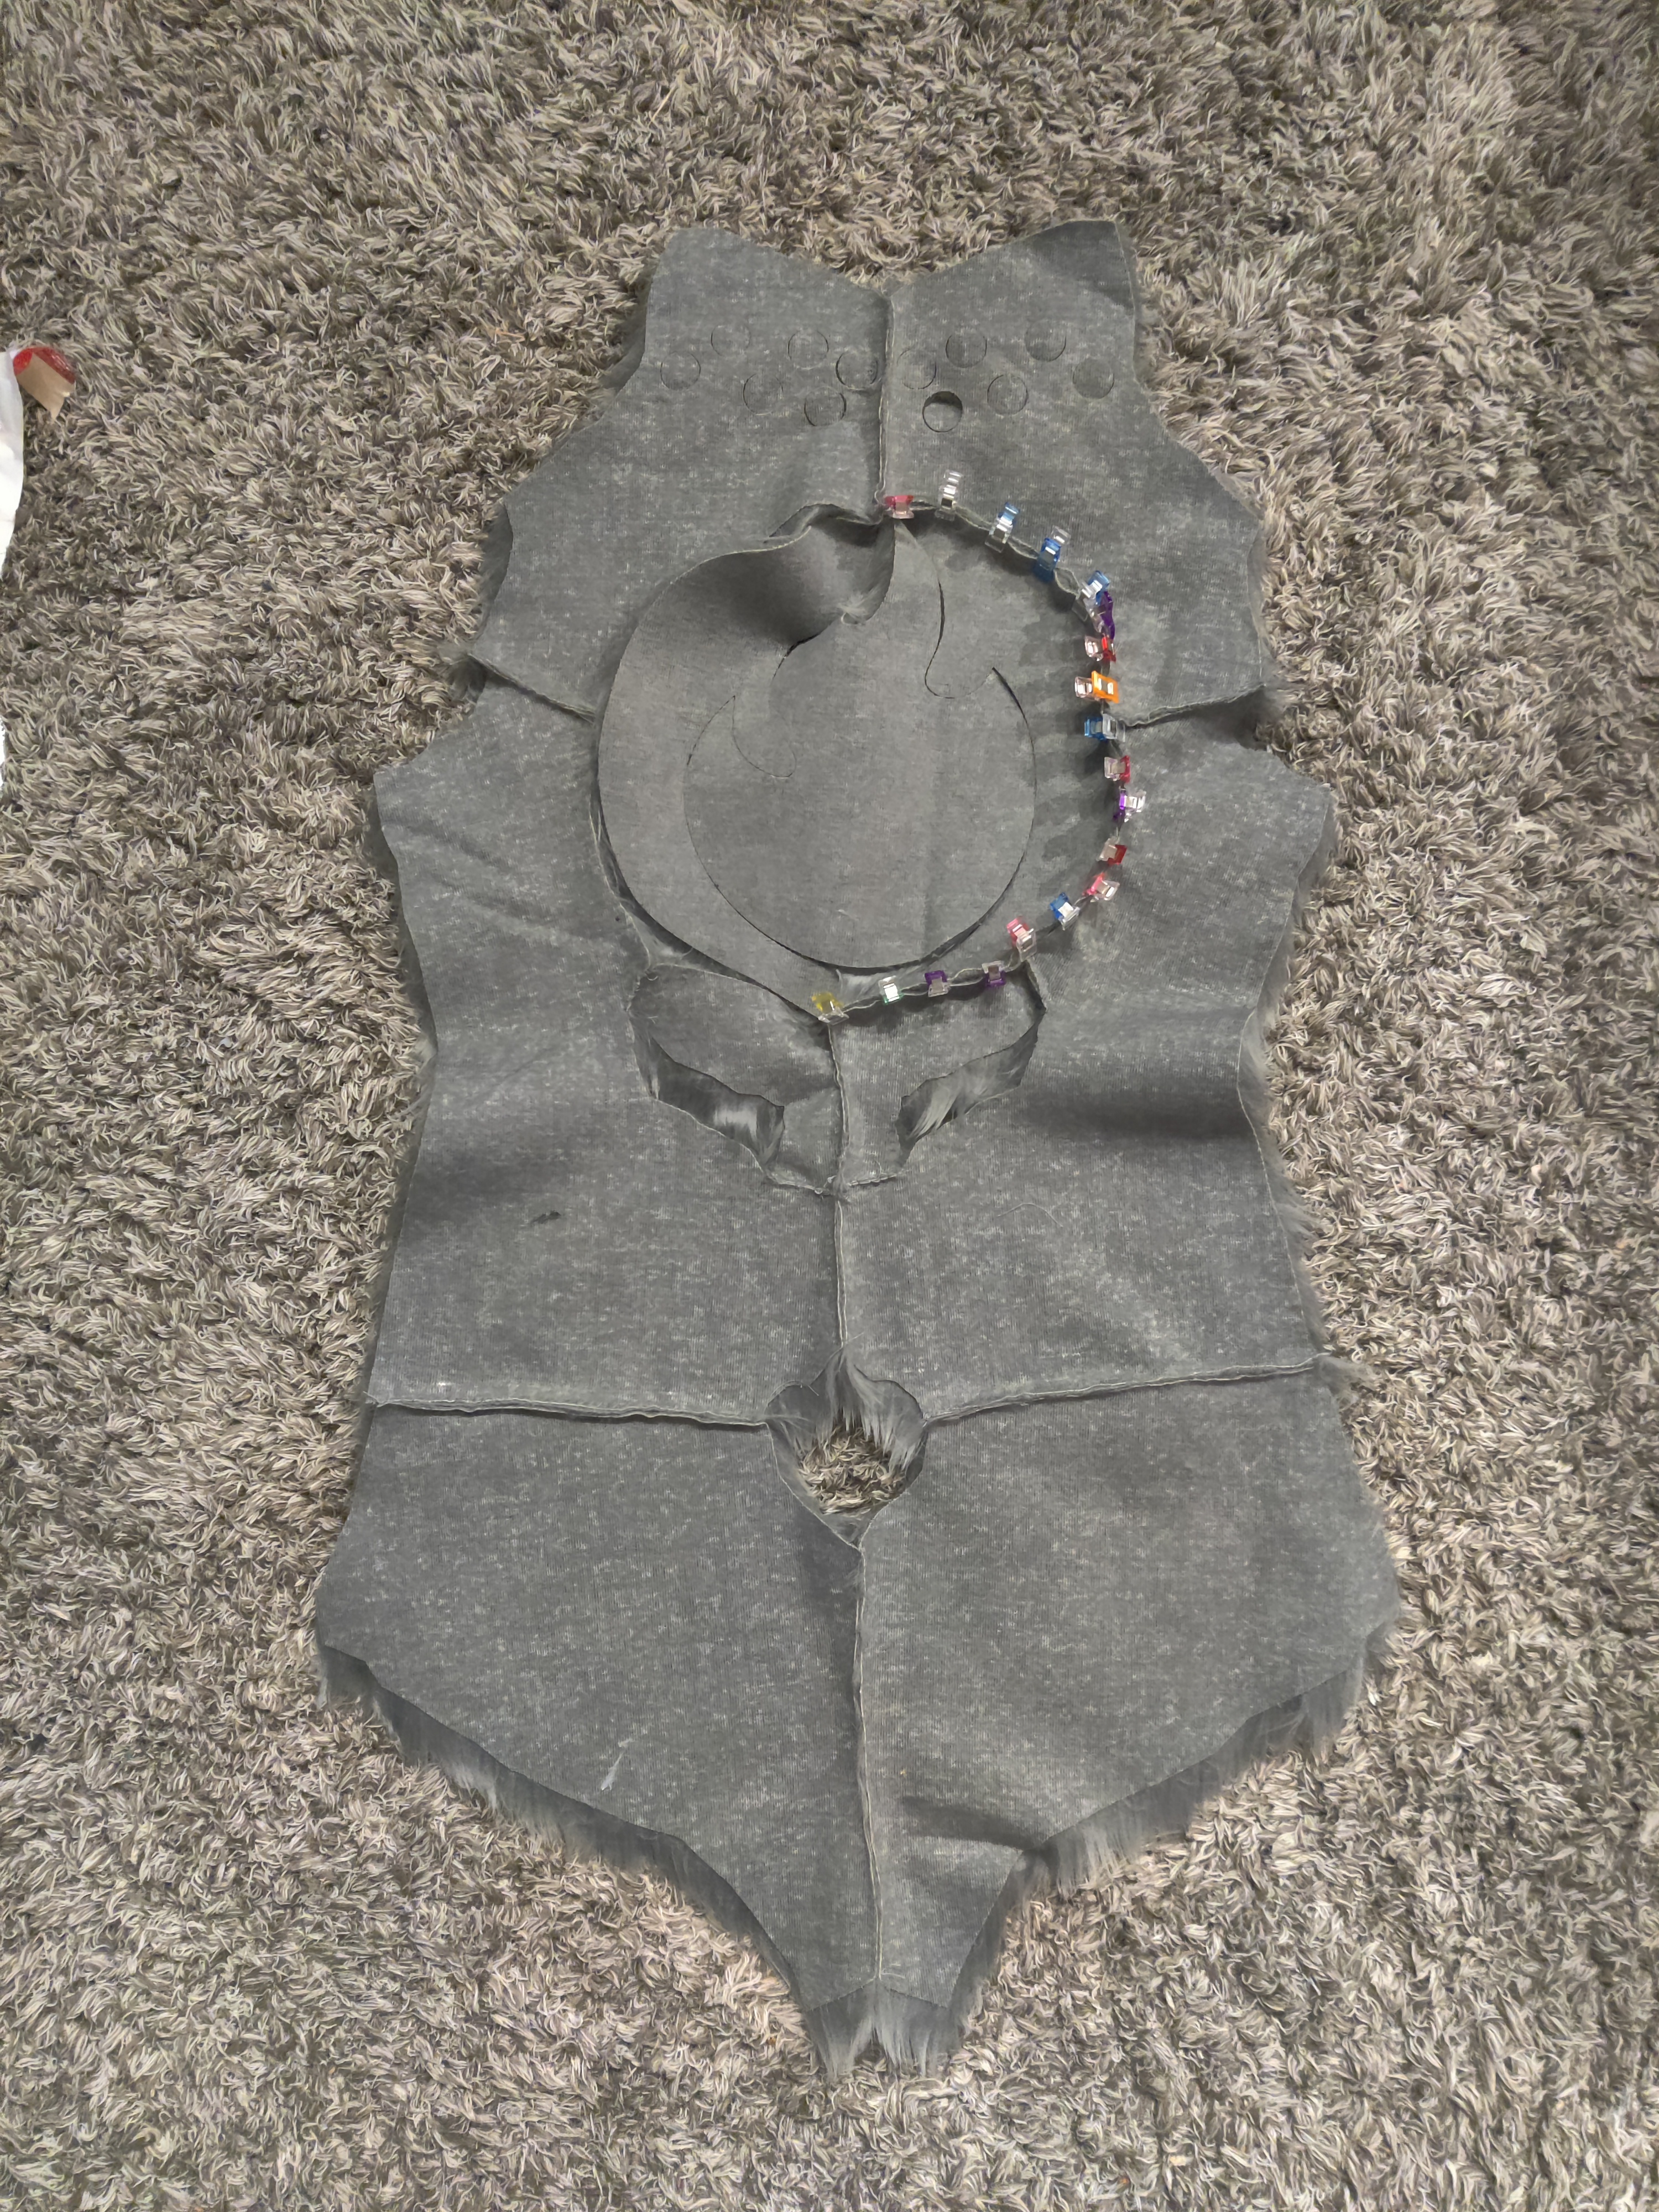
If you look at artboard 12 above, you can see the extremely complicated flame symbol that is tattooed on my back. It runs right down the middle, so I patterned a plain half-circle, mirrored it, and merged them right on top of each other. Then, the awesome thing is, since my ref sheet artist did the art in Inkscape, I just copy/pasted the art right into the pattern!! Zero effort involved on my part to draw an extremely complex piece and have it cut to perfection. I think laser cutting can really shine when you use it sparingly for difficult and complex patterns like this! Same with the 26 spots I drew, which are all 100% perfect circles that would be absolutely miserable to cut by hand but were trivial with this approach.
The head base was incredibly infuriating to make. Although I consider myself fairly skilled at nomad sculpt at this point, making myself proved to be an endeavour that nearly broke me. Every last detail had to be considered and reconsidered and reconsidered again, not to mention that I struggled with the shapes in the first place. It probably took a week to make this, and I definitely spent a full day just considering the final details before sending it off to the 3D printer.
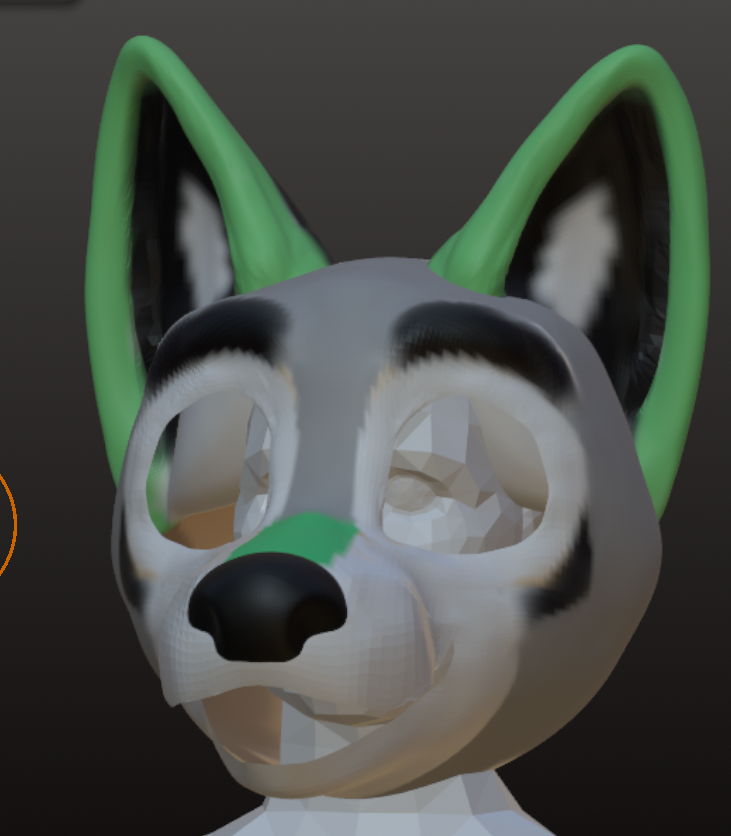
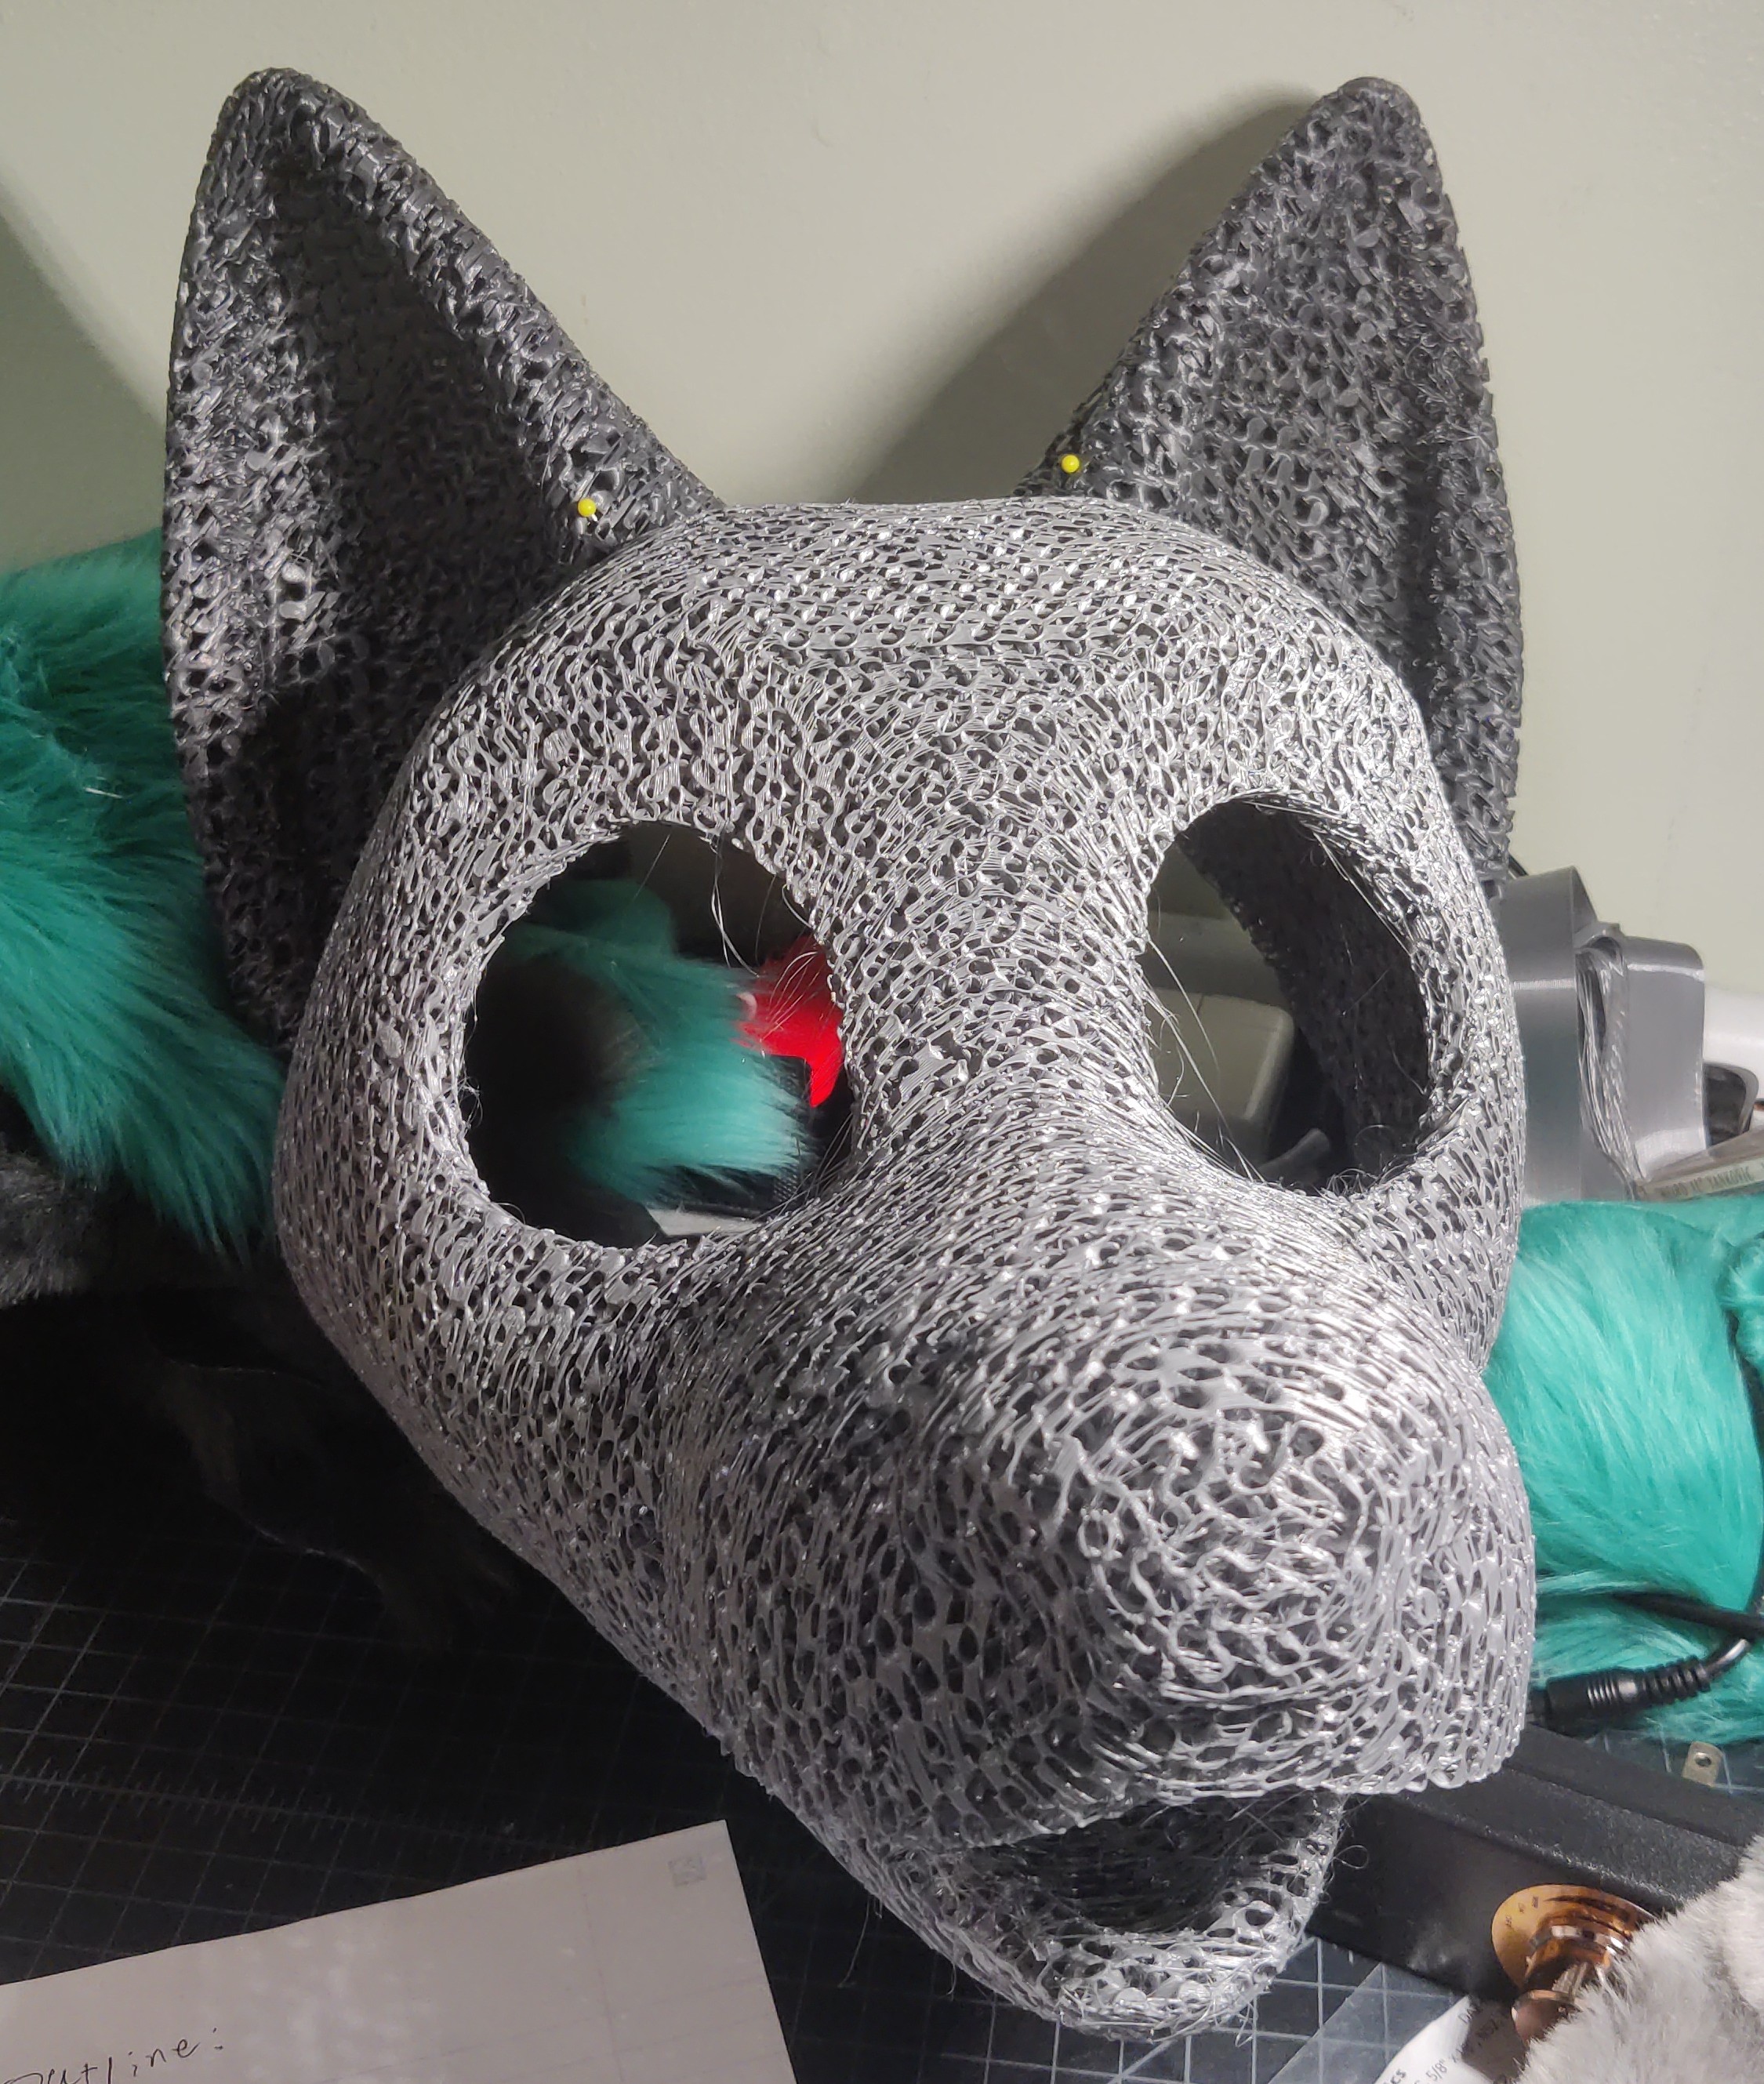
But just watch it finish the print!! Watching 3D printers go is hypnotizing. This one took 25 hours, as I recall.
https://art.morbinti.me/lima_build_log/ ... nished.mp4
I implemented the magnetic changeable eye system for this head base; sadly it's an imperfect process and the ones I printed are crap. I need to go back and revise them. The way I do this is pretty half baked and I'm pretty sure there's a much much better way to approach the problem.
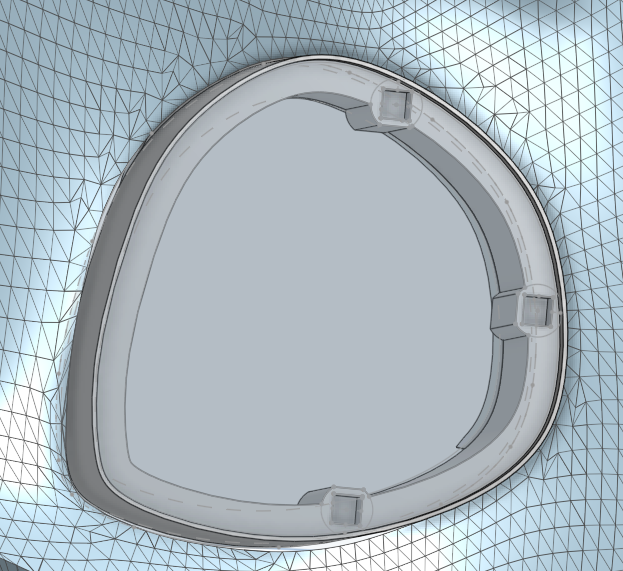
Prepping it for wearing was also miserable. I totally failed to consult my own previous build log for how to install 5 point head harnesses, and wound up having to reinvent the installation technique from scratch... Managed to get there in the end though... Currently there's a 1/2" foam padding piece in there, which I am thinking of replacing with a full 1" sheet.
Over the course of the last year, I had VERY SLOWLY re-created the proprietary 5-point harness used in previous projects with my own inhouse design. Much more to come on that when I write a full blog article on it!
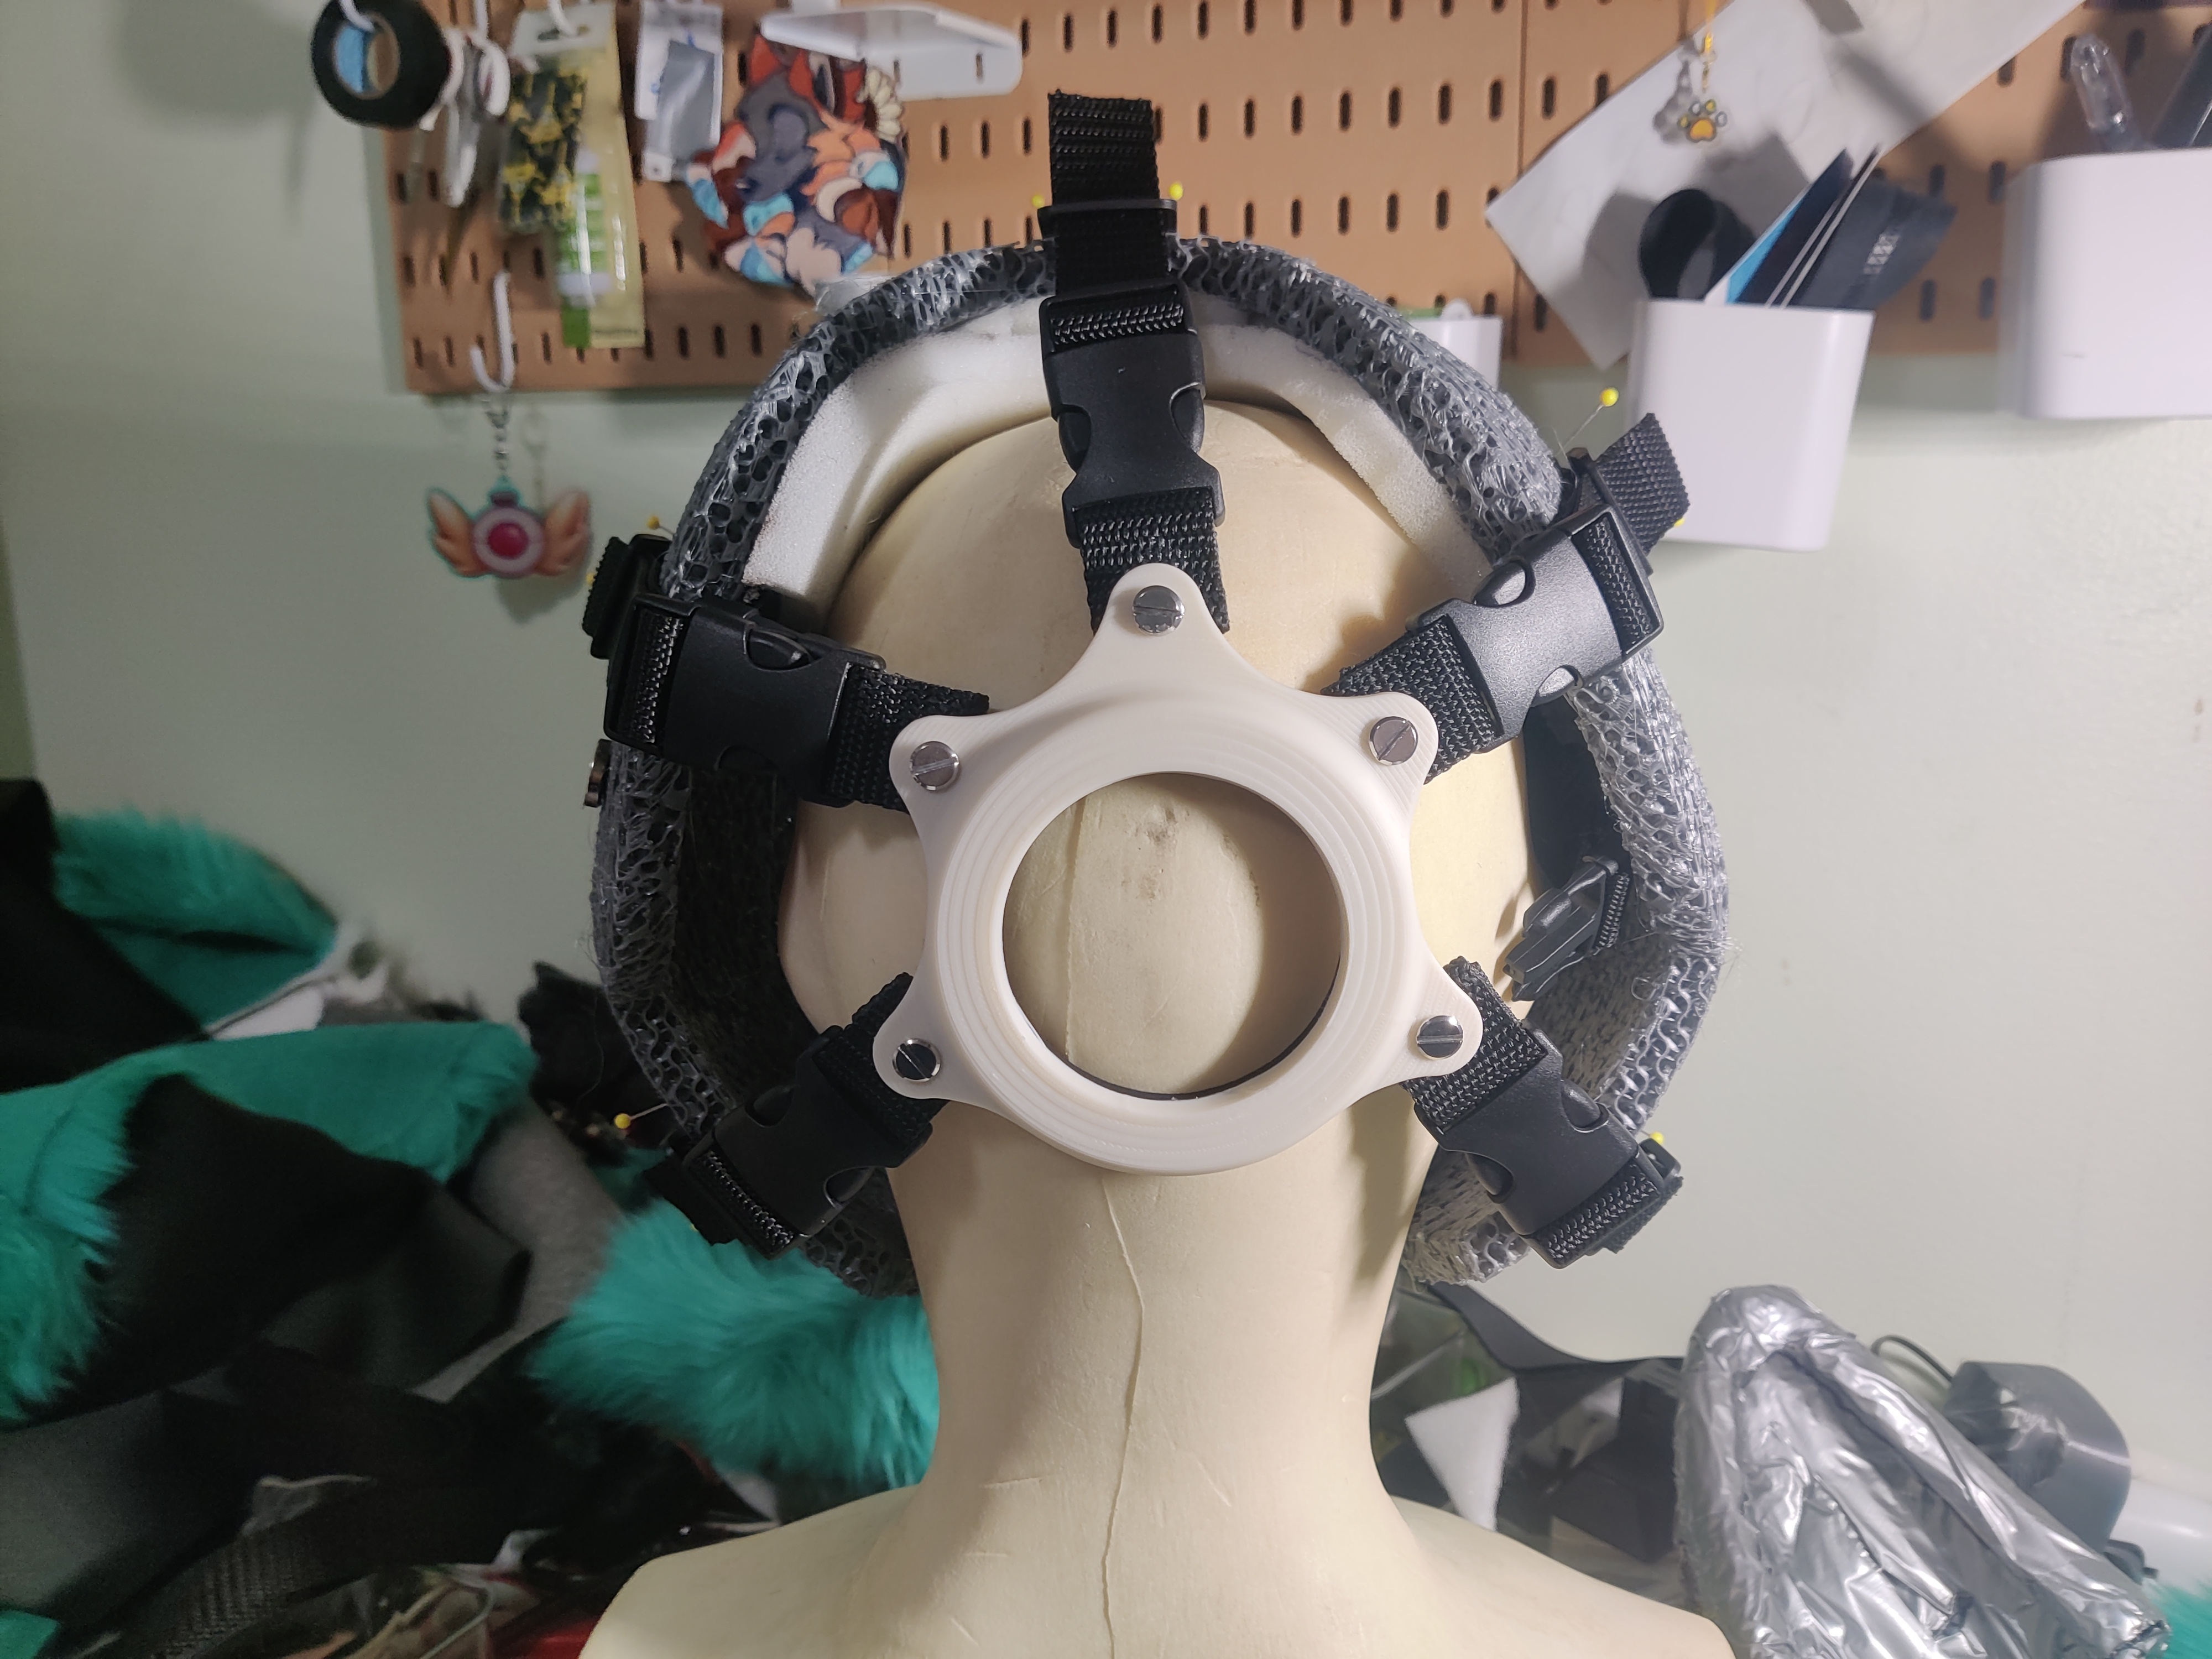
Within the same day of completing the harness mount, I managed to rush out a full duct tape wrap, including the back and neck, cut all the tape out, scan it, prep it, and laser cut it. Whew! (Again, this was kind of not worth it. At least there were fewer pieces this time and smaller ones to boot; only 3 beds.)
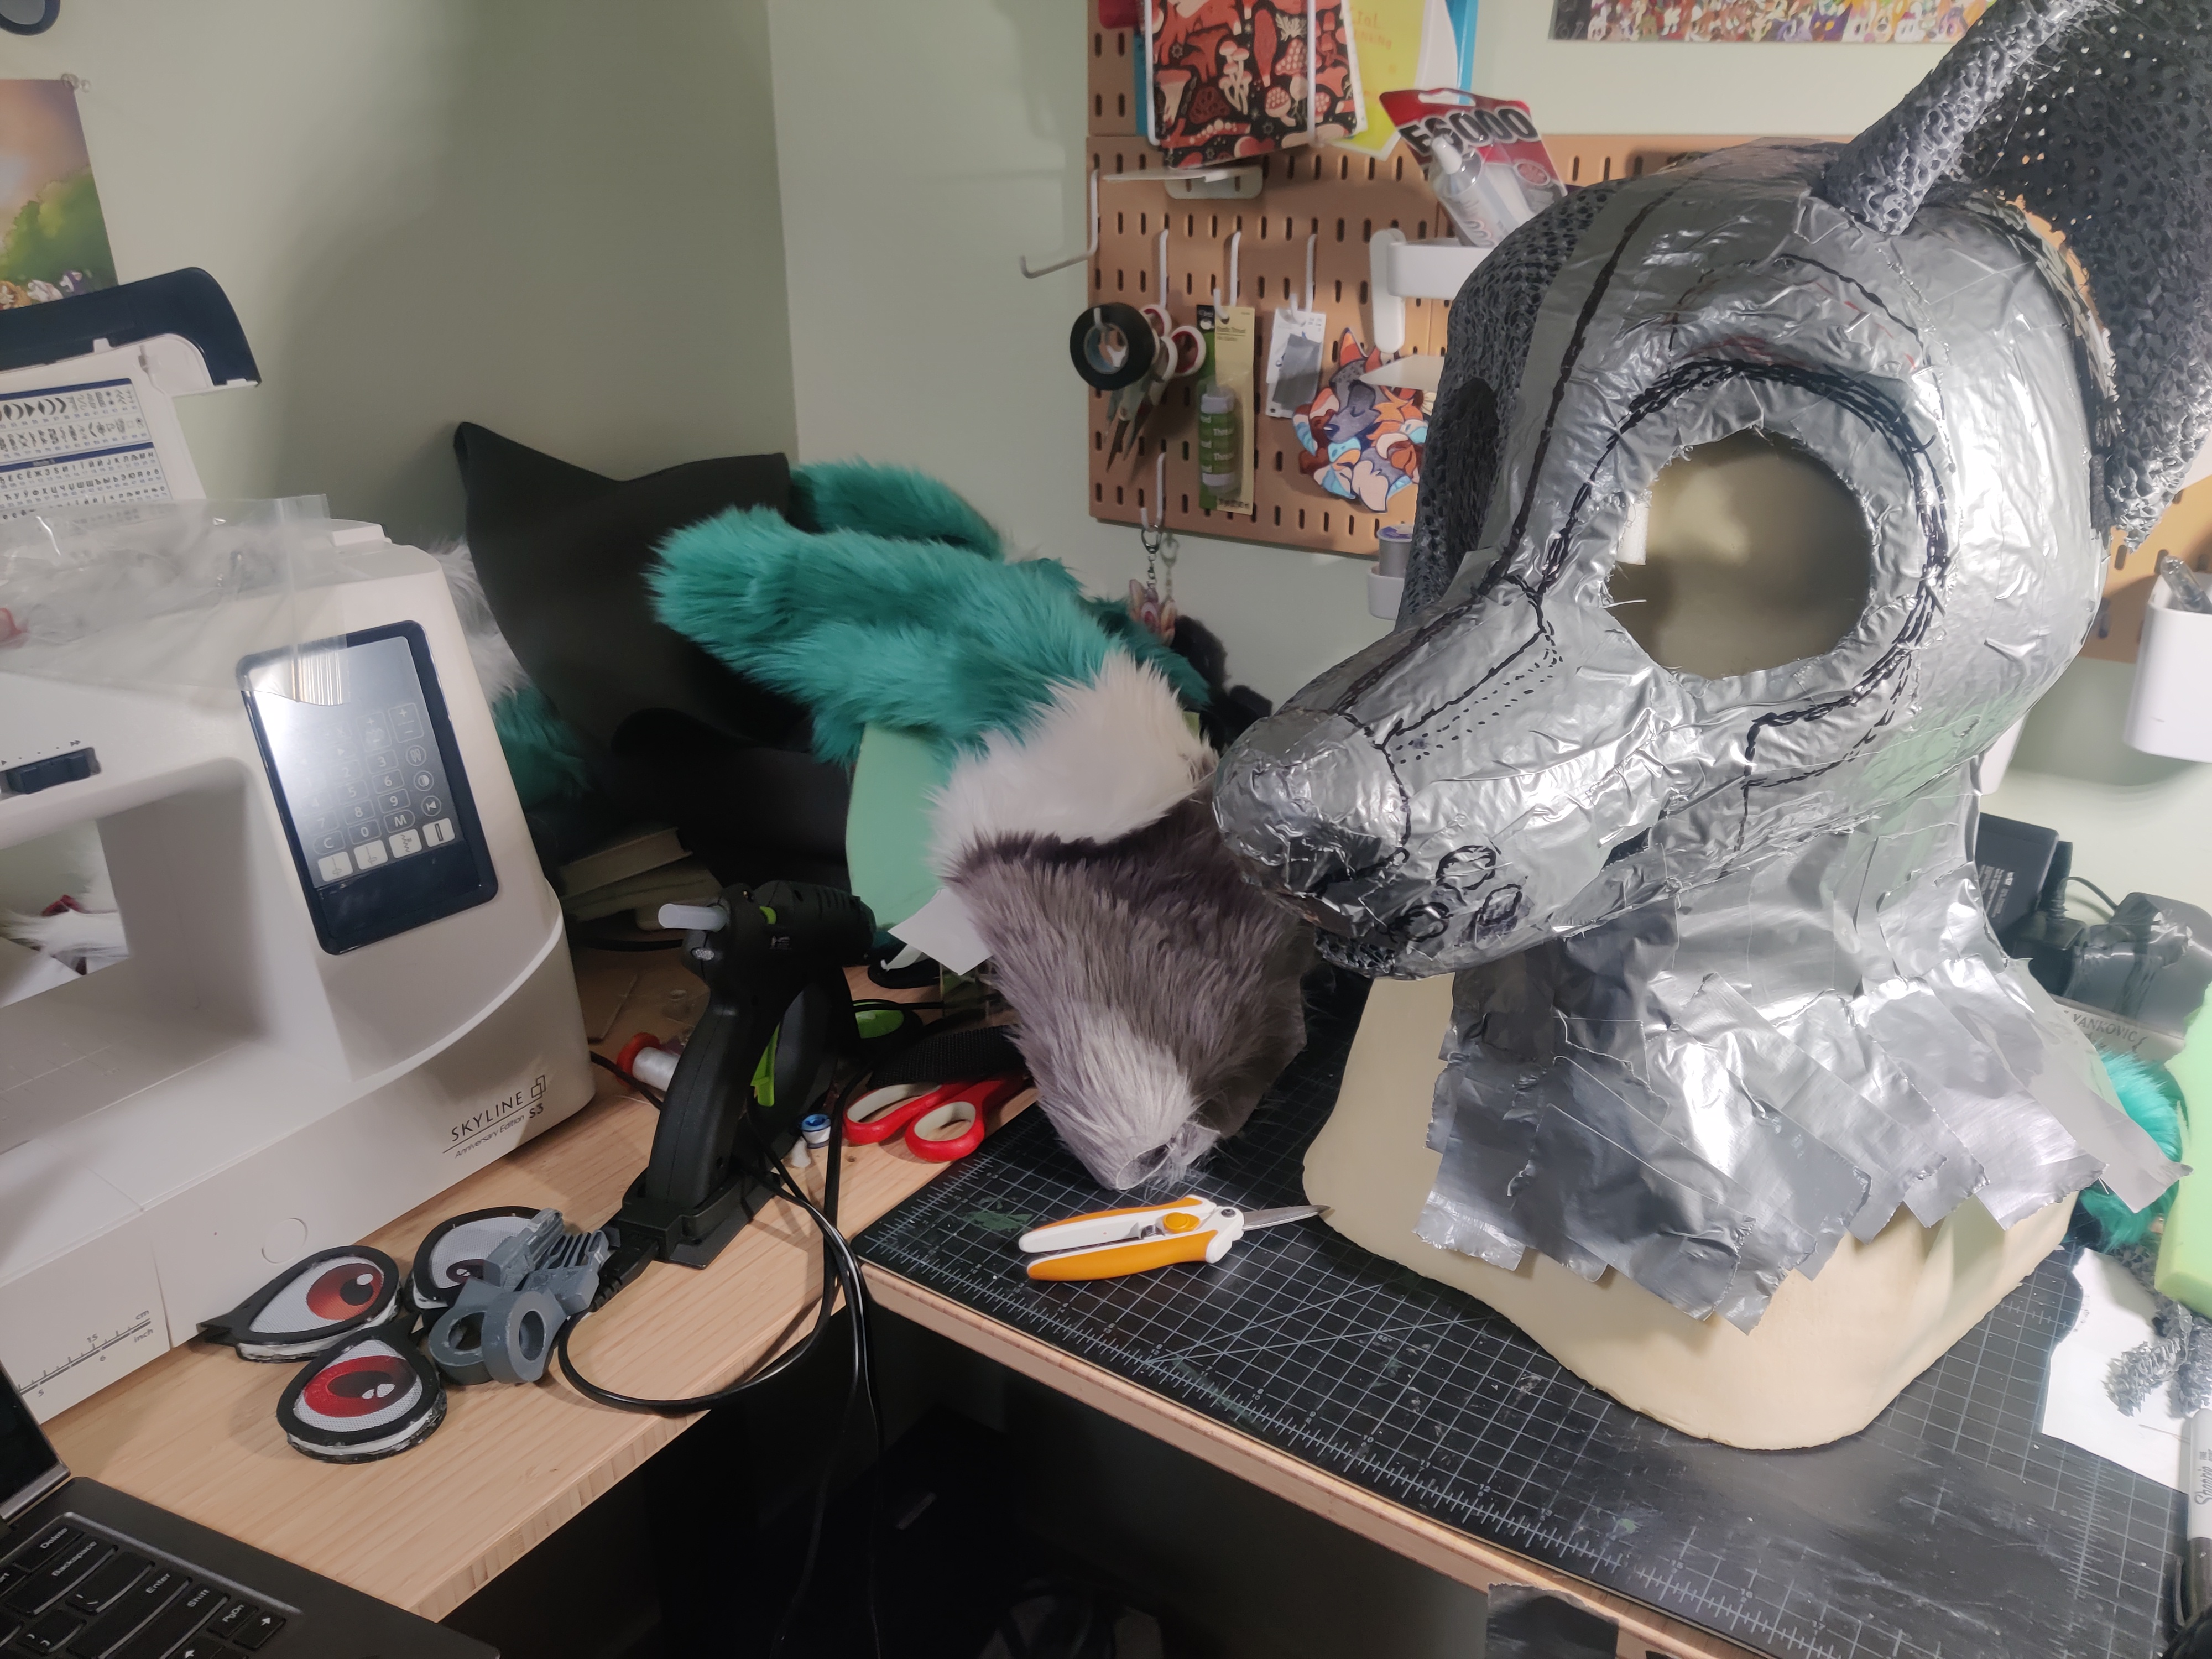
And that's where the project is at! I think I'm going to say 50% is optimistic, and a pessimistic outlook is closer to 40%-- very few seams are sewn, there's a great deal of tedious manual work to do, and I've barely started on the feet, which include by far my least favorite part of this entire process. But, 95% of fur cutting is complete (I have a small handful of pieces I'm just going to quickly hand cut left), all physical components are manufactured, and generally speaking the suit is really starting to take shape!! Just LOOK at it. It's giving me some extreme emotion seeing it even now:
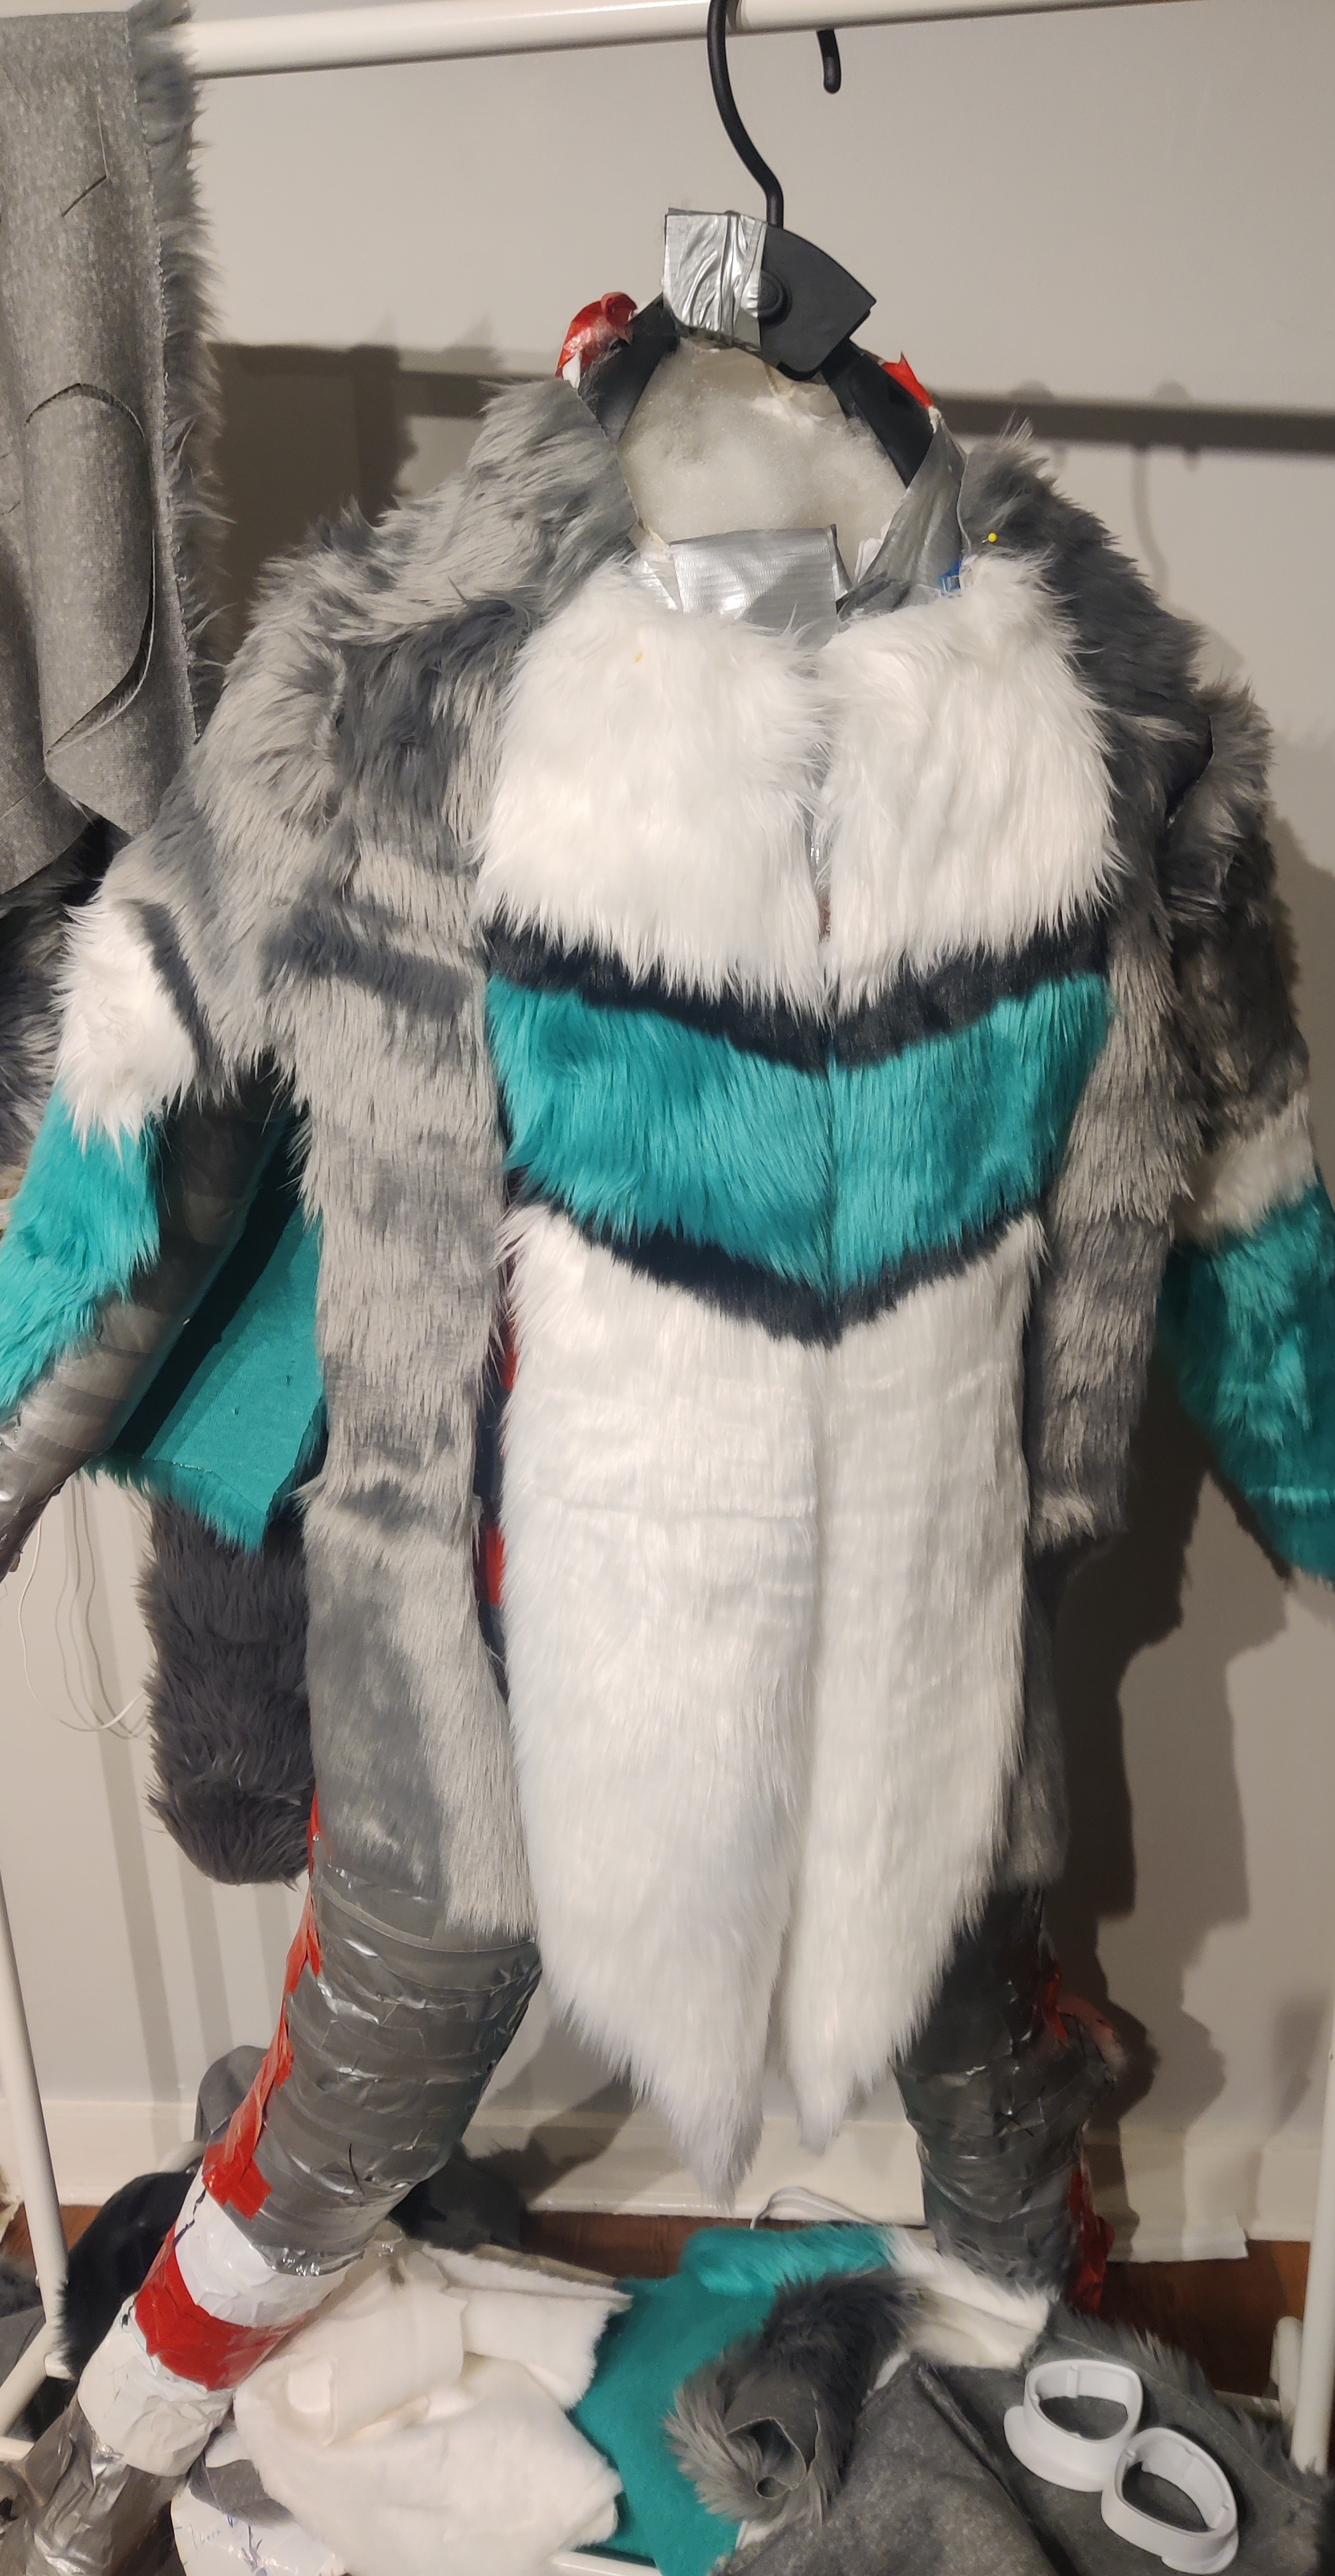
OK, that was incredibly cathartic. I miss long form writing SO BADLY. However, it took 2 days, and I am really paying the price for my enjoyment; my damaged muscles are NOT happy with me even with typing only half of this and short-form dictating the other half. So, future entries in this post will be shorter form, quickly updating what I did the previous day, using the state-of-the-art "Hum" speech-to-text model from Talon Voice with no corrections. The model just came out like a month ago so I'm excited to put it through its paces!
[hr][/hr]
This is Lima.
After nearly 5 years in the furry fandom and 3 fursuits, Lima finally solidified as my fursona early this year, after I had just about given up hope of ever completing him. I have settled into the identity, and in fact the previous sentence is somewhat off-putting-- because it's speaking in the third person! I am Lima.
I have made build logs or writeups for every fursuit I've made. The last one, Koromaru, the Shiba Inu from Persona 3, was posted to the Furry Corner forum here https://furrycorner.boards.net/thread/931/koromaru. (For personal reasons, the build log was never finished and will not be finished.
) I believed that that forum had gone defunct as it went through a major outage earlier this year, but it turns out that that was temporary, and it's back now! Nonetheless, I intend to cross post this thread in two places in order to maximize its chances of survival; here and https://crittertime.fun, which is a neat little semi-active furry forum.I have long delayed starting this build log mostly due to severe physical health issues which dramatically limit my ability to use a computer. While building Koromaru I frequently complained in my build log of carpal tunnel, which is an interesting real-time progress of my decline; it turns out that I was misdiagnosed and mistreated, and I have a rare health condition that basically shredded all the muscles in my arms that I need to work a keyboard and mouse. After over a year of physical therapy, some highly specialized and expensive input devices, and lots of use of voice control, I've grown able to use a computer enough to basically get through my work week and nothing else. SO, while I am indulging myself and typing this first entry, further entries will be restricted to solely using voice control with zero corrections so it remains practical to keep this log up. (I've also written some small voice control automation to simplify the process of appending images. Talon Voice is wonderful. https://talonvoice.com/)
Let's get started!
[hr][/hr]
The project is roughly 50% complete at the time of writing. It began early August, when I placed some orders of fur. My intended completion date for this project is New Years Eve. 9.5 weeks remain.
The first and by far biggest hiccup of the project started the moment I received the fur.
The fur was completely different from the swatch sample I had used to judge the order! This was unusable; the swatch was on the edge of what I considered acceptable, and this was far outside of it. It turns out Howl Fabrics has basically given up on quality control and just resupplies colors to "something that looks vaguely right".
I could not start the project until this was resolved. Sadly, and surprisingly, despite our three fur suppliers in the united states, we do not have anyone that makes decent greys.
The solution was to place an order for a swatch card from Miemiefurs, a Chinese fur manufacturer, and pay an outrageous amount of shipping to have the cards shipped to me. I believe the swatches cost $80 total. From there, I picked out a lovely grey, and placed an order for multiple lengths of it, and with a total turnaround time of a month (2 weeks cards + 2 weeks fur) I was ready to begin! This was both an outrageously long delay and a remarkable testament to the state of global shipping; a world away and it only took 14 days to travel to my doorstep.
With it being late September now, I started in earnest. (It's been a month since I started, with the order arriving September 23, and today being October 26.) Lima got a slight redesign to manage his white extremities; having built and worn white hand/feetpaws for the last year, I can confidently say that I no longer wish to do that. Keeping them clean is nearly impossible.
I started by redesigning my feet paw 3D model to be plantigrade instead of digigrade. Because I am not the original author of this model and therefore didn't keep the typical stages of progress I usually do, this wound up being a total pain in the ass, and took something ridiculous like 5 hours because I had to basically hack the model into being in a sanely editable state and then re-hack my changes back. I'm sure if I were an expert in topology I could figure that out fast, but I did it completely in Nomad Sculpt.
Next was patterning the feet paws. Technically, I didn't actually need the gray fur to do this, but I did need to acquire some charcoal fur, which a friend had a small amount left over of.
I have a tendency to go nuts and come up with wildly new and innovative ways of doing the most basic tasks. I have been trying to manage this urge, with moderate amounts of success; I set out to have the three following major innovations, and keep everything else to established techniques that I already know how to do:
- Laser cut fur at scale
- Feet paw escapes for shoelaces (To be covered in a later post)
- Embroidery machine
I had already made successful attempts at laser cutting fur earlier this year. It's actually not that hard if you know what to do; what you have to do is basically do a binary search with two parameters, speed and power, to determine the exact right amount of energy to deliver to cut JUST THE BACKING, but not damage the fur itself. I had a nice profile saved which I recalled and cut my pieces with. Actually getting the pieces ready is a somewhat tedious process of cutting the duct tape, scanning the pieces on a flat bed scanner, tracing them by hand in a vector processing software, adding seam allowance, and lining them all up to fit together nicely.
Unfortunately, I am a complete dumbass, and even recorded a video showcasing myself cutting almost all the charcoal fur I have left. With the wrong fur direction. Yep, every piece was ruined. Unless I want to be Bizarro Lima. At least it's fun to watch. (You can hear a peer mistakenly stating a notable exclamation at the end... ) https://art.morbinti.me/lima_build_log/ ... utting.mp4
At the time of writing Big Z Fabric is out of charcoal fur. So... Not really sure what I'm going to do about that right now.
There was a picture of Ollie in my photo reel. In the interest of maximum whimsy, I am posting it here. Meet Ollie, my geriatric 11 year old rabbit. Ollie is a good bun and loves eating grass and cuddling.
Next, embroidery. Running on fumes with miniscule amounts of scrap charcoal fur remaining, this was pretty stressful when trying to learn a new technique-- but I got there!
The objective was to perform appliqué, the process by which paw pads are attached to fur. Basically what you're trying to do is sew a fabric right on top of another fabric, then cut away the edges, so that you have an overlay. I ordered some mochi minky for this.
When using an embroidery machine, this is a two-stage process. Step one is to lay down the fabric within the hoop, with tear-away interfacing on both the bottom and top to prevent the minky, which loves to go everywhere except where you want, from slipping. Then, you command the machine to sew a simple straight stitch on the desired regions.
Notably, commanding the machine IS REALLY EASY WHEN YOU HAVE A COMPUTER PAW PATTERN! You can just extract the vector curves from a .PDF file, and basically dump them straight into the embroidery software. I don't have a picture of this at the moment but I will update this post with one later.
VERY CAREFULLY cut away the minky around the edge...
Then run it over a second time with a satin stitch in the exact same place for a nice smooth edge.
A nice trick I picked up is what I am calling "the scrap trick". Embroidery machines rely on tensioning the fabric with a hoop that snugly encloses it on all edges. However, this is pretty wasteful in this case, when you're not using the full build volume of the hoop (and ESPECIALLY when you're running critically short on material. Seriously, I have like 6 square inches left.) To work around this, just quickly use a crummy stitch to attach some extra scrap to the edges for the hoop to catch.
And with this my hand paws were fully cut!
[hr][/hr]
Next up was laser cutting the bodysuit fur. Now, the duct tape dummy part of this was easy; a few years back, I had been voluntold to be the victim of a duct tape dummy making panel at a convention. In exchange for a free duct tape dummy, I became the target of public mockery for 65 minutes while being wrapped in duct tape in order to explain to onlookers how a good DTD is made.
Patterning and cutting the dummy out was easy, but how would I prepare the pieces to be laser cut? This is where I state an opinion I've decided on after going through this--
I don't think laser cutting fur is worth it. The process of preparing physical duct tape pieces to be laser cut is extremely time consuming, outstripping any time savings you get from having a machine perform the physical cut.
For bodysuit pieces, the first problem is having the piece scanned. With pieces as large as 28x16", how will you fit that under a typical flatbed scanner on a printer? You can't, and stitching together various partial scans will be miserable. Fortunately I managed to escape this problem thanks to local libraries oversized 24x18" scanner, forcing me to only cut one single piece, this panel on the back, in two--
Then came the prep work. I had 23 unique pieces (x2 = 46 for both sides), not including spots. (Aside-- a friend is autistic in all the best ways, including a bizarre enjoyment of hand sewing, and offered to hand sew as much of the suit as I wanted. Thus, I also had 13x2 spots to cut. I don't understand them. ILU Emmet <3)
Every one of these pieces had to be hand-traced from the raster scan into a vector, rotated to match fur direction, have seam allowance added (including correcting for darts), aligned by fur color and length, copied with a mirror for the other side, and arranged so that everything fit into the 32x20" laser bed. THIS ALONE TOOK 4 HOURS.
Finally, I had to cut 12 pieces for every bed, matching up with the size that was actually consumed (for instance, bed 5 was roughly 28"x10", so I cut that much), aligned that piece under the laser, double checked dimensions, double checked seam allowance, double checked fur direction (in a bid to avoid the failure of the feet) and finally performed the cut. 12 times over.
I genuinely think that I would have finished quicker just cutting it all by hand. BUT, in addition to this being just plain cool, there are some great upsides to this approach- perfect complex geometry.
If you look at artboard 12 above, you can see the extremely complicated flame symbol that is tattooed on my back. It runs right down the middle, so I patterned a plain half-circle, mirrored it, and merged them right on top of each other. Then, the awesome thing is, since my ref sheet artist did the art in Inkscape, I just copy/pasted the art right into the pattern!! Zero effort involved on my part to draw an extremely complex piece and have it cut to perfection. I think laser cutting can really shine when you use it sparingly for difficult and complex patterns like this! Same with the 26 spots I drew, which are all 100% perfect circles that would be absolutely miserable to cut by hand but were trivial with this approach.
The head base was incredibly infuriating to make. Although I consider myself fairly skilled at nomad sculpt at this point, making myself proved to be an endeavour that nearly broke me. Every last detail had to be considered and reconsidered and reconsidered again, not to mention that I struggled with the shapes in the first place. It probably took a week to make this, and I definitely spent a full day just considering the final details before sending it off to the 3D printer.
But just watch it finish the print!! Watching 3D printers go is hypnotizing. This one took 25 hours, as I recall.
https://art.morbinti.me/lima_build_log/ ... nished.mp4
I implemented the magnetic changeable eye system for this head base; sadly it's an imperfect process and the ones I printed are crap. I need to go back and revise them. The way I do this is pretty half baked and I'm pretty sure there's a much much better way to approach the problem.
Prepping it for wearing was also miserable. I totally failed to consult my own previous build log for how to install 5 point head harnesses, and wound up having to reinvent the installation technique from scratch... Managed to get there in the end though... Currently there's a 1/2" foam padding piece in there, which I am thinking of replacing with a full 1" sheet.
Over the course of the last year, I had VERY SLOWLY re-created the proprietary 5-point harness used in previous projects with my own inhouse design. Much more to come on that when I write a full blog article on it!
Within the same day of completing the harness mount, I managed to rush out a full duct tape wrap, including the back and neck, cut all the tape out, scan it, prep it, and laser cut it. Whew! (Again, this was kind of not worth it. At least there were fewer pieces this time and smaller ones to boot; only 3 beds.)
And that's where the project is at! I think I'm going to say 50% is optimistic, and a pessimistic outlook is closer to 40%-- very few seams are sewn, there's a great deal of tedious manual work to do, and I've barely started on the feet, which include by far my least favorite part of this entire process. But, 95% of fur cutting is complete (I have a small handful of pieces I'm just going to quickly hand cut left), all physical components are manufactured, and generally speaking the suit is really starting to take shape!! Just LOOK at it. It's giving me some extreme emotion seeing it even now:
OK, that was incredibly cathartic. I miss long form writing SO BADLY. However, it took 2 days, and I am really paying the price for my enjoyment; my damaged muscles are NOT happy with me even with typing only half of this and short-form dictating the other half. So, future entries in this post will be shorter form, quickly updating what I did the previous day, using the state-of-the-art "Hum" speech-to-text model from Talon Voice with no corrections. The model just came out like a month ago so I'm excited to put it through its paces!