How to 3D Model a Headbase
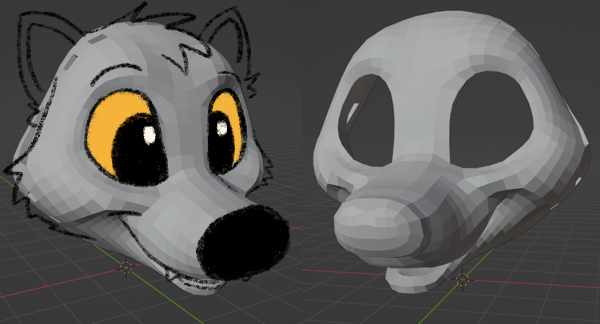
3D modeling is my go-to method for creating headbase shapes. It's easy to modify, forgiving, and flexible. Everything is perfectly symmetrical when created correctly. I also love working with computers and technology!
Sculpting a headbase when you have a limited artistic background can be daunting. This guide aims to break down the process, specifically the artistic process, into manageable bite-sized pieces.
I highly recommend using a combination of Nomad Sculpt, Cozyblanket, and Blender for creating headbases. However it is entirely possible to create a headbase completely in Blender if you don't have an iPad. If you do decide to sculpt in Blender, I recommend picking up a drawing tablet if you don't have one already. They can be found on Ebay for under $20 USD (no need for one with a screen!).
The models I create (in their various stages) are available for FREE for personal/educational use on my Gumroad!
Table of Contents
- What is 3D?
- Planning
- Nomad Sculpt Overview
- Blender Overview
- Sculpting the Base
- Retopology
- Preparation
- Exporting
- Printing Options
What is 3D?
A 3D model is a bunch of connected points in 3D space. Your computer sees these points and fills in the gaps between them with polygons. These points don't have mass or size, they represent specific points in space. Therefore, whenever you are scaling a model, you aren't changing the size of the points, merely changing the distance between them.I will be walking you through how to sculpt in 3D, and then translate that sculpt into a printer-friendly wearable model. Sculpting in 3D is working with a very high-res 3D model with lots of polygons. This is to get the desired shape of the base! The sculpt will then be retopologized to make it both easier for a printer to read and also wearable, and will have holes for both ventilation and head straps.
Planning
In my planning stage, I ask myself how I want this character to be portrayed. This is done both explicitly (if they're happy, they might be smiling) and implicitly (if they're innocent and cutesy, they might look rounder)I wanted to model a happy raccoon for this tutorial! I didn't have an established character in mind, so through my brainstorming and planning I experimented with lots of different shapes and feels. When doing your own brainstorming, it may help to take inspiration from other media or other fursuits. Do you want to lean into the stereotypes of your species (for example, foxes are often portrayed as sly or cunning)?
Look at photos of your real-life animal. If you are doing a fantasy creature such as a dragon, look up some of your favorite interpretations. If you are a hybrid, look up photos of all your species and figure out which traits you'd like to include from each species (fox/wolves, for example, could take the broader snout and nose of the wolf, and the fluffier cheeks of the fox. Or find a middle ground between both species. Up to you!).
Some things to think about while brainstorming:
- How long should the snout be?
- How wide should the snout be?
- Should the muzzle curve to form an upside down v shape near the nose, or remain flat?
- How big is the nose? What shape is it?
- How far up and how wide does the smile go? Does it get really close to the eyes for an exaggerated look, or does it stay within the cheeks?
- How wide or narrow is the entire head?
- Are the cheeks subdued or wide?
- How big are the eyes? What shape are they? Are they round on the bottom, or more flat? Are the corners sharp or round?
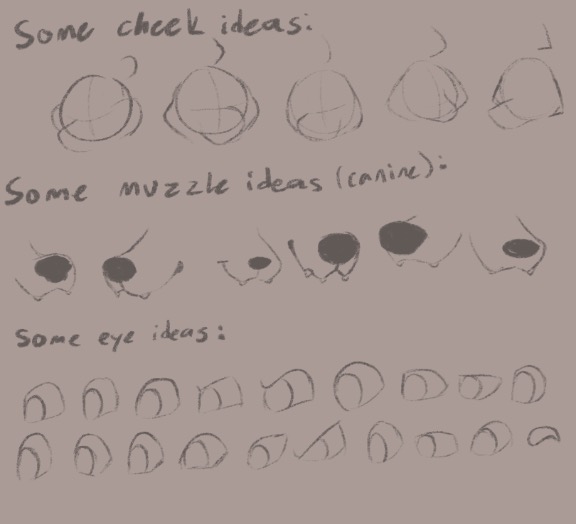
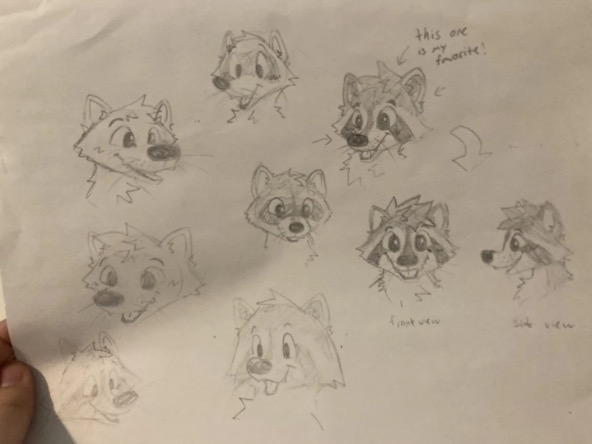
These are my sketches! I experimented a lot with what style I wanted. Eventually I found something I was really happy with, and expanded the idea with a front and side view. While sketching, I took inspiration from a lot of Disney's interpretations of raccoons and other raccoon fursuits, while also making sure to reference real photos of raccoons. You can use cartoons, furry art, VRChat models, existing fursuits, or other pieces of media to use as inspiration.
With my finished idea, I have a raccoon with a short-ish snout, a somewhat wide muzzle, a flat curve near the nose, a big rectangular nose, a BIG smile that almost reaches the eyes, a wide rhombus-shaped head, big fluffy cheeks, and big happy eyes with sharp-ish corners that are more strongly curved on the top than the bottom. He looks very friendly and approachable. Perhaps slightly mischievous.
My choices were very intuitive for the raccoon. If you struggle to think intuitively for choices like these, it may help to anchor it to a reason. Here's an example list:
(I answered these questions with a strong, confident, and masculine husky in mind.)
How long should the snout be?
Studying shape language, or the idea of shapes representing character traits, may also help with your choices. I had it in mind when answering these questions. I chose a lot of rectangular shapes because rectangles are seen as a strong and sturdy shape.
Side-example over, let's learn how to use Nomad Sculpt!
Nomad Sculpt Overview
Nomad Sculpt is my favorite app to use for sculpting. It is a one time purchase of $20 USD for mobile devices. It's what I'll be using for the raccoon!Nomad Sculpt has a lot of tools and features, but we'll only be using a few of them.
If you already know how to use Nomad Sculpt, you can jump immediately into the the Blender overview or modeling the headbase.
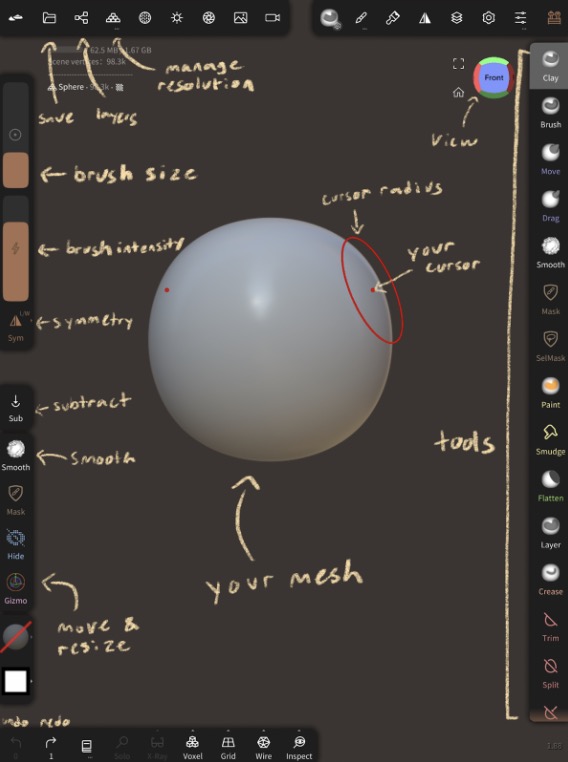
I've annotated my most-utilized features of Nomad Sculpt's user interface. This app is very fleshed out and a lot of parts I've never even touched!
Here are demos of some of the tools I commonly use:
The clay brush can either add or subtract to your mesh. It is square shaped. This is my favorite brush.
The brush tool is a circular and smoother version of the clay tool.
Move and drag pull on your mesh. Drag is more additive than move.
Smooth smoothes out variations in your mesh and makes it more level.
Paint allows you to select a color and paint your mesh. You can also "paint all" to make the entire mesh the same color.
Flatten makes curves in your mesh more flat.
Crease acts like dragging a stick through some sand. Like most of the other brushes, it can also be inverted.
Inflate makes your desired part of the mesh bigger.
Gizmo allows you to move, scale, and rotate your mesh. The orange circle scales it globally (meaning it will be scaled in all directions), and the black circle rotates it in any direction. I use the orange circle a lot, but rarely the black circle because it disturbs the symmetry. You can alternatively scale or rotate in only one direction/axis.
To add a mesh, open up the layers panel and select the mesh you would like. The mesh must be validated before you can sculpt on it. You can use the gizmo tool on the mesh before validating it.
Voxel remesh makes the geometry of your object a lot easier to work with, leading to more predictable sculpting if you do operations such as trimming.
You can join two meshes together within the layers panel. However, they must be remeshed before you are able to freely sculpt with them as if they are one object.
Subdivision takes each polygon in your mesh and breaks it up into smaller polygons. This adds more detail and information in your mesh.
Those are all the tools you need! Let's go over Blender!
Blender Overview
Blender is a completely free and open source program! I love Blender, I've been using it since 2016! If you don't have an iPad, Blender is a wonderful alternative.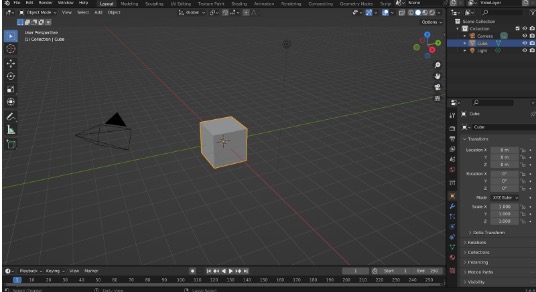
But WOW! There's a lot going on here! It can be confusing at first, but we can disregard a lot of Blender's features in the context of base sculpting, such as animation or textures.
Right-clicking any object (such as the default cube) brings up a context menu.
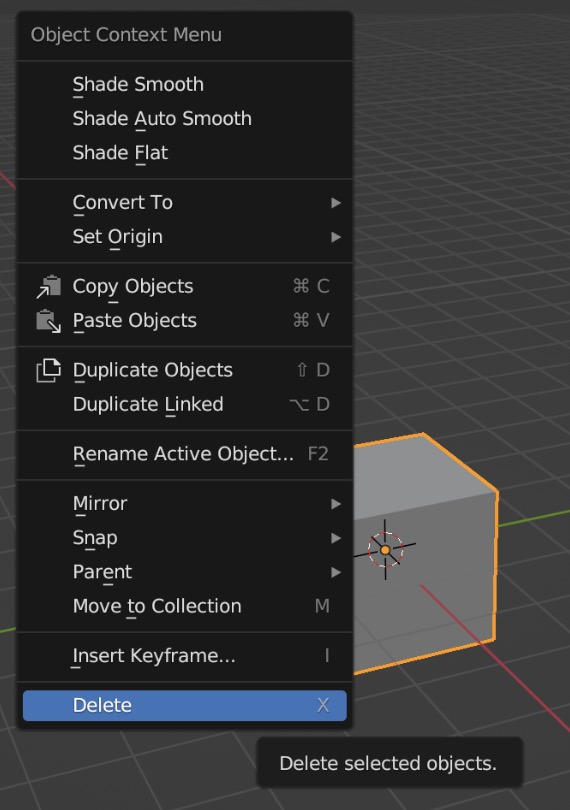
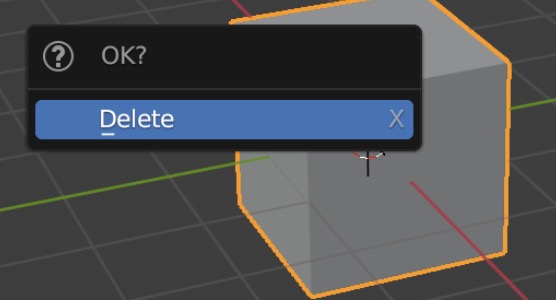
The key on the right-hand side is the shortcut for that action. So to delete this cube, I can left-click it to select it, right-click it to open this menu, and hit delete, or I can just left-click it and press X.
Objects can be renamed at any time by double clicking their current name in the top right corner.

Navigating around Blender is relatively straightforward, however in order to snap into a perfect front or side view and you don't have a number keypad, you will need to enable it in settings.
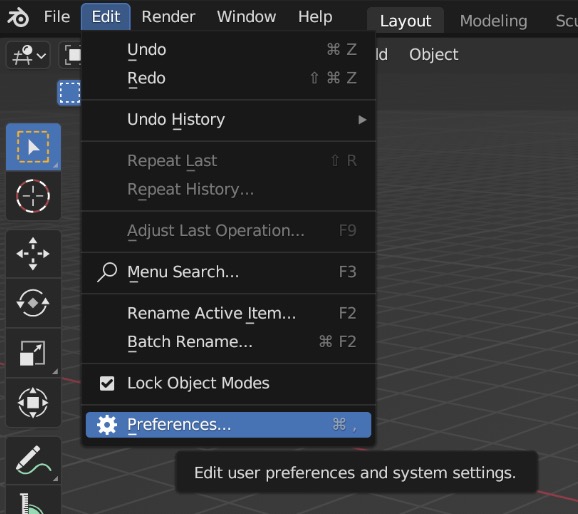
Go to Edit > Preferences.
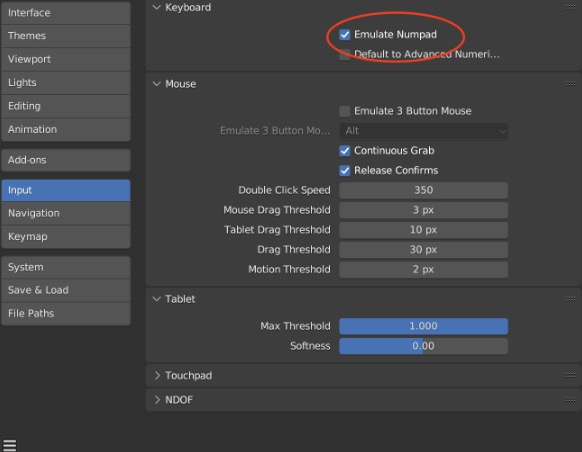
Enable "Emulate Numpad" under Input. Now, whenever you press a number, your view will snap to a certain angle. 1 is front-on, 3 is to the right, 7 is top-down, and 9 reverses the direction (for example, press 3 then 9 to get a left view). I rarely use the other numbers.
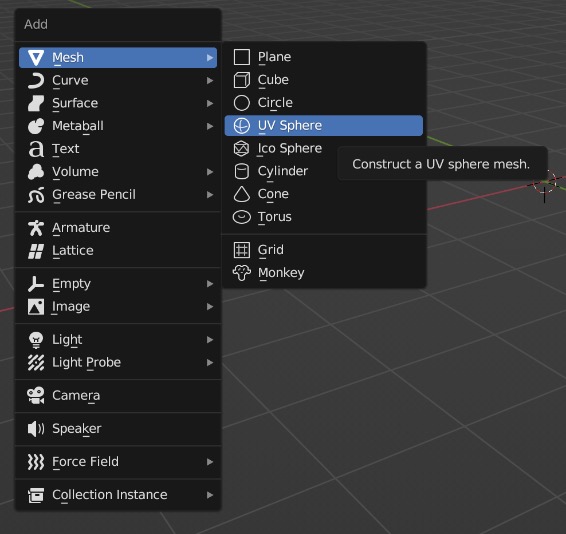
Add a mesh by either going to the top left corner ("Add" menu) or pressing the shift key and A. I added a UV Sphere.
Some useful shortcuts/tools: Pressing shift and D duplicates the object. S scales it. R rotates it. G moves it. While moving, rotating, or scaling an object, you can lock it to a specific X, Y, or Z axis by pressing the corresponding key.
If you hit tab, or click on "Object Mode" in the top left corner and click "Edit Mode", you can change all of the points, lines and faces on your mesh!
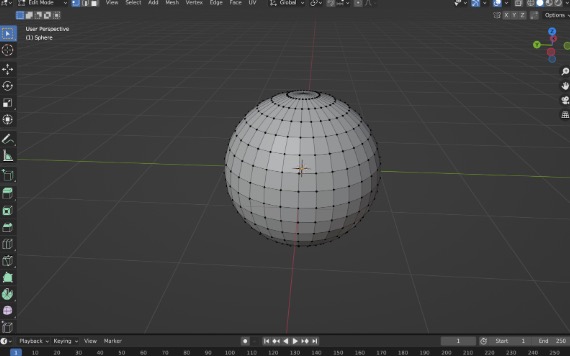
Once again, there is a lot going on here and you don't need most of it. Here's what I use with base making:
Loop cut: creates a line of new points between two existing lines of points.
Proportional editing: affects a radius of points/lines/faces, rather than just the selected one.
Smooth tool: "smooths out" the selected points/lines/faces, relative to the other ones selected.
Other shortcuts: A selects everything in the current mesh. M allows you to merge two points.
Go back to Object Mode by pressing tab again, or in the same menu used to get to Edit Mode.
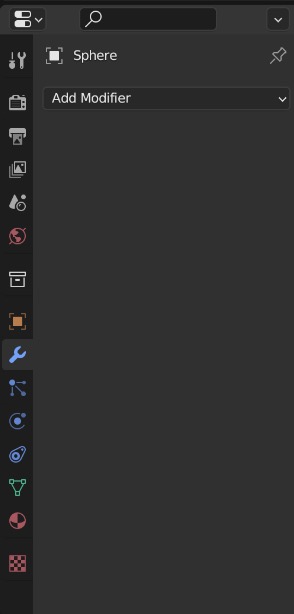
This menu with the wrench in the bottom right corner allows you to add modifiers!
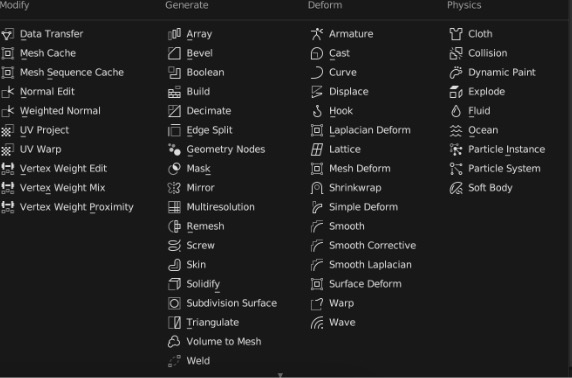
Once again, a TON of different modifiers that we really don't need!
Out of all of these, I only use Boolean, Mirror, Remesh, Solidify, and Subdivision Surface. Maybe shrinkwrap for Blender retopology.
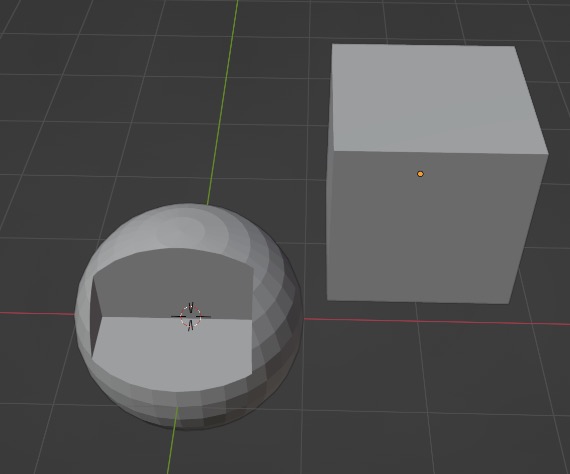
Boolean adds or subtracts a target object from the object the modifier was applied to.
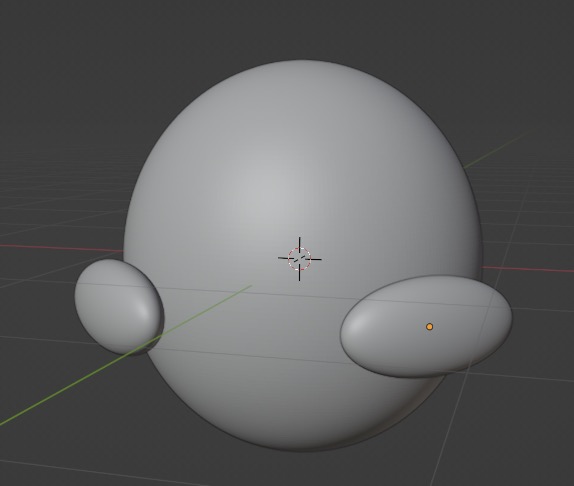
Mirror creates a mirrored copy of the object. The mirror axis is either the origin (orange dot) of the mirror object, or the origin of the object itself.
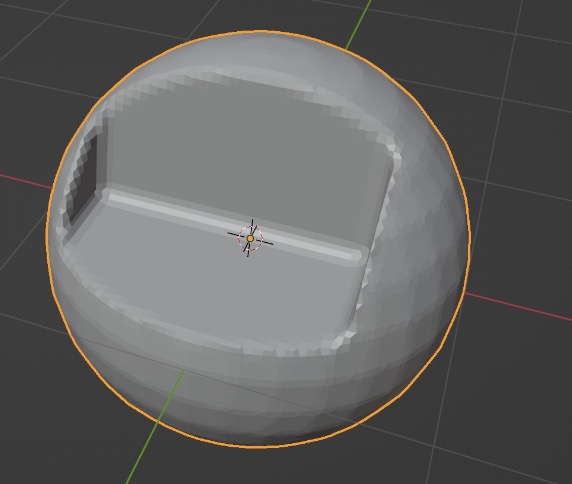
Remesh fixes a lot of the geometry issues caused by booleans or joining objects. This is because booleans/joining creates faces that may have more than four sides, which can cause issues. Remesh makes all the planes into four sides shapes. This comes in handy when sculpting.
Remesh is also accessible on the fly in sculpt mode.
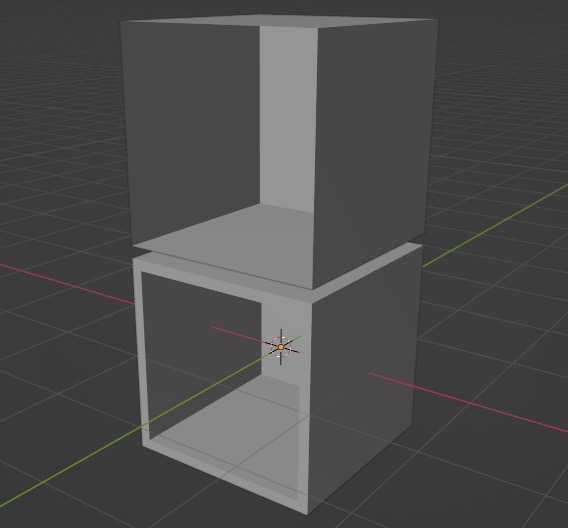
Solidify takes a shell (like the cube above) and gives it thickness (like the cube below).
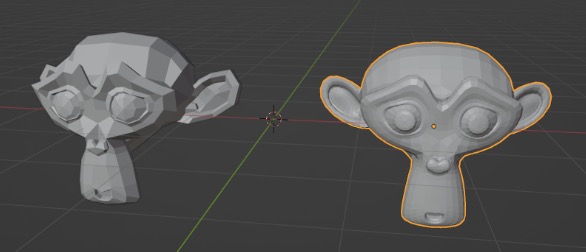
Subdivision surface smooths out the mesh by adding more points everywhere and smoothing them.
Blender provides lots of sculpting tools!
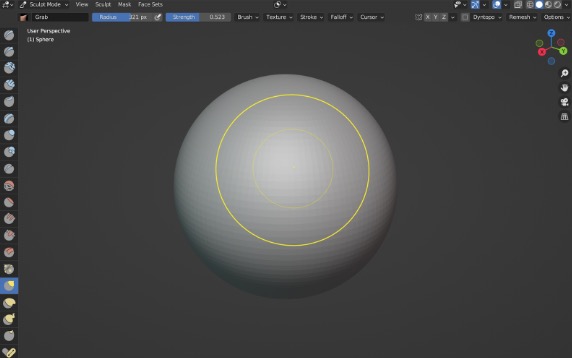
I am demonstrating on a UV sphere with a subdivision surface modifier set to level 2 applied. The thick yellow circle is the radius of your sculpting tool, and the smaller one is the strength.
The X/Y/Z next to the butterfly enables symmetry for the selected axis.
Many of the sculpting tools in Blender that you need are also found in Nomad Sculpt. The ones you will likely use the most are:
Draw, Draw Sharp, and Crease: adds or subtracts to your mesh with a smooth round brush. Crease is in between draw and draw sharp.
Clay and Clay Strips: similar to draw and draw sharp, but with a sharper cutoff at the edge of the radius. Clay strips is rectangular while clay is circular.
Layer: Like clay, but with a prominent plateau.
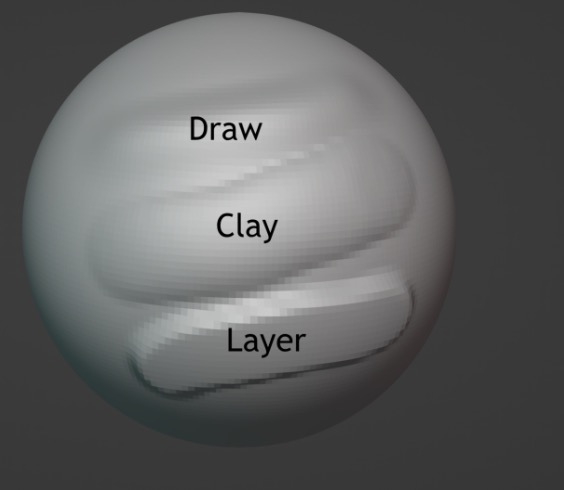
Inflate and Blob: expands the chosen area. Blob is more intense than inflate.
Smooth: one of the most important tools, smooths out an area. Can also be accessed by holding down shift.
Flatten: makes curves more flat.
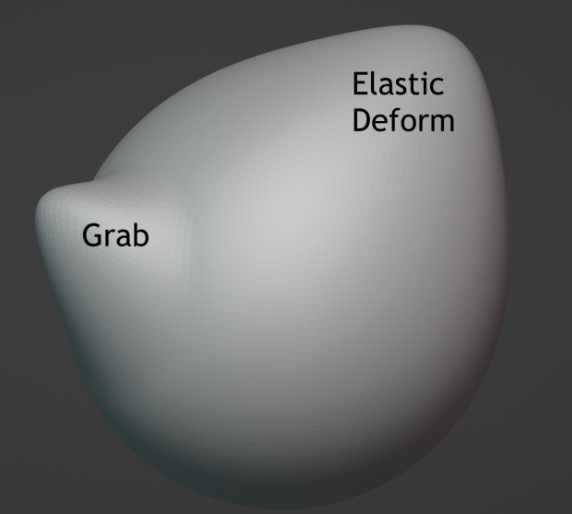
Grab and Elastic Deform: moves the portion of the mesh. Elastic deform is more absolute than the relative grab.
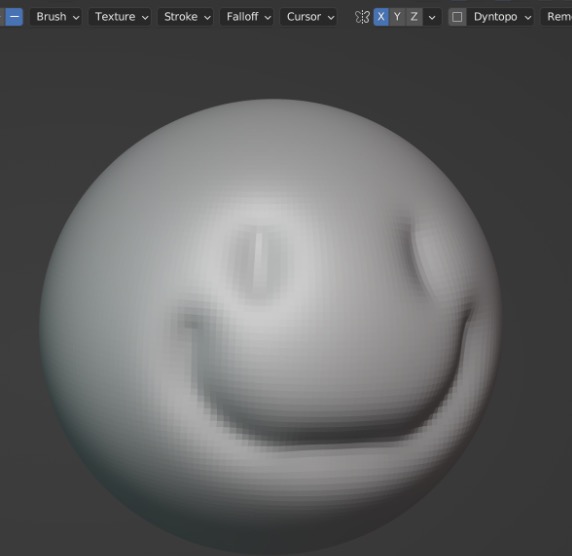
Dyntopo: A setting in the top right corner, between symmetry and remesh. Dyntopo stands for dynamic topology. It allows for a higher resolution mesh, only where you need it. Pictured below is the "relative detail" refine mode, which adds more resolution depending on how zoomed in you are. The left smiley face was done more zoomed out than the right smiley. I recommend playing with the different refine modes!
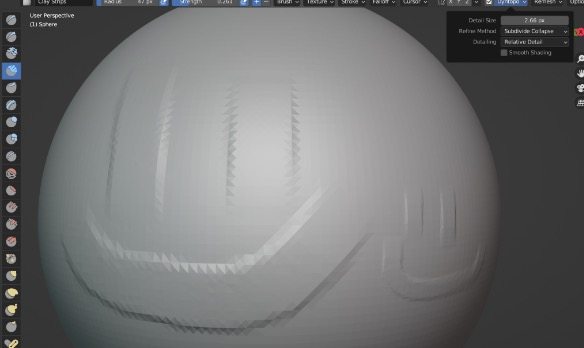
There are many other sculpting tools in Blender, but many of them do not apply to base sculpting. Feel free to experiment if you'd like!
Sculpting the Base
This part requires a lot of "trusting the process". Your sculpt might not look the best for a while. Don't give up on it, even if it doesn't look how you want it to for a while! I highly recommend sticking this part of the tutorial out until the end.Blender users should still read and follow this section of the tutorial, despite the Nomad Sculpt focus. All of the principles carry over. Skim it first to get an idea of the process, re-read the Blender Overview section, then follow along to this section closely.
Launch Nomad Sculpt and create a new project. Save it and give the file a name (I am using "tutorial raccoon"). Keep your planning sketches/notes handy, you will refer back to them often.
Open up the layers menu and add in a mannequin (NS refers to it as "head (mestela)").
For Blender users: EquinoxKitty has a wonderful mannequin 3D model for sale!
Do not resize the mannequin. Tap on the three dots and tap "rename". Rename the mannequin mesh to "mannequin" and the sphere to something along the lines of "base". We will be working with a ton of spheres here, so it is very important to keep the layers named uniquely in order to work smoothly!
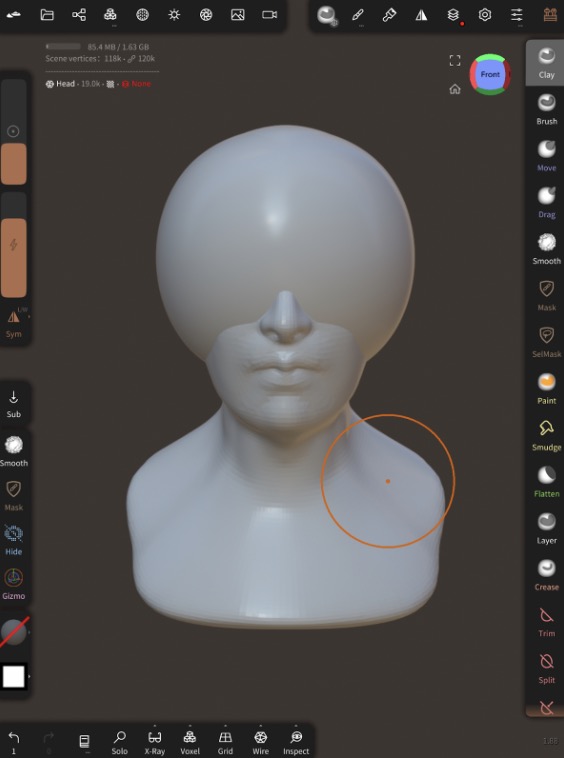
Resize the sphere to be roughly the desired size of your base. I recommend placing the sphere close to the front of your face, as this will result in better vision. You can get a "transparent view" of the sphere by tapping on the eye while the checkmark is enabled.
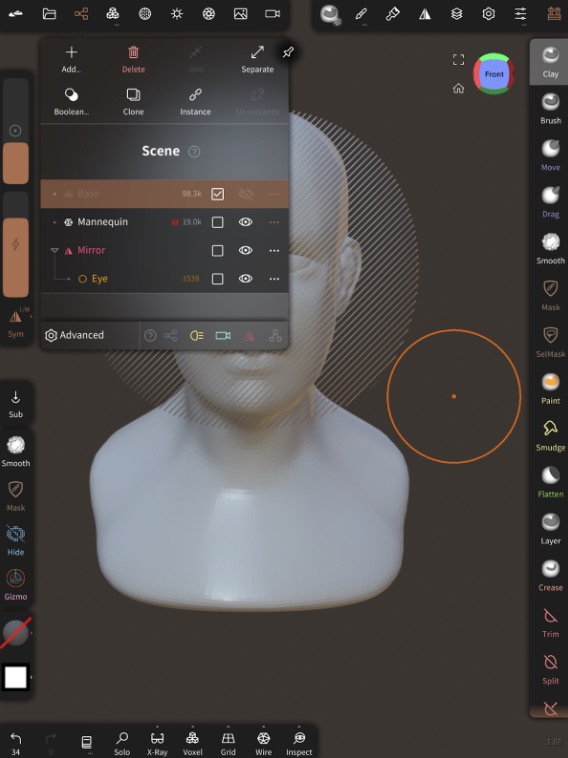
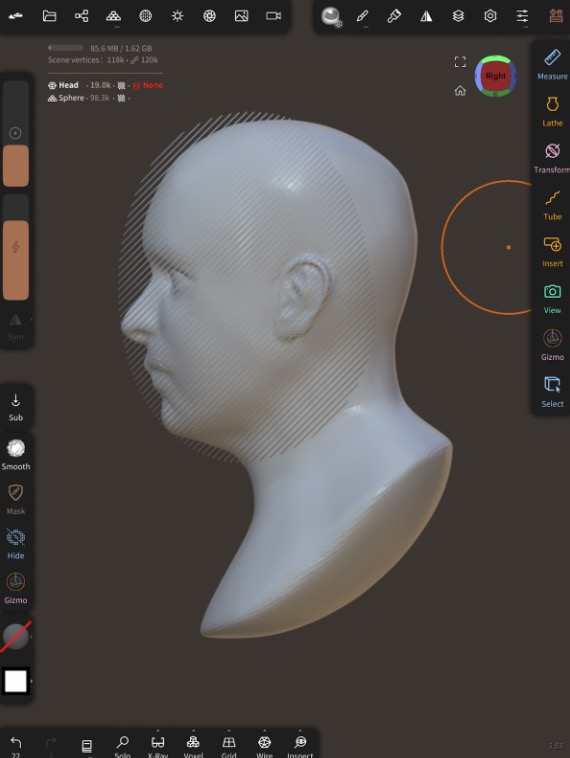
Don't worry too much about the back of the head. It will not be included in the final base model. Think of the model more like a mask than a helmet.
Next, we're going to add spheres to block out some primary facial features: the snout, chin, and cheeks. Eyebrows will come later!
This step mirrors what happens in many carved foam bases. With carved foam, blocks of foam for these facial features are added, then refined.
I start with the snout and base all my other features off it. Hit validate when done.
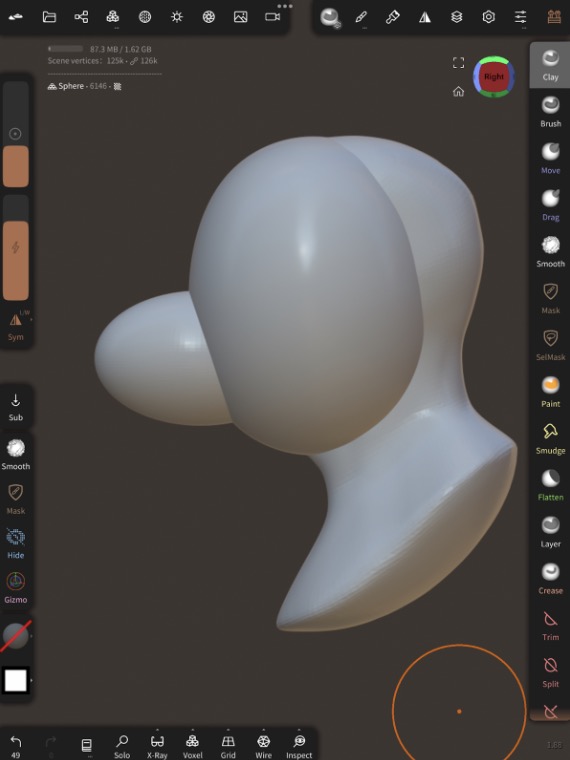
I made sure the curve on the top of the muzzle was still trending upwards, or at most becoming flat. If you've taken calculus before, you could say I stopped before the local maximum. I didn't really care about the bottom of the muzzle because I wanted it to curve like that anyways.
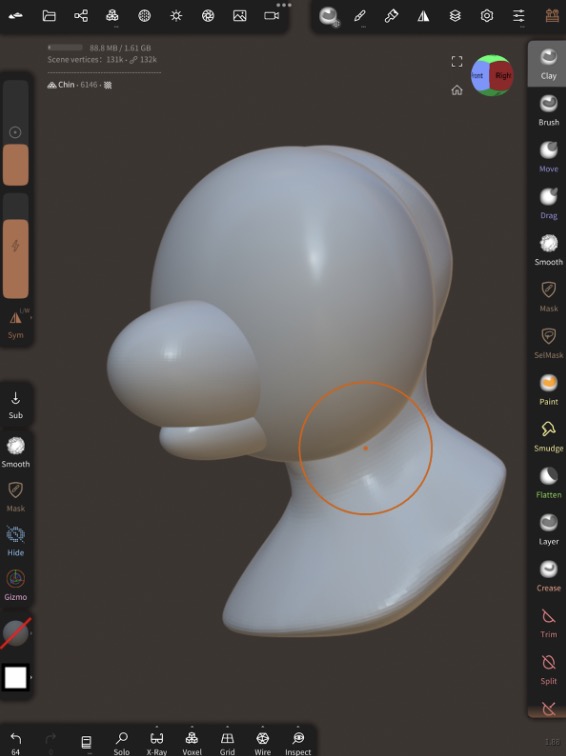
The chin got a similar treatment. I cloned the muzzle and resized/rotated/moved the duplicate instead of working from a brand new sphere.
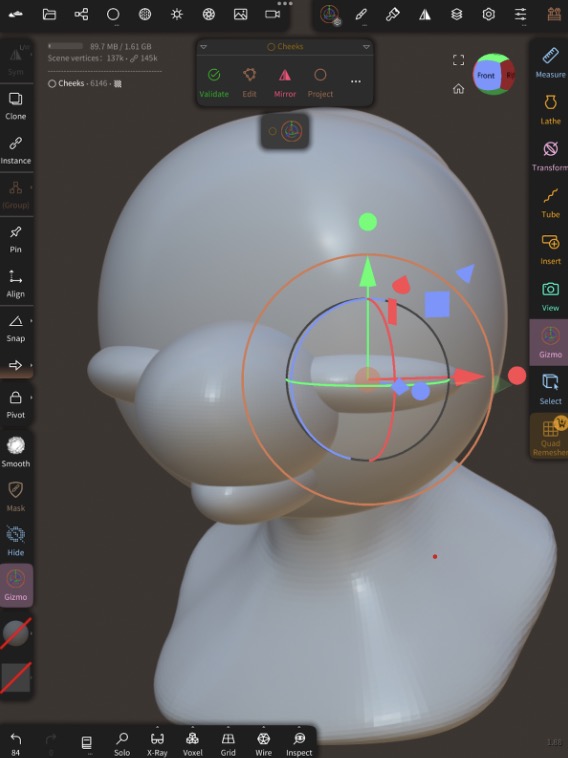
When blocking out the cheeks, make sure to hit the "mirror" button before hitting validate. I also rotated mine about 45 degrees to make it easier to move around. I know this doesn't look like a raccoon yet, but trust the process!
We're now going to refine these shapes, turning them from scaled and rotated spheres to actual facial features. During this process, I refer back to my planning sheet and reference photos. I'm going to start with the cheeks because they really don't look like cheeks yet.
I used a combination between the drag tool and the smooth tool. I'm still blocking out my general shapes here. I then moved onto the muzzle.
I did more adjustments after I stopped screen recording this segment, but the process is very similar to the cheeks. A lot of dragging!
The chin's biggest difference is the flattening. I adjusted the shape, then I used the flatten tool on the inside portion.
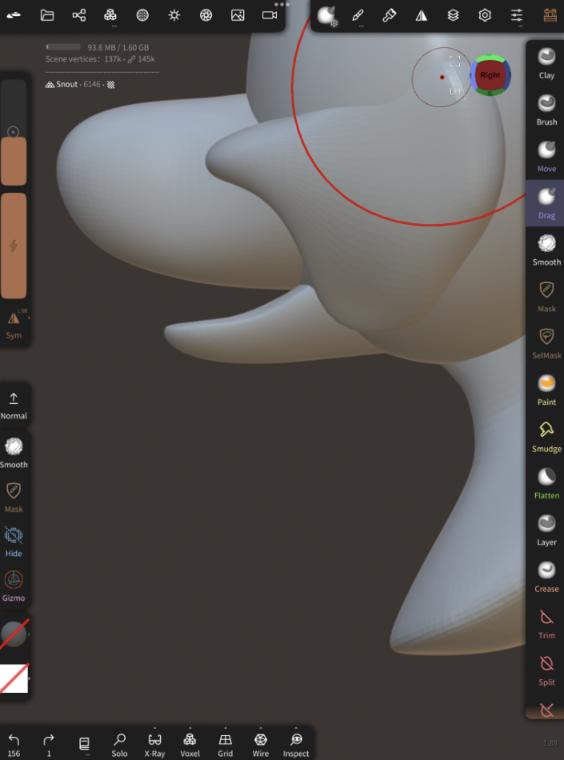
Once you are satisfied with your blocked-out shapes, it is time to refine them with sculpting. I began by carving out the muzzle with the clay tool.
I'm not going to go too much into how I did this because it's a lot of small tweaks. However, I will give you a few tips that I like to keep in mind:
Curves
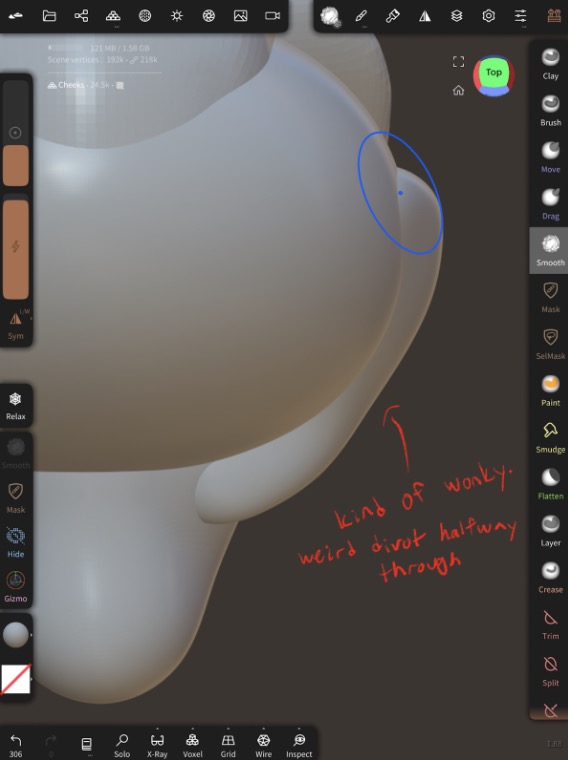
I like to have very smooth curves in my sculpts. Often these are fixed with the move/drag tool because they affect large areas, but if you need precision for a smaller area, the clay tool does a good job too!
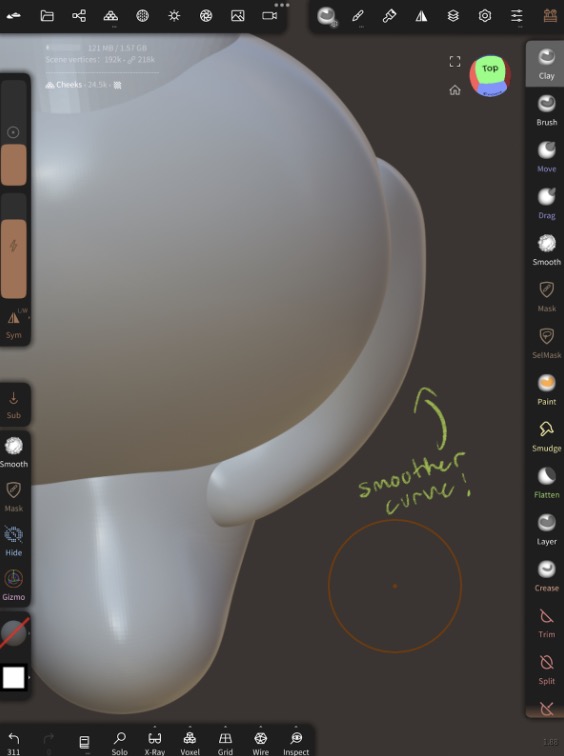
Curves can interact with each other, too. With the snout and lower jaw, their curves will eventually intersect. Here's a clip of me fixing those curves to ensure they will.
Continuity
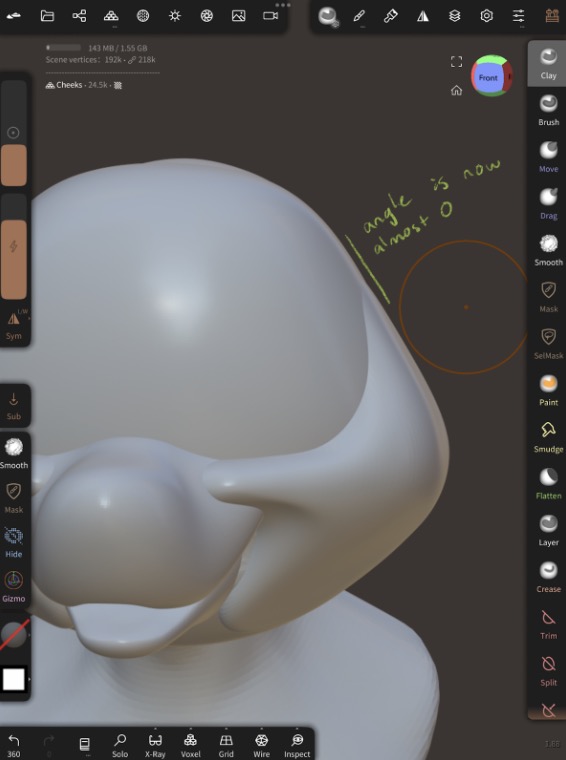
Smooth transitions between shapes can be achieved with continuity. Once again, if you have taken calculus, you may already be familiar with this.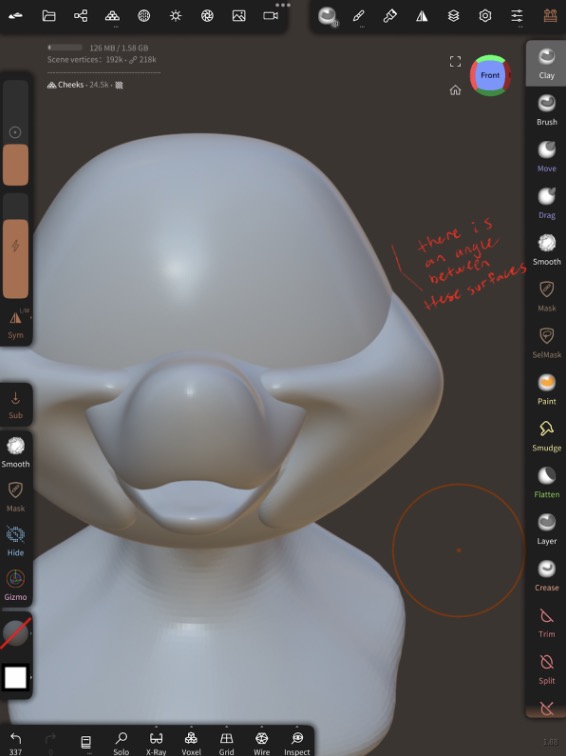
I used the move tool to push the cheek shape upwards. This creates a smoother transition between the shapes. This is not a rule, you don't have to make all your shapes smooth transitions!
I think it's time for me to move onto the next part: eyes!
Using the clay tool set to subtract, I carved out the eye sockets. I edited the cheek and muzzle shapes to mold around the eye sockets.
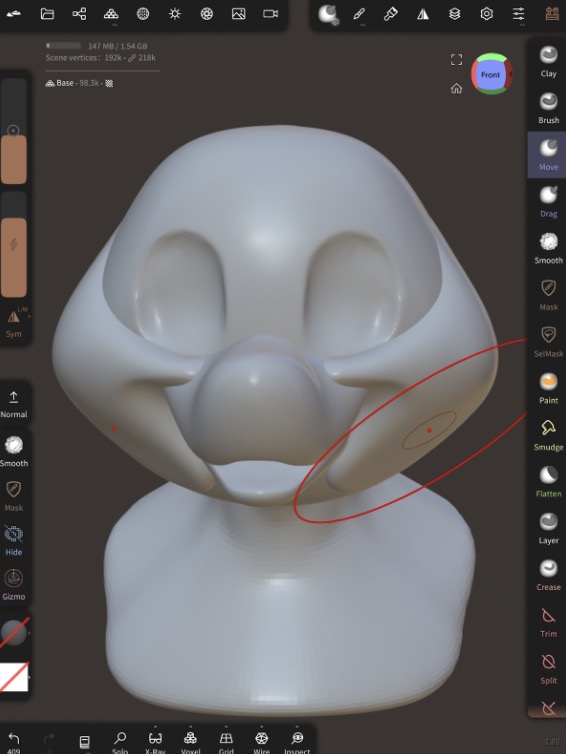
I then inserted a mirrored and squished sphere for the eyes, and fit it into place. I used the move tool to tweak the shape.
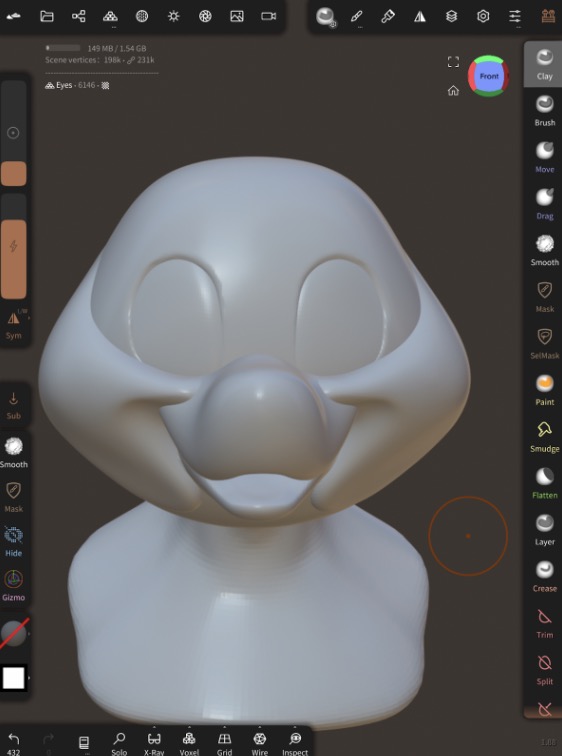
I painted some pupils.
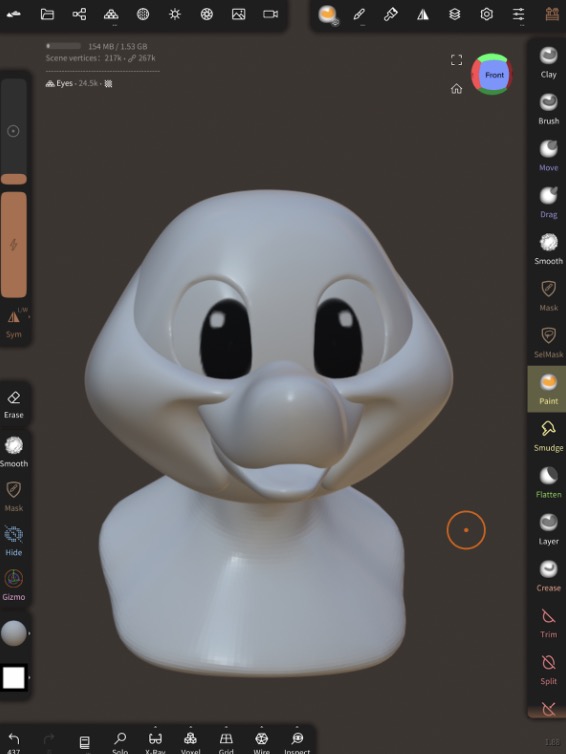
We're getting somewhere! The base starts to really come to life with some eyes.
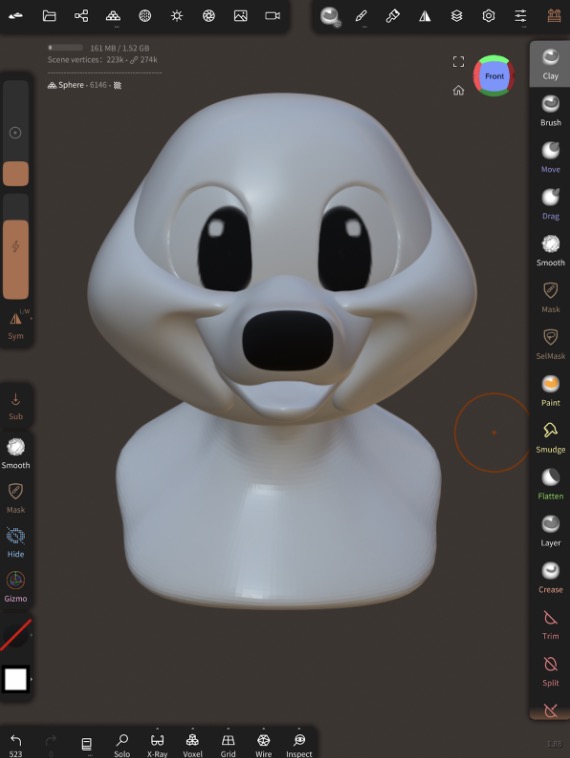
I inserted a sphere for the nose, painted it all with black, and fiddled with the size, shape, placement, and interfacing with the snout. I mainly used the move and smooth tools for this.
I'm feeling pretty good about these shapes! Let's merge everything together!
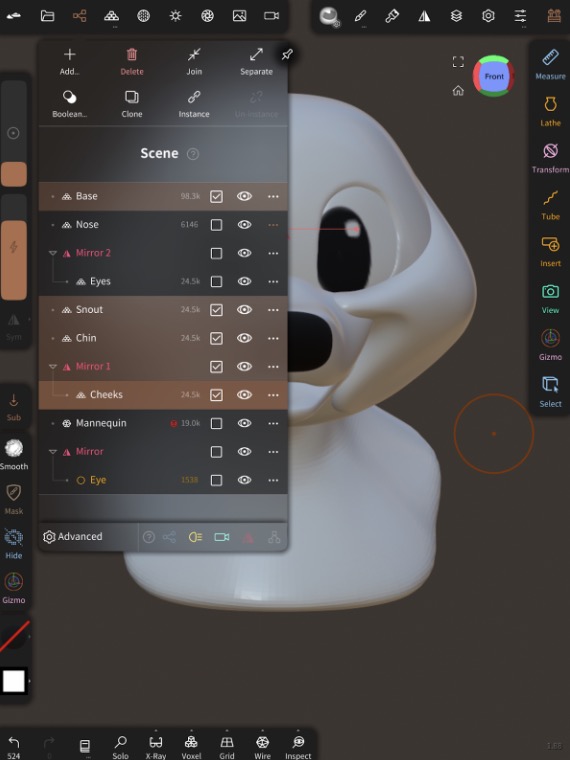
Select the base, snout, chin, and cheeks. Hit clone, hit join, and then rename the new mesh to something along the lines of "merged". Hide the original base, snout, chin, and cheeks. With the merged mesh selected, give it a voxel remesh of a resolution of around 200.
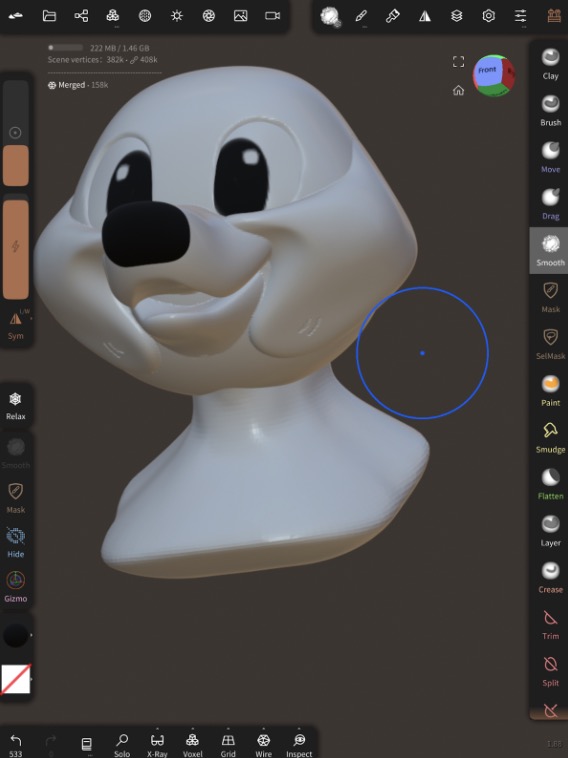
Smooth out any artifacts.
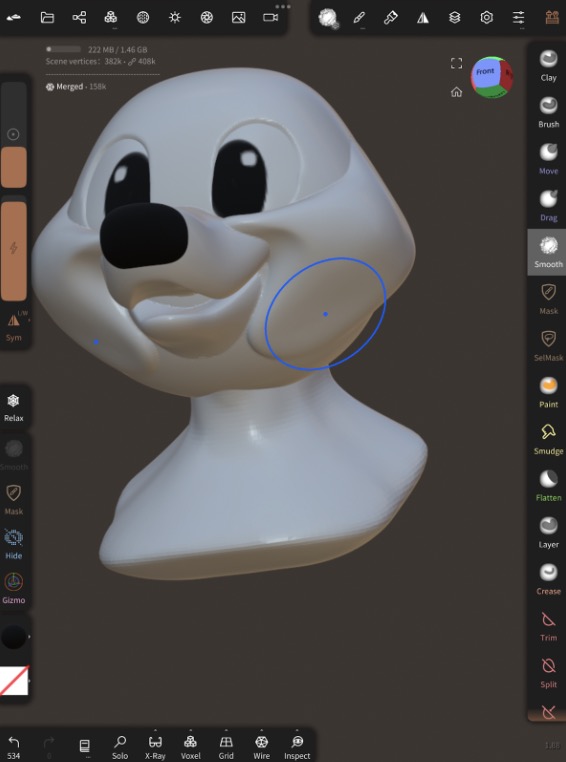
Some of the transitions, such as the chin to the base and/or cheeks, will need to be bridged. I used the clay tool.
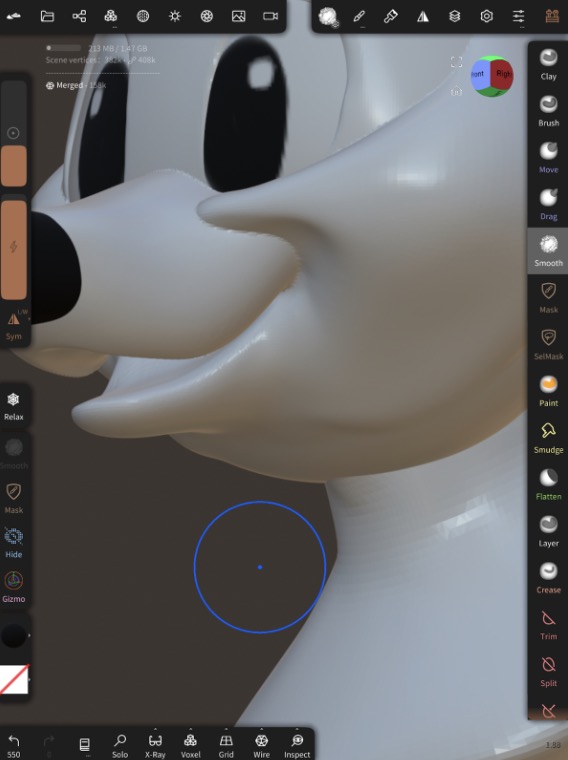
Continue the same sculpting/moving/refining process as before, except now you are focusing on transitioning everything together and refining the overall shape.
I had realized I had forgotten the eyebrows, so I added them in after merging. Same process as before, except this time I had to validate the mirror before merging it with the already-merged mesh.
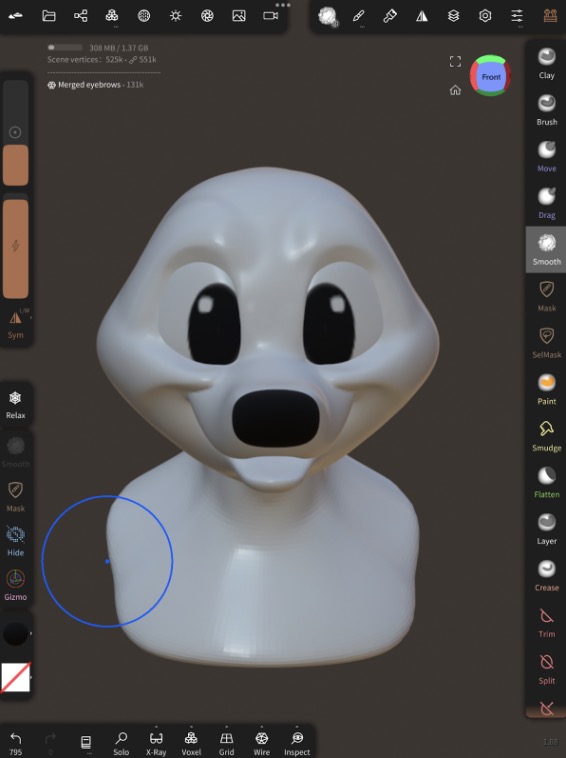
Looking good! I took this screenshot and imported it into Procreate, where I did a drawover. I do these drawovers to help visualize the final head. They help me see if I am on the right track.
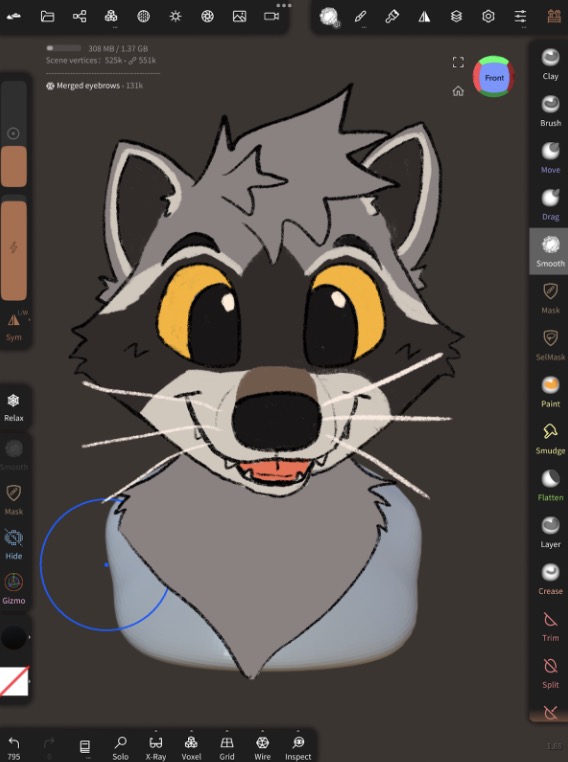
I traced over the 3D model and added some generic raccoon colors. I was really happy with this! However, I still stepped away from the model for a day, and I recommend doing the same. Coming back to the model with fresh eyes will allow you to see things to improve upon that you may have missed prior.
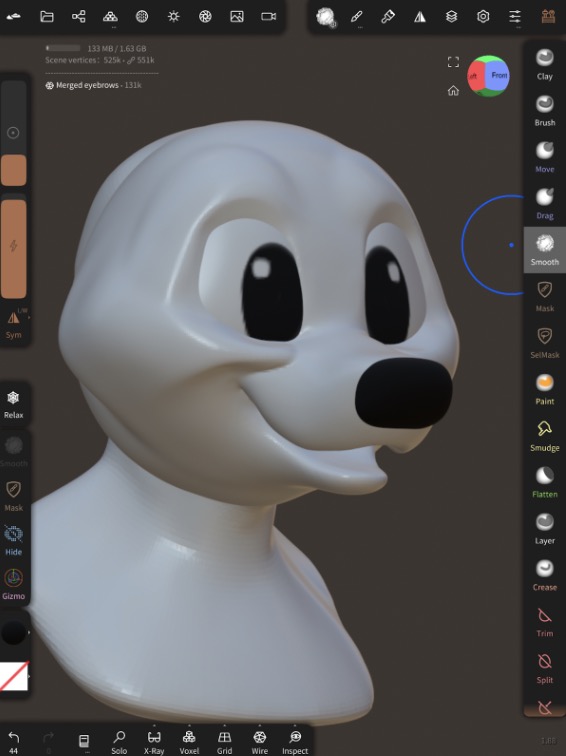
The next day I came back and I was still really happy with the sculpt. I still made a few adjustments and fixes, but I moved onto the final sculpting part!
Make a copy of the merged mesh, name it something along the lines of "trimmed".
Using the rectangular trim in side view, cut off the back part of your mesh. Check the mesh to see if everything looks ok and that the head still fits.
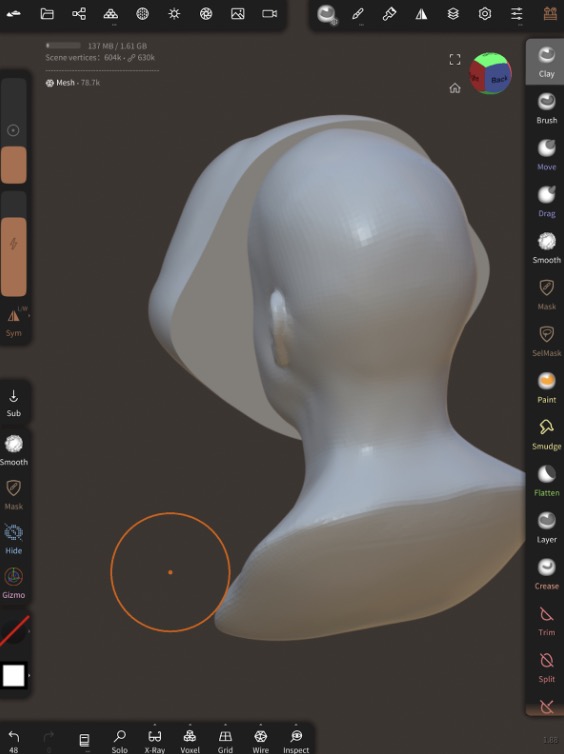
We are DONE with the sculpting part!!! Time to export!
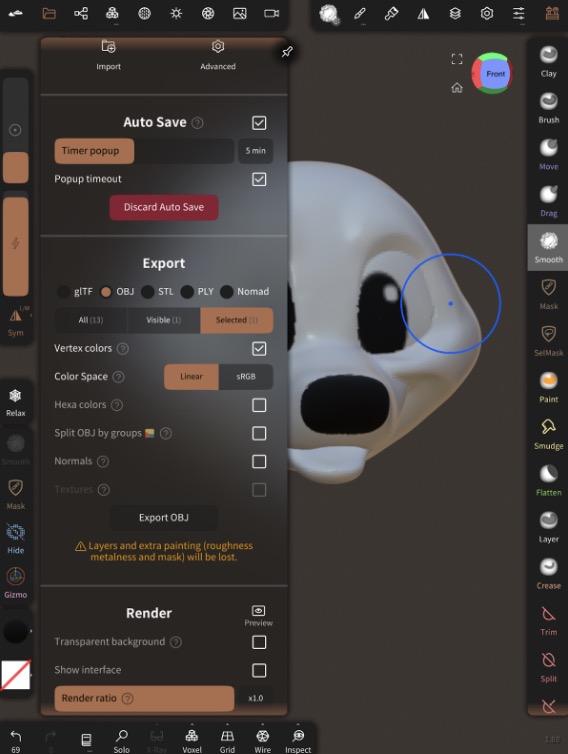
I cloned, merged, and remeshed everything one more time (the main mesh, the eyes, and the nose), and exported everything as an OBJ file.
Retopology
Digital sculpts are super densely packed with polygons. They look great, but can be difficult for a computer or a 3D printer to work with.This is where retopology comes in! Retopology is the process of taking a mesh and making it less dense by simplifying a lot of unnecessary details. This process is often used with 3D animation or VRChat models. It makes the model easier to work with and animate, and is far faster to render and load.
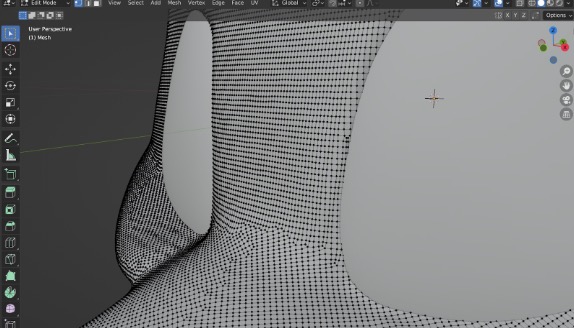
This is an up-close view of my raccoon sculpt in Blender. This is a LOT of polygons, and we really don't need this many!
Another advantage to retopology is that we get a shell of our model instead of a solid block. This shell will be thickened during the prep process later.
There are two options for retopology: using Cozyblanket, or using Blender.
I will be going over Cozyblanket because it's my preferred method. It is an app that is free to download and $15 to get access to importing and exporting. I really enjoy using it.
I will not be covering the technical aspect of how to retopologize a mesh in Blender. If you would like to use Blender, check out this video. I recommend skimming through the Cozyblanket section of the tutorial to get an idea of what a retopologized mesh should look like.
Using Cozyblanket
After purchasing the $15 "lite" edition (tap on the top left icon, then hit store, and go through with the purchase), import your model by tapping on the circled icon: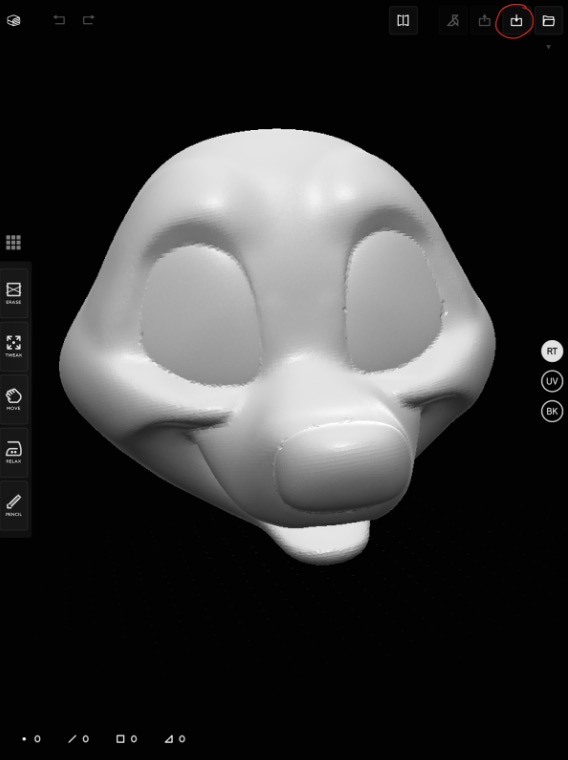
If Cozyblanket crashes upon importing the model (like mine was), you will need to remesh it at a lower resolution. It crashes because the model is simply too large for the app to handle.
Cozyblanket is simple to get started with. Draw quadrilaterals to add them to your mesh, draw an X in one stroke to get rid of them.
Cozyblanket has a bunch of other features and gestures too!
Draw a line across more than one plane and a line will go across all of them in that direction. Hold down relax with one finger and make a scrubbing motion on the desired planes with your other finger to make them more uniform.
Use tweak to adjust individual points, and move to adjust an area.
Draw a big plane next to a line of existing planes to automatically create an array. This works best on uniform surfaces with little curvature.
Let's get started!
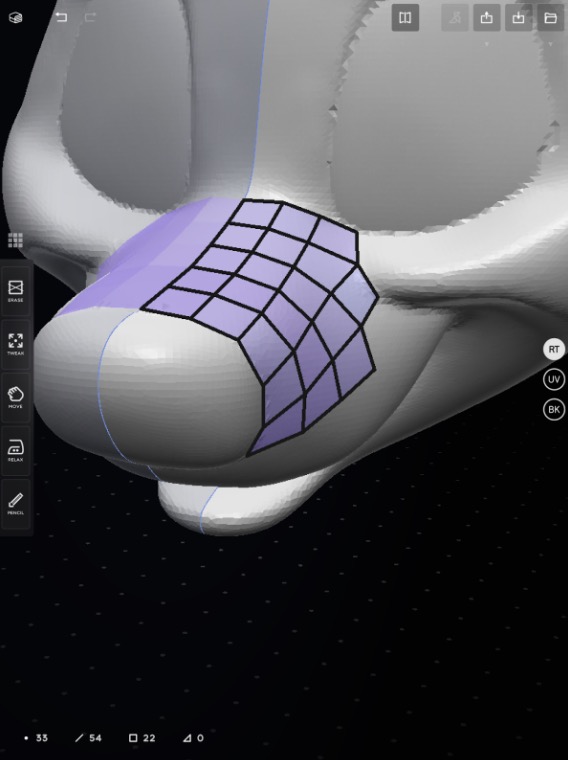
I began on an easy part that connects to everything else, the snout.
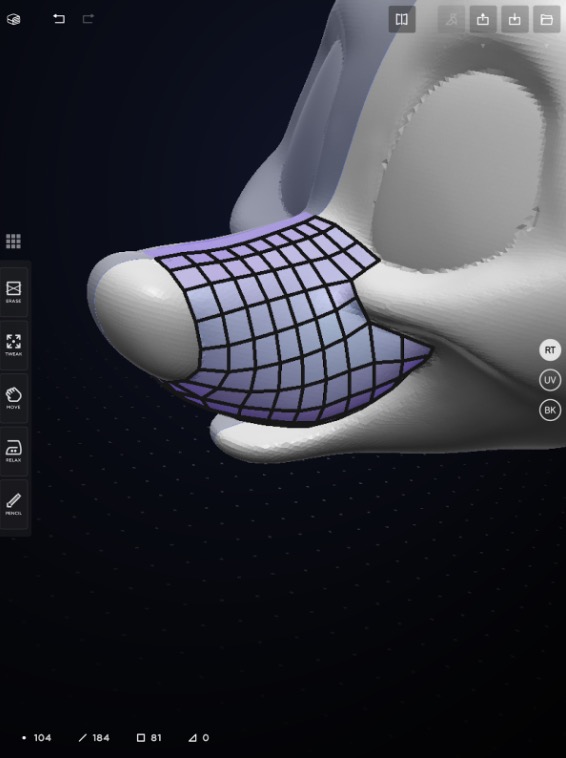
Don't be afraid to add more topology and smooth it out as you go! The goal here is to simplify and streamline the unnecessary information from the original sculpt, while also maintaining enough detail.
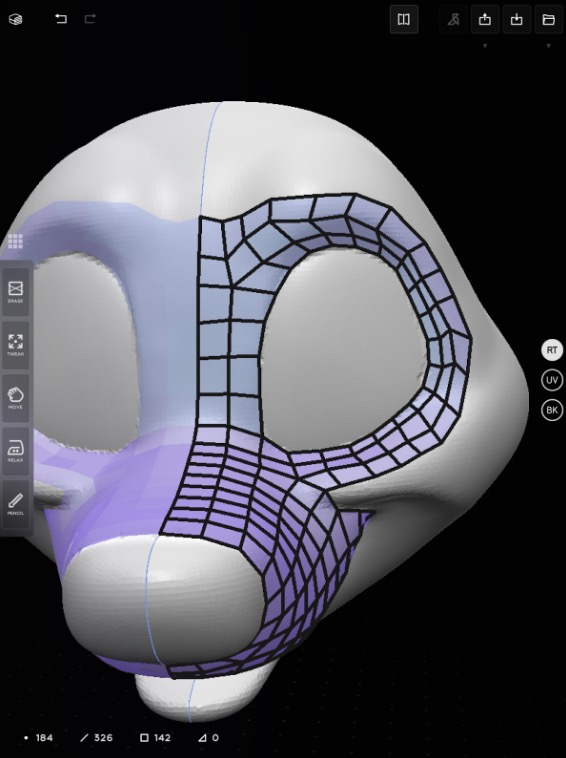
I created a loop around each of the eyes.
If you come across a junction that would result in very stretched planes, you can insert a new plane between them.
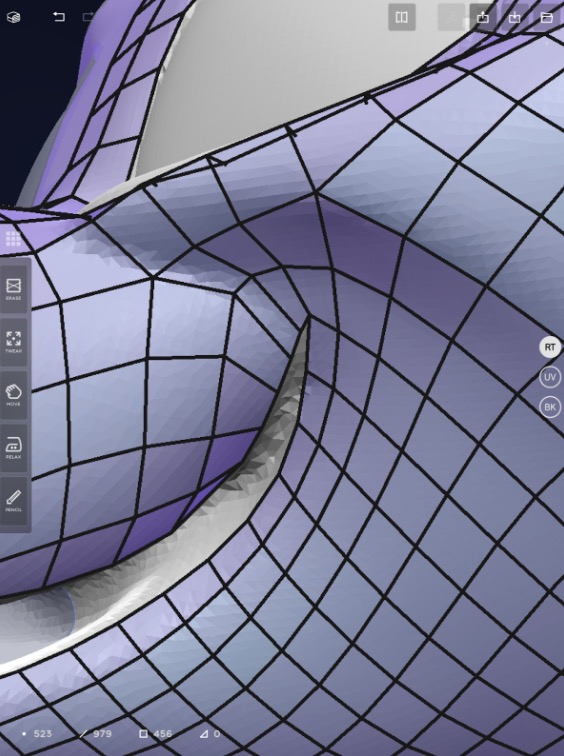
Generally, I tried to keep my edges near where my sculpting edges were.
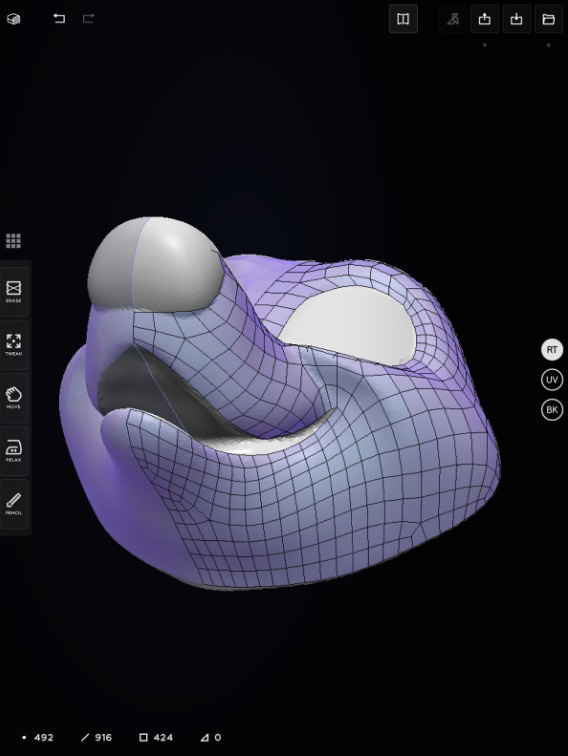
There were a lot of areas where I needed to merge two rows of planes. Don't be afraid to do this!
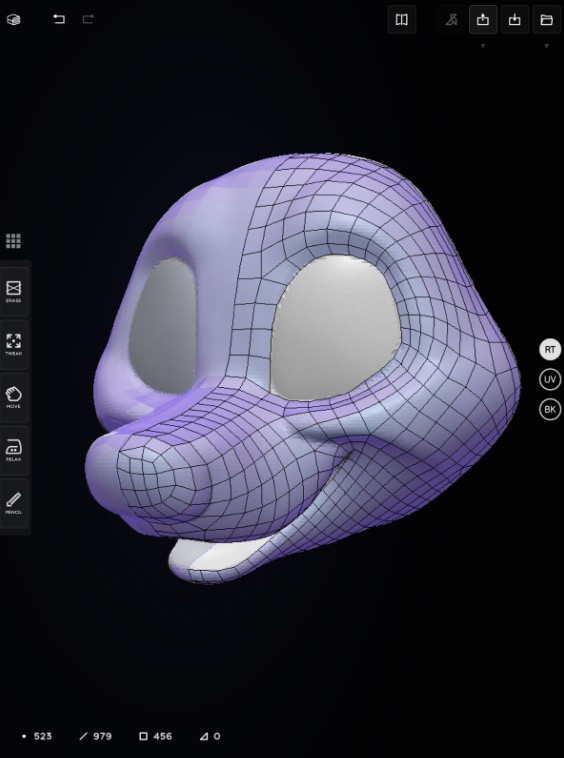
I finished my retopologized model at the nose. All done! Do not retopologize the eyes or the inside of the mouth. Export the model and transfer it onto your computer, either through sending it to yourself on a messaging platform such as Discord or Telegram or emailing it to yourself.
Preparation
Right now, the model does not have any thickness. A 3D printer is unable to print it. This step will make the new shell printable and wearable.Import the model into Blender if you haven't already.
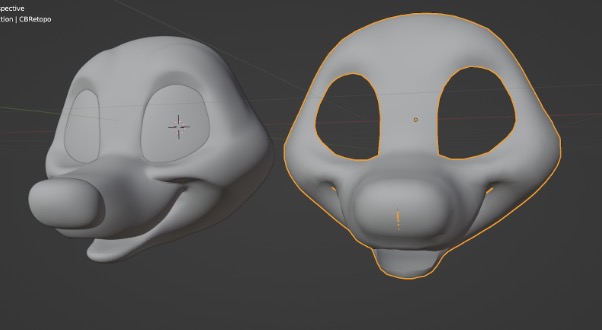
When I put the two models side-by-side in Blender for a comparison, I realized there was a gap near the nose.
In Cozyblanket, this can be fixed by putting the offending vertex right up to the symmetry line.
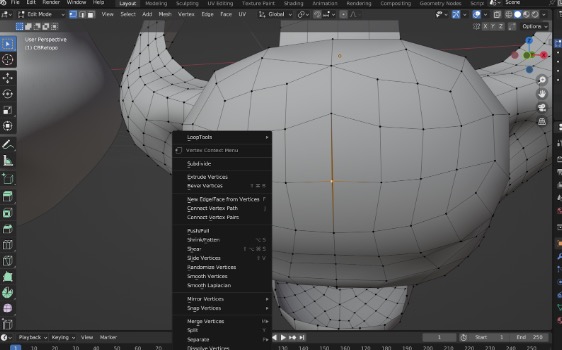
In Blender this can be fixed by going into edit mode, selecting the two points, right clicking, and clicking merge at center (or hitting M and clicking merge at center).
I used the Blender method of fixing it. I had also noticed the nose had lost a lot of definition. While still in edit mode, I added a loop cut in the loop of faces right after where the nose began.
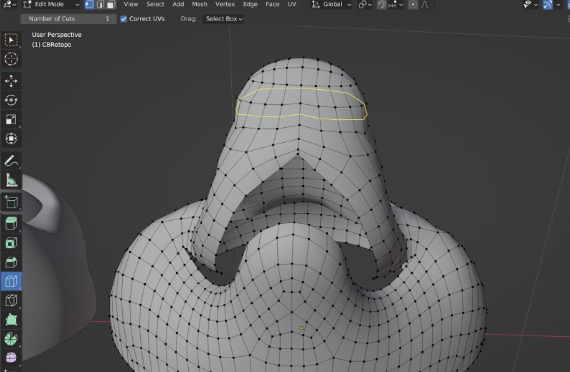
I moved it towards the edge of the nose, hitting Y to lock it to the y-axis.
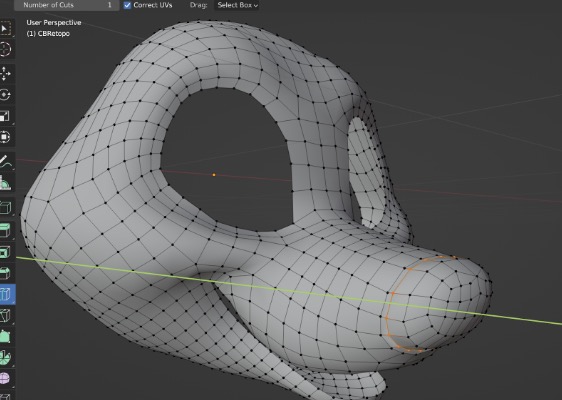
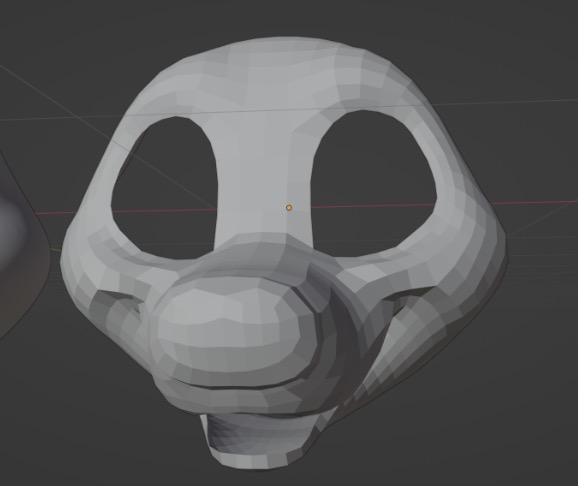
This was enough definition for me! This base is going to be covered in fur anyways, I was mainly looking for an indicator for where the nose began.
Go back into edit mode and select a bunch of faces on the bottom.
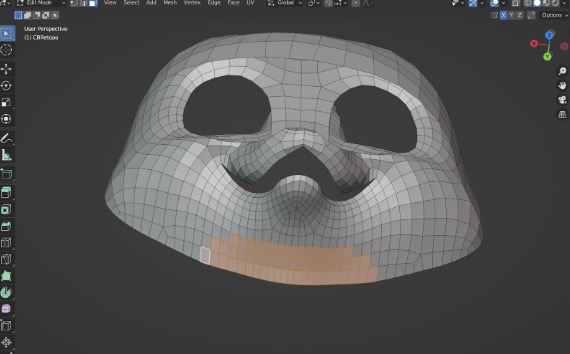
This cutout will be for the wearer's neck. Delete the faces, then go to sculpt mode.
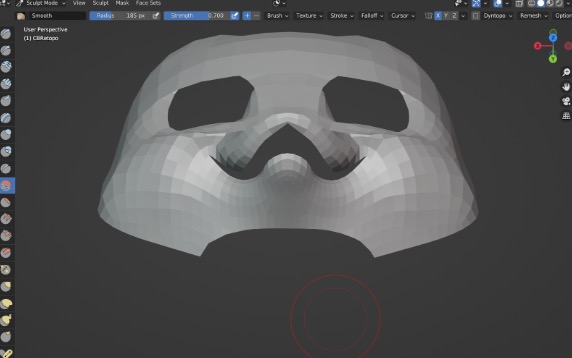
Make sure symmetry is enabled. Use the smooth tool on the edge to curve it. Go back into edit mode.
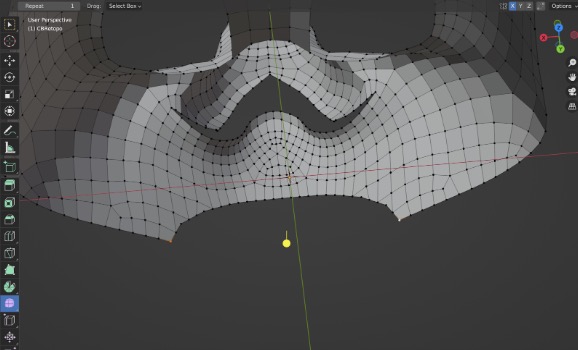
With the edit mode smooth tool enabled, select the corners. Drag the yellow dot to smooth them out.
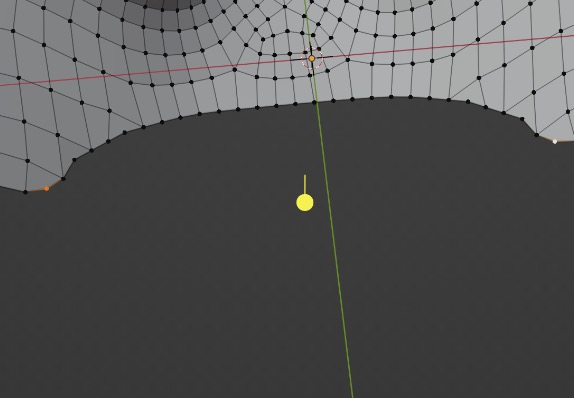
This makes the head much more comfortable to wear! Better vision due to it sitting closer on your face, and no sharp corners either.
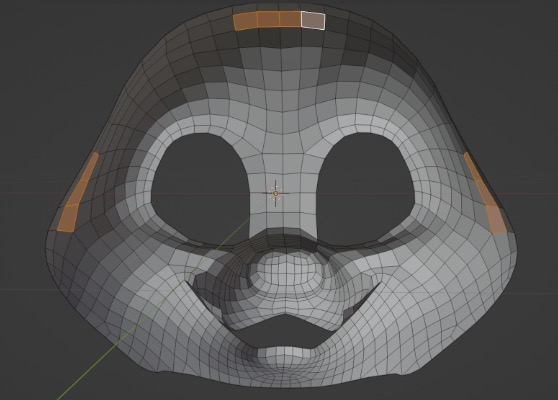
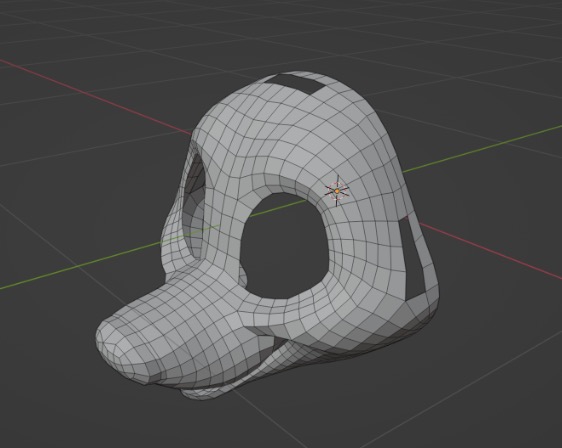
Select the faces for the support straps, and delete them. These won't touch the wearer's head, so they don't have to be smoothed out.
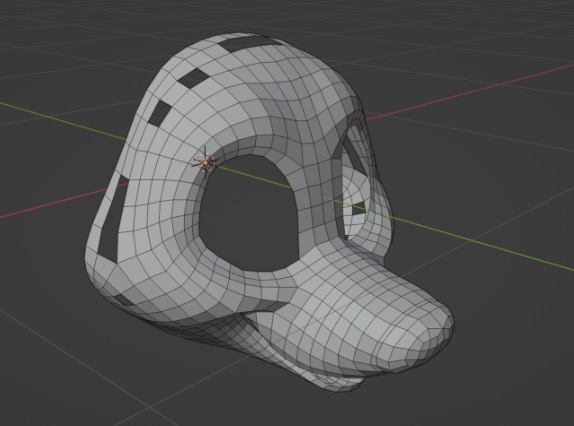
I used the same process for the ventilation holes.
Time to solidify the base!
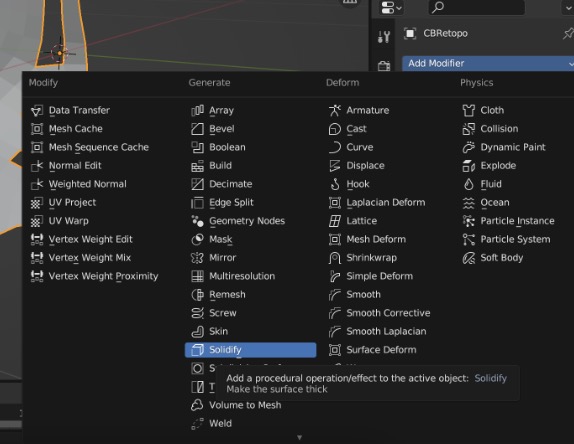
Add a solidify modifier (in the tab with the wrench).
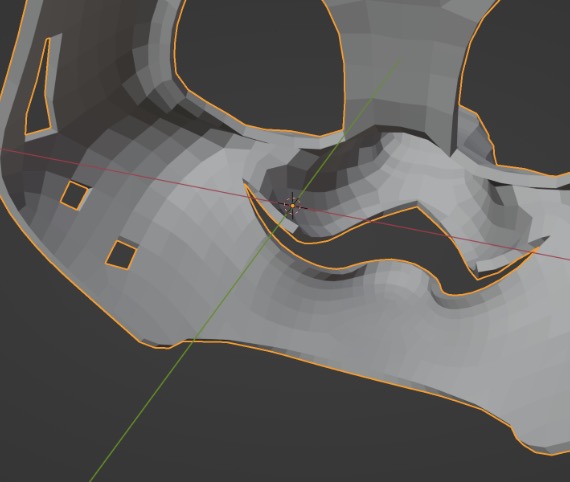
While inspecting the mesh, I noticed there were two corners in the mouth.
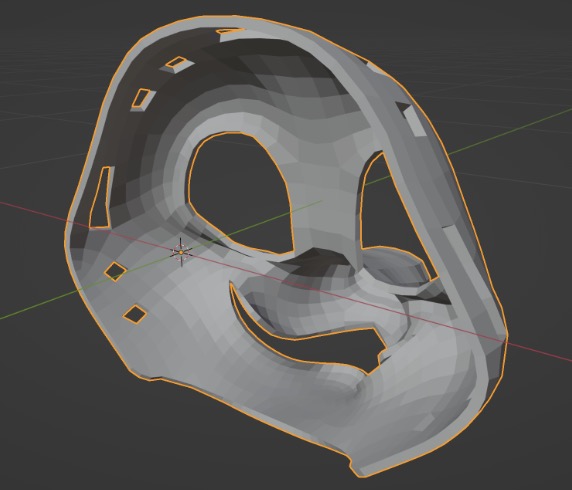
I smoothed them out with the same smoothing methods from before.
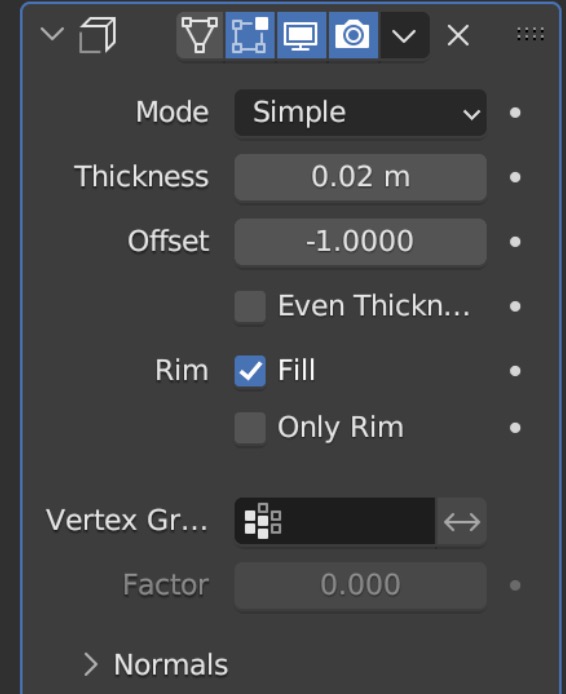
The thickness of your base depends on the material you are printing with. I did not scale this head and to Blender it has a width of 1.14 meters. To find out how much "0.02 m" would be if it was printed at, say, 250 mm, we need to do MORE MATH!
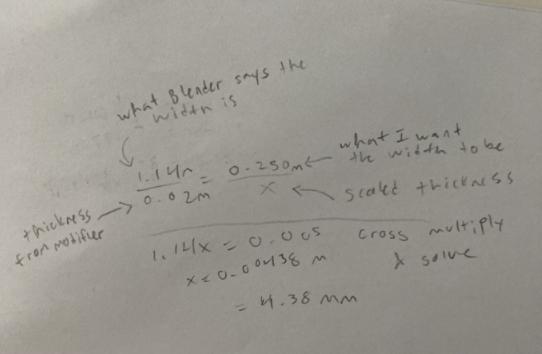
I set up a proportion and solved for x, which ended up being 4.38 millimeters. This is fine for a PLA pro head! However, it is too thin for a flexible TPU head, which should be 10-15 mm.
Here's the math for figuring out how thick the base should be in Blender for 10 mm of thickness:
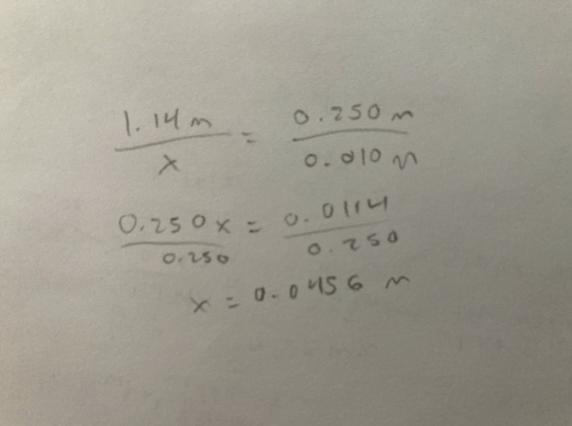
Apply the modifier when you're happy with the thickness (and you've double checked your math). When my base was printed, 250 mm was a tad small and it was reprinted at 280 mm. Check against a mannequin file.
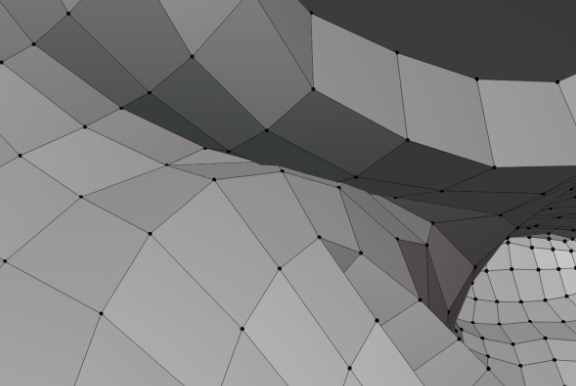
There was some intersecting geometry on the 10 mm thick base that concerned me for printing. I used the smooth tool in sculpt mode to separate the points from each other. The outside of the base was unaffected!
With that said, this 3D model is DONE!!!!
Exporting
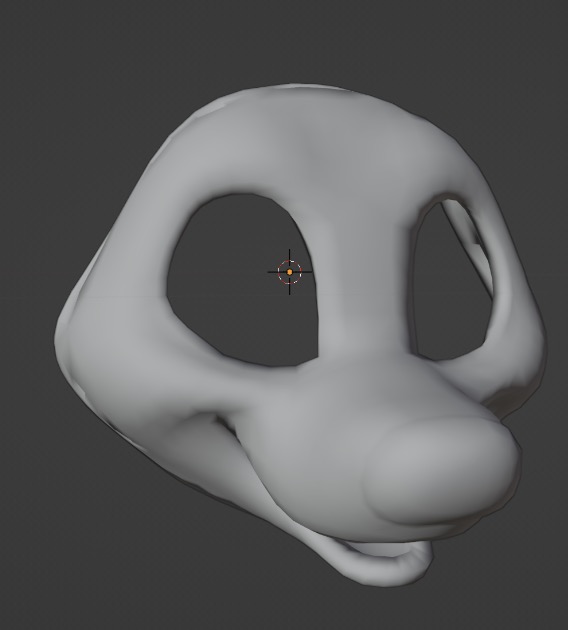
Export your model as either an OBJ or an STL, depending on what your printing software or printing service prefers.At this point, if you would like to make 3D eye blanks, I suggest following my 3D eye tutorial. To get the exact shape, go into orthographic front view and screenshot one of the eye sockets.
Printing Options
If you don't have a printer at home, you still have plenty of printing options!My biggest recommendation is paying a friend with a 3D printer to print it for you. If you don't know anyone with a printer, try going to a local makerspace or poking around furry groups to see if anyone is willing to do so.
I recommend getting in contact with someone one on one rather than going to a print service. Many print services have a minimum infill of 20%, which is far too much for a fursuit headbase.
Honey Dadger offers a TPU headbase printing service, I highly recommend going to him! He was the one who printed the base for this tutorial!
Alternatively, you can get a 3D printer of your own! The price of 3D printers has decreased tremendously in the past decade or so. You can also score a second hand printer for a discounted price, either directly from someone locally or through Ebay, or by the manufacturer (Elegoo sells pre-owned printers on their website). Then you can help your friends print their own bases.
Back to Top
