
Which Headbase Should I Choose?
A headbase is like the skeleton of your fursuit's head. It provides a shape for all of your fur to sit on top of and for your own head to rest. Headbases come in a variety of materials, with pros and cons for each one.
Based on your needs and comfortability, certain methods will be more appealing than others. After reading through all of the methods, read the recommendations section to figure out which method is best for you.
Table of Contents:
Main Methods:- Carved Foam
- Patterned Foam
- Resin
- Rigid 3D Printed
- Flexible 3D Printed
- Expanding Foam
- Dinomasks
- Protogens
My Recommendations
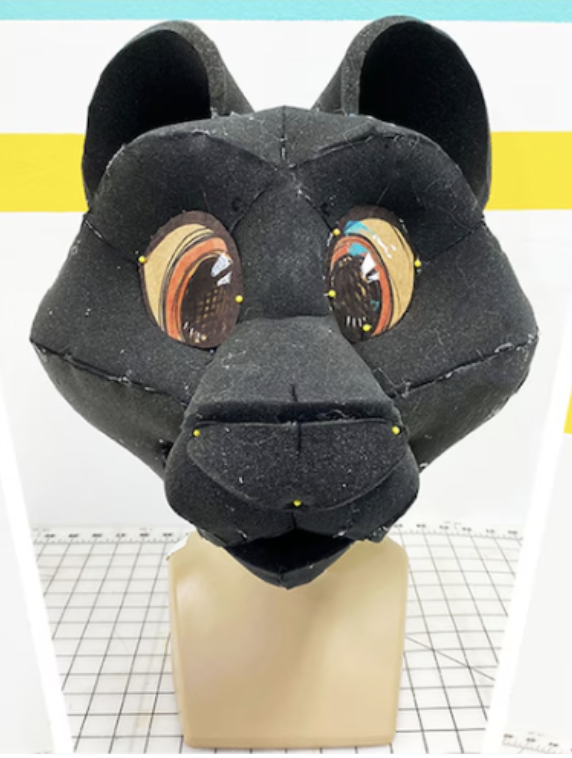
Carved Foam
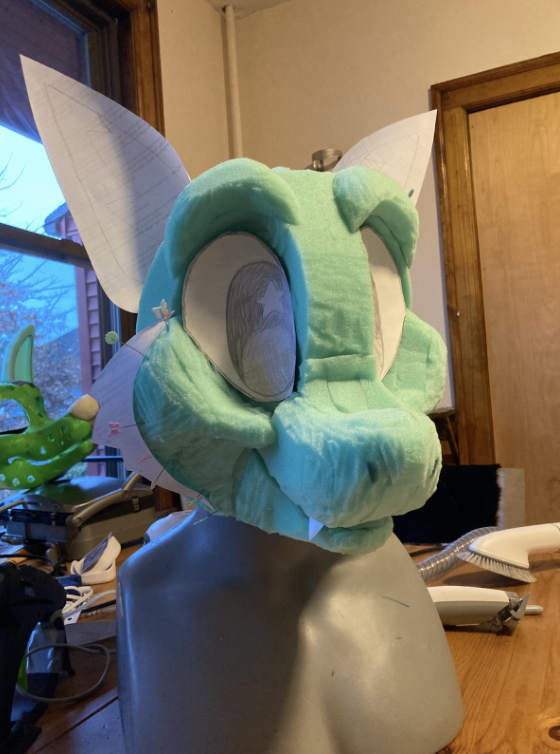
photo credit: myself; base by myself
A carved foam base is like a big foam sculpted helmet. Pieces of foam are glued together and carved into shape to resemble a critter. Carved foam has a low floor and a high ceiling: it's easy to get started with it, and it allows for some very intricate and refined shapes. It's the most popular method, and many makers have patterns up for sale to help you make your own. If you mess up, it's easy to undo by heating up the hot glue that holds the pieces together and removing them.
All you need for a carved foam base is some upholstery foam (the same kind of foam found in a couch!), a hot glue gun and hot glue sticks, some scissors, and a Sharpie. When you can snag a good sale from Joann Fabrics, the foam can cost less than $25.
There is no singular "correct" way to make a carved foam base. Some people like to mount their foam pieces onto a "bucket base", a foam helmet that resembles a bucket. Some prefer mounting their pieces on a fabric balaclava. I've seen some makers take a subtractive approach by cutting giant slabs of foam and carving away until they get the shape that they want. Symmetry can be difficult with a hand carved base, however a lot of people find that there is a lot of charm in a head that isn't perfectly symmetrical.
Foam is soft and doesn't have to be handled as carefully as a hard base. It won't shatter if dropped or thrown around. Upholstery foam has lots of small air bubbles so it's a lot lighter than a hard base and can be squished into a suitcase.
Pros:
- Most accessible method
- Most documented method
- Soft and squishy; holds its shape
- Very light
- Allows for unique bases with handmade charm
- Resilient and durable
- Can stick pins in it
- Messy (lots of foam scraps!)
- Moving jaws will not be as reactive as a hard base
A Word About Styrofoam
Styrofoam can seem like an appealing option at first for a carved foam base due to how easy and cheap it is to access. However, for your own health and safety, please do not use it!I have seen some people cut styrofoam with a hot wire to form it into shape. This causes the styrofoam to release harmful fumes into the air, such as styrene (which can cause cancer) and carbon monoxide (which can be deadly).
Even when cut without melting it, your face will be exposed to styrene while wearing the head. Styrofoam is also very brittle and can easily snap.
Upholstery foam is not very expensive and is far safer to use.
Patterned Foam
photo/base credit: corgilegs.pizza
Patterned foam involves very little carving. Instead, pieces are cut out of foam (either the aforementioned upholstery foam or EVA foam; a slightly more rigid type of foam) and glued together, usually with contact cement for a stronger bond. Patterned foam is great for getting smooth and reproducible bases!
Making the pattern is usually done by making a scale model out of a 3D print or clay and covering it in duct tape. The pattern pieces are drawn while the tape is still stuck on the model, then are cut off with an x-acto knife and scaled digitally with a scanner and a printer. The pieces are then cut out of foam and glued together.
Pros:
- Extremely lightweight
- With a decent pattern, you can make many bases with the same shape
- Can stick pins in it
- Doesn't break when dropped
- Creating a pattern is even trickier than carved foam
- Requires contact cement, a chemical that needs to be used in an area with good ventilation
Resin
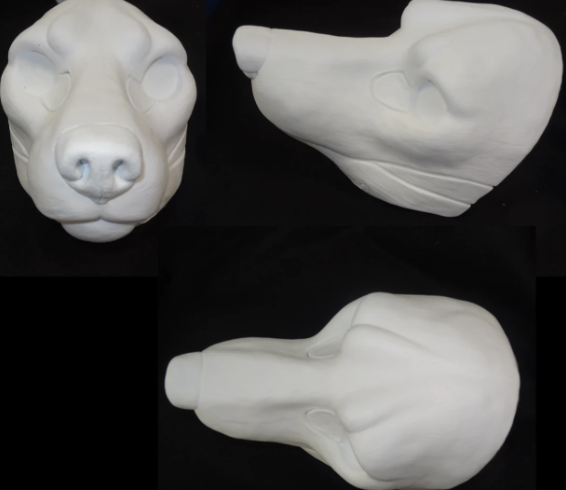
photo/base credit: dreamvisioncreations.com
Resin is a casted solid material. Its rigidity is great for adding fancy hardware like moving jaws.
Resin bases start off as either clay sculpts or solid 3D prints. A silicone mold is made off the shape and is secured with a plaster mold on top. The resin is poured into the silicone mold to create a shell and is left to dry. Once the casting is finished, the base is taken out of the mold and has the eyes and mouth cut out.
If you aren't a fan of casting, resin 3D printers are a viable option. I've mostly seen them for smaller parts such as eyes and teeth, but I have seen protogen helmets printed with them. I wouldn't resin print a regular fursuit head because an FDM printed head (FDM meaning a non-resin 3D printer) is far lighter and cheaper.
Resin used to be very popular for realistic fursuits because it is significantly easier to create a smaller head with it instead of carved foam. In recent years, however, many makers have been gravitating towards 3D printing or expanding foam for smaller heads. Resin is at risk of shattering if it is dropped from a high enough height and is incredibly warm inside.
If you have a skulldog or protogen character, resin requires far less post-processing than a 3D print, because the surface is already extremely smooth.
Pros:
- Great for realistic fursuits that need smaller proportions
- Great for moving jaws
- Little post-processing for skulldogs and protogen helmets
- Smoother fur placement
- Casting resin requires a mold
- Poor ventilation especially with a moving jaw; resin is a solid material and traps heat very easily
- Can snap and break if handled too roughly
- Very heavy
- Can't stick pins in it
- Glue can have difficulty adhering without scoring the surface
- Harder to hide seams
Rigid 3D Printed
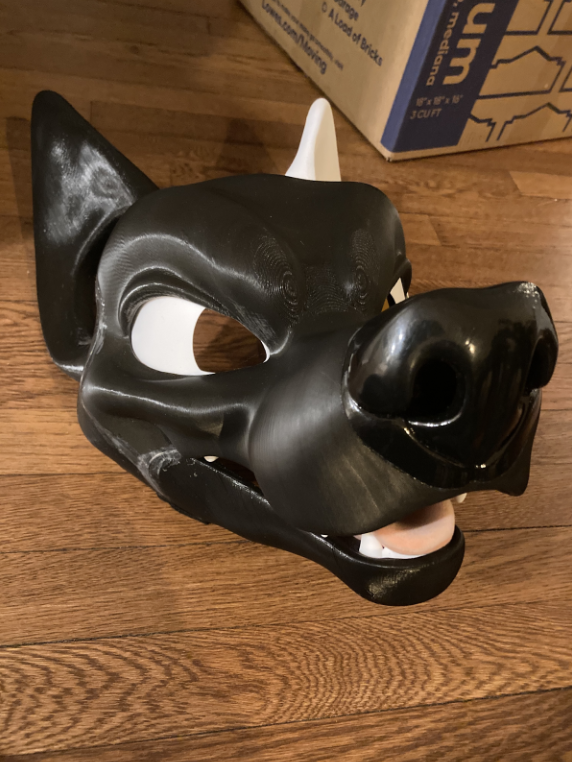
photo credit: myself; base by Latinvixen/mixedcandy.com
Rigid 3D printed heads have all the pros as resin heads, and then some! They're still great for moving jaws and realistic heads, but have significantly better ventilation and don't require a mold. They are still at risk of shattering, but that risk can be reduced by using a stronger filament such as PETG.
If you have a 3D printer already, know a friend who would be willing to let you borrow theirs, or have access to a community printer, a rigid 3D print can be pretty cheap! A roll of PLA costs $15-$30 off Amazon. 3D printers themselves can be expensive but are a worthy investment if you intend to continue fursuit making.
Pros:
- Allows for perfectly symmetrical bases
- Great for moving jaws
- Holes in the print allow for better ventilation
- Great for realistic fursuits that need smaller proportions
- Digital sculpts allow for more detail and more control over shapes
- Easy to edit
- Smoother fur placement
- Expensive setup
- Can snap and break if handled too roughly
- Learning curve with 3D modeling
- Glue can have difficulty adhering without scoring the base
- Can't stick pins in it
- Protogen helmets/skulldog skulls require a lot of post processing
- Must be comfortable working with and fixing 3D printers
- Harder to hide seams
- Prints can take days to finish and are prone to failure
Flexible 3D Printed
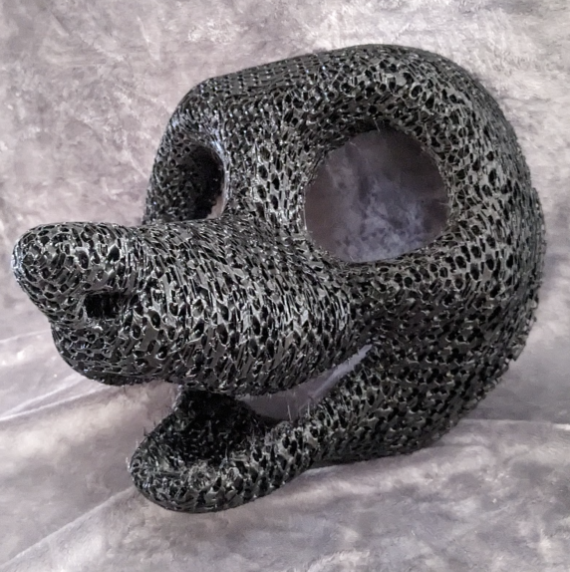
base/photo credit: Honey Dadger/honeydadger.com
Flexible 3D prints are printed out of TPU filament. These foam-like bases are printed with no walls and only infill, allowing the base to squish and stretch while still giving great airflow. TPU has a higher melting point than PLA which makes it more resistant to melting.
The only downside to TPU bases is the technical setup. TPU requires a special 3D printing extruder and is known to be difficult to get working correctly. Apart from that, I think flexible 3D prints could become very commonplace for fursuits in the future. Instead of creating a whole new mold like for an expanding foam head, you can simply change the model to better fit a given character.
Pros:
- Allows for perfectly symmetrical bases
- Very porous; great ventilation
- Very durable; can squish and pop right back into shape (even after being run over by a car!)
- Great for fursuits that need smaller proportions
- Digital sculpts allow for more detail and more control over shapes
- Easy to edit
- Can stick pins in it
- Expensive setup
- TPU is difficult to print
- Learning curve with 3D modeling
- Must be comfortable working with and fixing 3D printers
- Prints can take days to finish and are prone to failure
Expanding Foam
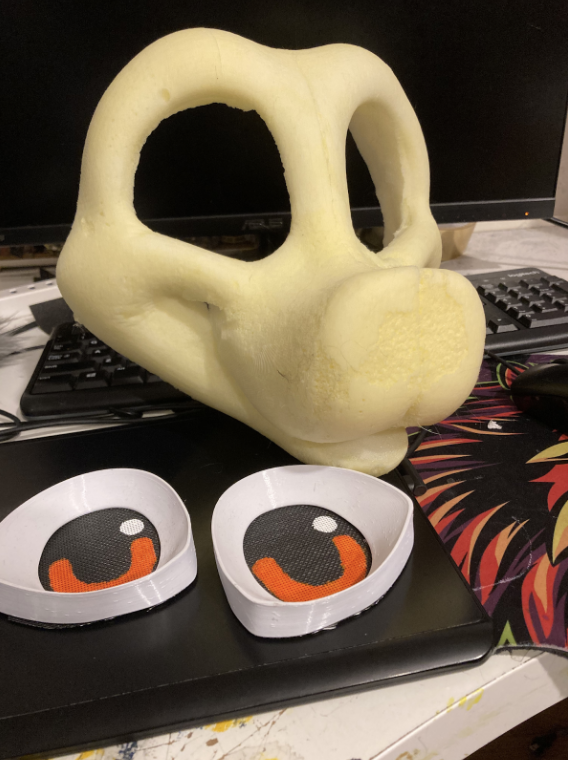
photo credit: myself; base by myself
Expanding foam bases are created by mixing two specific chemicals together and pouring them into a mold. The mold making process is very similar to the one for resin, but expanding foam molds can be 3D printed instead of being limited to just silicone and plaster. When the mixed chemicals are poured into the mold, they react and turn into foam that expands and fills the base! This saves a lot of time compared to a hand carved base, especially if you need a lot of bases.
These are great for getting a consistent shape with multiple suits. Some people see this as a hinderance because they feel restricted to a certain shape, where others see it as the opportunity to streamline their style and create cohesive-looking heads.
Pros:
- Allows for perfectly symmetrical bases
- Very durable; can squish and pop right back into shape
- Great for fursuits that need smaller proportions
- Digital sculpts allow for more detail and more control over shapes, but can also be sculpted with clay
- Can stick pins in it
- Can create many bases with the same shape
- Allows for consistency, streamlining, and cohesive heads
- Requires you to make a mold, either 3D printed or with silicone
- Hazardous chemicals
- Can be heavier than carved foam
- Consistency can make creating different species or unique shapes difficult
- Risk of miscasts
Dinomasks
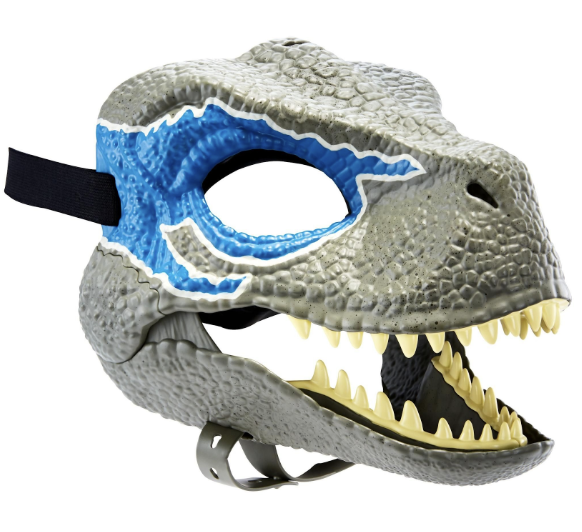
Dinomasks erupted in popularity in the late 2010s after some people saw potential in a kids' raptor mask toy created to promote the film Jurassic World. People began buying these raptor masks and customizing them with paint, fur, eyes, and sometimes ears. Due to how budget friendly it is to buy a cheap dino mask and some paint, dinomasks have become very popular with kids and teens. Despite their popularity with a younger demographic, anyone of any age can customize and rock a dinomask.
I think dinomasks have their place, especially for younger crafters! They can be a great starting point. However, the other methods I have listed offer far more customizability than a dinomask can offer while still maintaining an affordable price. Dinomasks have gone from being around $15 USD to $40 USD over the years, and can be very expensive for people outside the US to acquire.
Other cheap mass-produced masks exist, too. Many Halloween popup stores carry werewolf masks. It's possible to buy one and re-fur it to look like a totally new character.
Pros:
- Easy and cheap to acquire in the US
- Has a moving jaw right out of the box
- Lots of customizability options
- Great for kids!
- Limited to just a dinosaur
- Harder (but not impossible) to fit on an adult face
Protogens
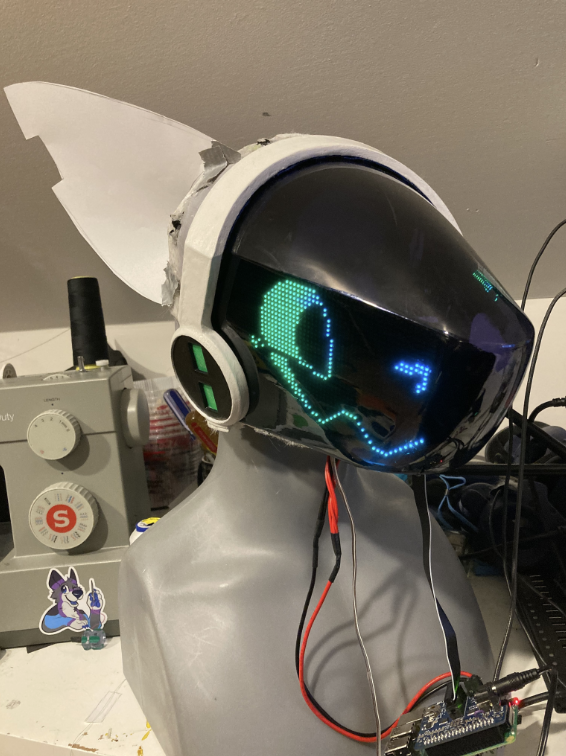
photo/base credit: myself
Protogens are a part organic, part robotic fictional species. They have both fur and robotic parts on their body, with most notably an electronic visor on the protogen's face. Anyone is able to make their own protogen character.
Protogen fursuits look and feel pretty different from a non-robotic suit! Their construction is vastly different as well. A protogen base can be broken up into a couple of different parts:
- Ears
- Helmet frame
- Visor
- Face
The helmet frame is most commonly 3D printed out of PLA or PETG, although I have seen some resin helmet frames in the past. The print is then post-processed with sanding, primer, more sanding, and then painting. This removes the print lines that a 3D printer produces, and results in a clean finish.
The visor is also 3D printed and post-processed to remove the print lines, but instead of being painted, it is used like a mold. Instead of being casted, like resin or expanding foam, the visor is instead vacuum formed with a sheet of clear heated PETG. The visor is then dyed in a large pot, then the excess plastic around the edge is cut away. My visor connected to my helmet frame with magnets, although you can glue yours as well.
I have seen many different ways of doing the face of a protogen. Some people go all out with high resolution screens with cameras, sensors, eye tracking, and bluetooth, some prefer setting up two matrices with a simple blinking animation, some simply put some stickers on and don't even bother with the electronics.
Protogens are a great way to get into electronics if you are unfamiliar with any sort of electronic work. I ended up pursuing electrical and computer engineering in college because I had so much fun with it while making my protogens. Maybe you'll enjoy it too!
Here's a list of parts to get you started:
Essentials:
- https://www.adafruit.com/product/2279 (LED matrix, get 2)
- https://www.adafruit.com/product/3055 (Raspberry Pi; a mini computer)
- https://www.adafruit.com/product/3211 (Bonnet for the Raspberry Pi; used to connect the LED matrix to the microcontroller)
- A 5V, 4A battery pack
- A USB fan (even if you're doing just stickers, this is essential for good ventilation)
Other fun things you can add:
- A microphone
- An eye tracking camera
- A controller of your choice (your phone, a Wii remote, buttons attached to a glove, flex sensors, etc)
- A "boop sensor" (https://www.adafruit.com/product/5913)
Pros:
- Super cool!
- Great for tech enthusiasts or tech curious people
- Can yield great vision
- Lots of different parts, lots of skills to learn, lots of tools
- A little fragile
- Can be heavy
Foam Protogens?
If you have a protogen character but the idea of a tech-heavy protogen is a little intimidating, or you're on a budget, you can make one out of foam! Instead of having electronics in the head, foam protogens have fabric or painted faces and mesh to see out of.Other Methods
These methods are either not very well documented or legacy methods that have a better alternative. You can take them into consideration, but I would recommend one of the methods above instead due to their extended documentation.Casting Bandages
This method involves casting bandages, the same kind used for if you break a bone. The cast bandages are activated with water and placed on top of a clay or 3D printed sculpt. They are then reinforced with hot glue.Vacuum Forming
Vacuum forming uses heated sheets of plastic and a vacuum attached to a box in order to pull plastic over a particular shape. This is how protogen visors are formed! It can also be used for regular heads as well, using either EVA foam or regular plastic.Plastic Mesh
Plastic mesh is a method that was popular in the 2000s, but has fallen out in favor of foam. Sheets of plastic mesh are woven together with thick thread to create a frame and muzzle, and features such as cheeks and ears are made out of foam. Plastic mesh is very hard to work with and can permanently shatter if handled roughly, but is very lightweight and breathable.Although plastic mesh still exists as an option, I think carved foam is a much better alternative!
Fosshape
Fosshape is a material that resembles hard felt at first, but becomes stiff when heated up. It's extremely light and breathable as a result! It is reinforced with sealed wire to get a more desired shape.My Recommendations
Recommended overall: hand carved baseIf you are brand new to fursuit making and want to create your own base from scratch, I recommend a hand carved base! Since it doesn't require any fancy equipment, it's a very cheap way of getting a base that looks exactly how you want it to.
Recommended for moving jaws: rigid 3D printed base
A rigid 3D printed base provides the structure needed for an effective moving jaw while also providing better ventilation and less weight than resin.
Recommended for consistency and efficiency: expanding foam
Expanding foam is great for creating many heads in a particular style, or if you simply do not like carving foam. The setup is time consuming, but each cast can take a lot less time than a hand-carved base.
Recommended if you have the technology and patience: flexible 3D printed base
Flexible 3D printed bases are a middleground between carving and a rigid 3D print. Digital sculpts provide a choice between unique bases for each suit, one main base to print over and over again, or something in between. All-infil TPU has the durability and softness foam has, but doesn't require any carving like for a rigid print.
As fursuit making technology has evolved, common methods have evolved too. I don't see any new heads being made with plastic mesh, and resin heads are becoming less and less commonplace. Hand-carved upholstery foam has been a consistently popular method since the mid-2000s. 3D printed heads have become more popular for a hard head because printers have been going down in price and up in quality. I believe flexible 3D printed heads have a lot of potential because they provide the durability of foam and the symmetry and control of digital sculpting. I intend to experiment myself with flexible 3D heads and will update this guide once I do!
Back to top